Customize OneAgent installation on Windows
OneAgent installer for Windows is provided and used as a self-extracting EXE file. The installer can also be extracted and used directly—as an MSI package. This later approach is mostly used in Group Policy deployment.
You can customize the installation by specifying command-line parameters for selected settings, or you can rely on default settings.
However, note that parameters marked below as environment-specific—that is, parameters that set the communication endpoint, environment ID, and token—are:
mandatory
pre-configured only for the EXE version of the installer. Therefore, when using the installer as and MSI package, you must specify these parameters explicitly.
Passing installation parameters
Command line
To pass the parameters, append them to the installer command and separate them with spaces.
For example, for the EXE version of the installer:
.\Dynatrace-OneAgent-Windows.exe --set-host-group=my_host_group --set-monitoring-mode=infra-only INSTALL_PATH="C:\installdir"
When using the installer as an MSI package, you can directly append only the INSTALL_PATH, LOG_PATH, DATA_STORAGE, PCAP_DRIVER, and USER parameters. This type of installation is usually run in silent mode, as part of Group Policy deployment. The --set-param=<value> has to be placed inside of ADDITIONAL_CONFIGURATION (ADDITIONAL_CONFIGURATION="--set-param=<value>").
For more information on command-line syntax, see Silent installation.
Installer UI
You can also add the --set-param=<value> parameters in the Configure OneAgent settings installation screen.
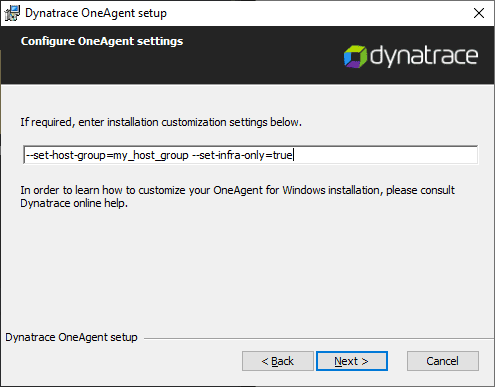
The UI of the OneAgent installer for Windows supports only the --set-param=<value> parameters.
The following parameters are NOT supported by the installer UI: USER, INSTALL_PATH, LOG_PATH, PCAP_DRIVER, and DATA_STORAGE.
Removed installation parameters
Starting with version 1.213, the following parameters are only accepted if specified using the --set-param=<value> syntax. For these specific parameters, the equivalent PARAM=<value> syntax is no longer supported:
Removed PARAM=<value> parameter | New --set-param=<value> parameter |
|---|---|
SERVER | --set-server |
TENANT | --set-tenant |
TENANT_TOKEN | --set-tenant-token |
PROXY | --set-proxy |
HOST_GROUP | --set-host-group |
APP_LOG_CONTENT_ACCESS | --set-app-log-content-access |
INFRA_ONLY | --set-monitoring-mode |
MSI installation parameters
INSTALL_PATH, LOG_PATH, DATA_STORAGE, PCAP_DRIVER and USER are a special kind of parameter adhering to MSI public property syntax. They won't be replaced by equivalent --set-param=<value> parameters. You can use them only on the installer command line, not in the installer UI.
Installation path
Default value: %PROGRAMFILES%\dynatrace\oneagent
The INSTALL_PATH parameter allows OneAgent installation to a directory of your choice.
For example:
.\Dynatrace-OneAgent-Windows.exe INSTALL_PATH="C:\test dir".
This parameter is not supported by the installer UI.
The INSTALL_PATH parameter doesn't control the OneAgent log and configuration files directories. To customize the log path, use the LOG_PATH parameter.
Custom directory requirements
Your custom installation directory must meet the following requirements:
The directory must be dedicated to OneAgent purposes only. No other software can have access to it. One reason is security, while the other is automatic cleanup performed periodically by OneAgent, which could remove files created by other applications.
- You must not share or nest in one another the installation, storage, and log directories.
The value must be an absolute path and must not point to the root volume directory.
- The value must not be a child directory of
%PROGRAMDATA%\dynatrace.
Log path
Default value: %PROGRAMDATA%\dynatrace\oneagent\log
The LOG_PATH parameter allows you to customize your OneAgent log directory.
For example:
.\Dynatrace-OneAgent-Windows.exe LOG_PATH=C:\dynatrace\logs
This parameter is not supported by the installer UI.
Custom directory requirements
Your custom installation directory must meet the following requirements:
The directory must be dedicated to OneAgent purposes only. No other software can have access to it. One reason is security, while the other is automatic cleanup performed periodically by OneAgent, which could remove files created by other applications.
- You must not share or nest in one another the installation, storage, and log directories.
The value must be an absolute path and must not point to the root volume directory.
- The value must not be a child directory of
%PROGRAMDATA%\dynatrace.
Changing location
If you use the parameter to change the location for an already installed OneAgent:
Existing files are not migrated to the new location
- After you set or change the
LOG_PATHparameter, you must restart deep-monitored processes so that OneAgents monitoring them can pick up the new path to store logs. You will be notified to restart a corresponding process on the Process overview page.
Data storage
OneAgent version 1.199
Default value: %PROGRAMDATA%\dynatrace\oneagent\datastorage
The DATA_STORAGE parameter allows you to define a directory dedicated to storing large runtime data produced by OneAgent in full-stack monitoring mode, such as crash reports or memory dumps.
For example:
.\Dynatrace-OneAgent-Windows.exe DATA_STORAGE=D:\data\dynatrace\runtime
This parameter is not supported by the installer UI.
Custom directory requirements
The directory must be dedicated to OneAgent purposes only. No other software can have access to it. One reason is security, while the other is automatic cleanup performed periodically by OneAgent, which could remove files created by other applications.
- You must not share or nest in one another the installation, storage, and log directories.
The value must be an absolute path and must not point to the root volume directory.
- The value must not be a child directory of
%PROGRAMDATA%\dynatrace.
Changing location
If you use the parameter to change the location for an already installed OneAgent:
Existing files are not migrated to the new location
- After you set or change the
DATA_STORAGEparameter, you must restart deep-monitored processes, so that OneAgents monitoring them can pick up the new path to store runtime data. Otherwise, memory dumps and other runtime data won't be saved. You will be notified to restart a corresponding process on the Process overview page.
Communication endpoint
Default value: environment specific
The address of the OneAgent communication endpoint, which is a Dynatrace component that OneAgent sends data to. Depending on your deployment, it can be a Dynatrace Cluster or ActiveGate. If you install OneAgent using the Dynatrace Deploy page, this is already set to the correct value. To change it, use the IP address or a name. Add the port number following a colon.
To set the communication endpoint, pass it as a parameter value:
--set-server=https://100.20.10.1:443
OneAgent and Dynatrace Cluster automatically maintain a working connection. If an endpoint detail changes, the cluster notifies OneAgent of the change and OneAgent automatically updates the endpoint you set using the --set-server to the new working value.
To change the endpoint after installation, use --set-server in the OneAgent command-line interface.
Environment ID
Default value: environment specific
The Dynatrace environment ID you received with your activation email. If you install OneAgent using the Dynatrace Deploy page, this is already set to the correct value. If you're selling Dynatrace-based services, use this option to set your customers' IDs from the pool of IDs you purchased from Dynatrace.
To set the environment ID, pass it as a parameter value:
--set-tenant=mySampleEnv
To change the tenant after installation, use --set-tenant in the OneAgent command-line interface.
Token
Default value: environment specific
The tenant token that is used for authentication when OneAgent connects to the communication endpoint to send data. If you install OneAgent using the Dynatrace Deploy page, this is already set to the correct value.
To set a token, pass it as a parameter value:
--set-tenant-token=abcdefghij123456
See Access tokens to learn how to obtain a token.
To change the tenant token after installation, use --set-tenant-token in the OneAgent command-line interface.
Network zones
Default value: unset
To learn about network zone naming rules and other reference information, see Network zones.
Use the --set-network-zone parameter to instruct OneAgent to communicate via the specified network zone:
--set-network-zone=your.network.zone
To change or clear the network zone assignment after installation, use Remote configuration management (select the modify network zone action).
Alternatively, you can use --set-network-zone on the OneAgent command-line interface.
Proxy
Default value: unset
The address of the proxy server. Use the IP address or a name, and add the port number following a colon. For an authenticating proxy you can specify a username and password like this username:password@172.1.1.128:8080 where both username and password need to be URL encoded.
To set a proxy, pass it as a parameter value:
--set-proxy=172.1.1.128:8080
Dynatrace also supports IPv6 addresses.
To change or clear the proxy address after installation, use --set-proxy in the OneAgent command-line interface.
Port range
Default value: 50000:50100
Watchdog is a binary used for starting and monitoring OneAgent monitoring processes:
oneagentos—operating system monitoringoneagentplugin—monitoring using OneAgent extensionsoneagentextensions—monitoring using local Extensions 2.0oneagentloganalytics—Log Monitoringoneagentnetwork—network monitoring
Use the --set-watchdog-portrange=<arg> parameter to change the watchdog listening port range to <arg>. The <arg> must contain two port numbers separated by a colon (:). For example 50000:50100. The maximum supported port range is from 1024 to 65535. The port range must cover at least 4 ports. The port number starting the range must be lower. For example:
--set-watchdog-portrange=50000:50100
To change port range after installation, use --set-watchdog-portrange in the OneAgent command-line interface.
Auto-update
Use the --set-auto-update-enabled=<arg> to enable or disable OneAgent auto-update. For example:
--set-auto-update-enabled=true
After you set the parameter to false, you won't be able to control OneAgent automatic updates using the Dynatrace web UI at Settings > Updates > OneAgent updates.
Host group
Default value: unset
The name of a group you want to assign the host to. For details, see Organize your environment using host groups. Host group string requirements:
Can contain only alphanumeric characters, hyphens, underscores, and periods
- Must not start with
dt. Maximum length is 100 characters
To assign a host to the host group, pass the host group name as a parameter value:
--set-host-group=My.HostGroup_123-456
To remove the host from a group, you need to uninstall OneAgent or pass an empty value --set-host-group="" when running a OneAgent update. You can't remove the host from a group using the HOST_GROUP parameter when updating OneAgent.
To change or clear the host group assignment after installation, use Remote configuration management (select the modify host group action).
Alternatively, you can use --set-host-group in the OneAgent command-line interface.
Monitoring mode
Default value: fullstack
Activates one of the OneAgent monitoring modes:
fullstack: Full-Stack Monitoringinfra-only: Infrastructure Monitoringdiscovery: Discovery
The --set-infra-only command is now deprecated. Use the --set-monitoring-mode command instead.
To enable a specific monitoring mode, set the --set-monitoring-mode parameter to one of the following values:
fullstackinfra-onlydiscovery
For example:
--set-monitoring-mode=infra-only
To change the monitoring mode after installation, use --set-monitoring-mode in the OneAgent command-line interface or set it using the Host settings page.
Custom host name
Default value: unset
Use the --set-host-name to override an automatically detected host name. The host name value must not contain the <, >, &, CR (carriage return), and LF (line feed) characters and the maximum length is 256 characters.
This command adds a custom host name to display in the UI, but the detected host name is not changed. For details, see Set custom host names.
To set the host name:
--set-host-name=myhostname
To change the host name after installation, use --set-host-name in the OneAgent command-line interface.
Custom host metadata
Default value: unset
Once configured, custom metadata is displayed as a set of properties at the bottom of the Properties and tags section of the host overview page. The property values must not contain the = (except key-value delimiter) and whitespace characters. The maximum length is 256 characters including the key-value delimiter.
To add or change host properties:
--set-host-property=AppName --set-host-property=Environment=Dev
You can add or change more than one property in the same command.
To change the host metadata after installation, use Remote configuration management (select modify host properties action).
Alternatively, you can use --set-host-property in the OneAgent command-line interface.
Custom host tags
Default value: unset
Once configured, the tags are displayed at the top of the Properties and tags section of the host overview page. The property values must not contain the = (except key-value delimiter) and whitespace characters. The maximum length is 256 characters including the key-value delimiter.
To add or change host tags:
--set-host-tag=TestHost --set-host-tag=role=fallback --set-host-tag=Gdansk
You can add or change more than one tag in the same command. It is allowed to define tags with the same key but different values.
To change the host tags after installation, use Remote configuration management (select the modify host tags action).
Alternatively, you can use --set-host-tag in the OneAgent command-line interface.
Host ID source
Default value: auto
Available on all supported platforms for OneAgent version 1.223+. For OneAgent version 1.221 and earlier, this feature is supported only for Citrix Virtual Apps and Desktops.
It's particularly important to keep you host ID static in dynamic virtual environments where hosts are recreated on a daily basis.
To define the source for host ID generation, use --set-host-id-source and set it to one of the predefined values:
auto— Let Dynatrace generate the host ID automaticallyip-addresses— Generate host ID based on the host IP addressmac-addresses— Generate host ID based on the host's NIC MAC addressfqdn— Generate host ID based on the host fully qualified domain name (FQDN) in thehost.domainformat. If the FQDN doesn't contain a dot character, the NIC MAC address is used instead.If you monitor multiple environments, you can split the hosts with identical IPs, MAC addresses, or FQDNs using a different namespace for each environment. The namespace can contain only alphanumeric characters, hyphens, underscores, and periods; the maximum length is 256 characters:
ip-addresses;namespace=<namespace>mac-addresses;namespace=<namespace>fqdn;namespace=<namespace>
For example, to set the host ID source to ip-addresses and assign it to a namespace called test, run the OneAgent installer with the following parameter:
--set-host-id-source="ip-addresses;namespace=test"
To install OneAgent on a Citrix host, set the host ID source to mac-addresses:
--set-host-id-source="mac-addresses;namespace=test"
Access to system logs
OneAgent can download system logs for the purpose of diagnosing issues that may be caused by conditions in your environment. OneAgent doesn't currently download any Windows system logs, but this can change in future releases.
--set-system-logs-access-enabled=false disables access to logs
--set-system-logs-access-enabled=true enables access to logs
If you need to change this access after installation, use the OneAgent command-line interface:
Note that this is a self-diagnostics setting that is not related to Log Monitoring.
Log Monitoring
Default value: true
When set to true, allows OneAgent to access log files for the purpose of Log Monitoring. Accepted values are (true, false) or (1, 0). This option can alternatively be enabled/disabled through the Web UI.
For example:
--set-app-log-content-access=true
If you need to enable or disable Log Monitoring after installation, use -set-app-log-content-access in OneAgent command-line interface.
Automatic injection
Do not set this parameter to true during the installation process.
Default value: true
You can set the --set-auto-injection-enabled=<arg> parameter to true or false to disable or enable OneAgent auto-injection.
For more information, see Automatic injection.
Local metric ingestion
Default value: 14449
You can use the --set-extensions-ingest-port=<arg> parameter to change the default communication port used for local metric ingestion. The port is used by OneAgent REST API, Scripting integration (dynatrace_ingest), and Telegraf.
For more information, see Metric ingestion.
StatsD metric ingest
Default value: 18125
You can use the --set-extensions-statsd-port=<arg> parameter to change the default DynatraceStatsD UDP listening port.
For more information, see Metric ingestion.
OneAgent extension user
The Default value: LocalSystem (OneAgent version 1.195+. For earlier versions, it's dtuser)
Use the USER parameter to define the user running the process responsible for Dynatrace OneAgent extensions functionality. For example:
.\Dynatrace-OneAgent-Windows.exe USER=LocalService
This parameter is not supported by the installer UI.
If you don't add the USER parameter:
- For fresh OneAgent 1.195+ installations, the default
LocalSystemaccount will be used to run OneAgent extensions. - For fresh OneAgent deployments prior to version 1.195, OneAgent will use the
dtuseraccount. - Updating the OneAgent preserves the previously configured user account. To change it, you must reinstall OneAgent setting the
USERparameter to a new value.
The USER parameter can have one of the following values:
-
recommended
LocalSystemis the default user account used to run OneAgent extensions starting with OneAgent version 1.195. Applied automatically when theUSERparameter isn't used. This parameter value makes OneAgent use theNT AUTHORITY\SYSTEMprivileged system account to run OneAgent extensions. Effectively, no local user account is created. As a result, all OneAgent modules, including all extensions, are fully functional. This is the recommended setting to use for all OneAgent Windows installations starting with OneAgent version 1.191. -
LocalService: This parameter makes OneAgent use theNT AUTHORITY\LOCAL SERVICEsystem account to run OneAgent extensions. While this reduced set of privileges is enough for most of the extensions to operate, there are some that won't be able to produce data effectively (namely, extensions that collect Performance Monitor counters, such as MS SQL or .NET extensions). If you're unsure about which extensions you might use, it's best to use theLocalSystemparameter value instead. -
deprecated
no_createdisabled user creation when installing OneAgent prior to OneAgent version 1.209. Starting with the version 1.209, when you use theno_createparameter, the OneAgent installer applies theLocalSystemparameter without any warning. Theno_createsetting is not converted toLocalSystemfor existing installations when running an update. To convert, you must reinstall OneAgent setting theUSERparameter to a new value. -
deprecated
dtuserwas the default user account used to run OneAgent extensions prior to OneAgent version 1.195. It made the installer create a local user account with the same name in the system. Starting with the version 1.209, when you use thedtuserparameter, the OneAgent installer applies theLocalSystemparameter without any warning. Starting with OneAgent version 1.239, thedtusersetting is converted toLocalSystemfor existing installations when running an update.
When deploying Dynatrace on Windows Server Domain Controller, make sure the USER parameter is set to LocalSystem, or alternatively LocalService, to avoid propagation of dtuser across the domain, which can cause interference with existing dtuser accounts on hosts that have Dynatrace installed.
Silent installation
When using the silent installation mode, the OneAgent installer should be pre-configured with appropriate parameter values, since interactive dialogs and prompts will not be displayed during installation.
The environment specific parameters are preconfigured only for the EXE version of the installer. When using the installer in the form of an MSI package, you must specify all of these parameters yourself.
MSI package—silent installation
To set up silent command-line installation when using an MSI package, add /quiet /qn as in these examples:
Command shell
msiexec /i C:\some\path\Dynatrace-OneAgent-Windows.msi ADDITIONAL_CONFIGURATION="--set-server=https://someserver.com --set-tenant=xxx --set-tenant-token=xxx --set-host-group=myGroup" /quiet /qn
PowerShell 3.0+
msiexec /i C:\some\path\Dynatrace-OneAgent-Windows.msi --% ADDITIONAL_CONFIGURATION="--set-server=https://someserver.com --set-tenant=xxx --set-tenant-token=xxx --set-host-group=myGroup" /quiet /qn
Note the --% stop-parsing symbol used in the PowerShell command.
EXE installer—silent installation
To set up silent command-line installation for an EXE version of the installer, add --quiet as in this example:
.\Dynatrace-OneAgent-Windows.exe --set-host-group="myGroup" --quiet
Packet capture driver (pcap)
OneAgent version 1.229+
The PCAP_DRIVER parameter allows you to specify which packet capture driver will be installed and used for network metrics collection.
Example:
.\Dynatrace-OneAgent-Windows.exe PCAP_DRIVER=npcap
Default value: npcap
Possible values:
| Value | Description |
|---|---|
|
This option uninstalls any installation of WinPcap or outdated Npcap previously installed by OneAgent. If you installed WinPcap or Npcap manually, however, you'll need to uninstall it yourself. |
|
This option does NOT uninstall or overlay any existing installation of |
| Deprecated with OneAgent version 1.255+
|
| Available with OneAgent version 1.249+
|
This parameter is not supported by the installer web UI.
The value of this parameter persists through updates.
- If you install
Npcapduring OneAgent installation, the installer creates a scheduled task callednpcapwatchdog.- This task ensures that the
Npcapdriver functions correctly after Windows feature updates. The task runs in the background and has no effect on the performance or functionality of the system. - While the
npcapwatchdogtask is meant to prevent issues with Windows updates, you can remove it. However, if removed, the Npcap driver may need to be reinstalled before it can be used again.
- This task ensures that the
For more information, see