Proxy for ActiveGate
Your ActiveGate connectivity configuration allows you to define one or more proxies for outgoing connections: You can use a single proxy for all outgoing traffic, or you can specify different proxies for different purposes, or you can even define exceptions by turning off proxy use for specific connections, while using proxies for other connections.
To see this configuration in a wider context, refer to the supported connectivity schemes and in particular to the proxy and load balancer configuration.
Proxy configuration properties
ActiveGate proxy configuration consists of the following settings. Depending on the type of communication for which you want to use (or disable) a proxy, the following configuration properties can appear in different configuration sections of your ActiveGate configuration.
| Property | Description |
|---|---|
| Server address (hostname or IP address) |
| Port optional If left empty, the default |
| Scheme optional If left empty, the default Must be set to |
| User name optional |
| User domain in the case of NTLM authentication |
| Password optional The password provided in the If a comma ( |
| If set to |
| A list of hosts for communication with which proxy should not be used by ActiveGate The hosts in the list should be separated by |
| ActiveGate version 1.271+ A list of proxy authentication schemes optional This is a prioritized list of proxy authentication schemes that ActiveGate should use when authenticating with the proxy server.
Supported values: |
Specify proxy configuration for ActiveGate
ActiveGate proxy configuration can be specified during ActiveGate installation on Linux or Windows (only the setting for all outgoing connections), or it can be configured after ActiveGate is installed. To configure proxy for ActiveGate:
-
Edit the
custom.propertiesfile in the ActiveGate configuration directory -
Specify the proxy-related parameters in the appropriate configuration section of the
custom.propertiesfile, depending for which purpose you want to use the proxy (see examples below). For example:[http.client]proxy-server=127.0.0.1proxy-port=8080# basic authentication credentialsproxy-user=usernameproxy-password=password -
Save the
custom.propertiesfile. -
Restart the ActiveGate main service.
Note that after the service is restarted, the proxy password, as specified by you in the configuration, is encrypted and moved from the
proxy-passwordproperty toproxy-password-encr.
ActiveGate proxy settings for simple proxy configuration scenarios
The following simple proxy configuration scenarios for ActiveGate are the most common and widely used. If you have special and more complex requirements, you can also define an advanced configuration.
ActiveGate proxy settings for all outgoing traffic
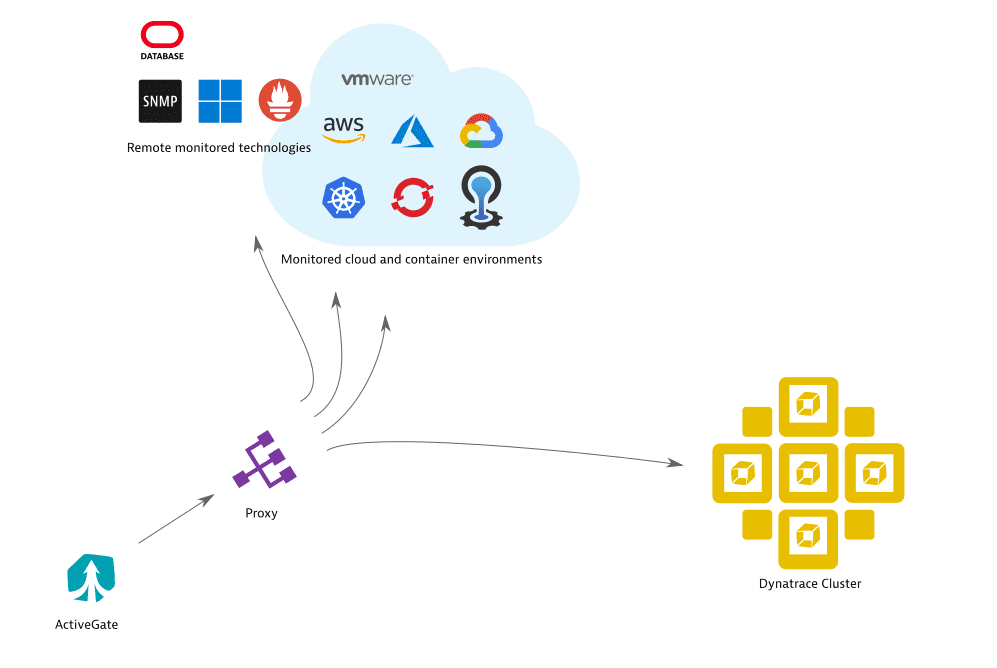
The following configuration covers the most common case of specifying proxy settings for ActiveGate outgoing connection to both the Dynatrace Cluster as well as monitored technologies, such as AWS, VMware, or Azure.
Specify the proxy-related parameters in the [http.client] section of the custom.properties file— including those parameters related to authentication, if required:
[http.client]proxy-server=127.0.0.1proxy-port=8080# basic authentication credentialsproxy-user=usernameproxy-password=password
ActiveGate proxy settings for Dynatrace Cluster only
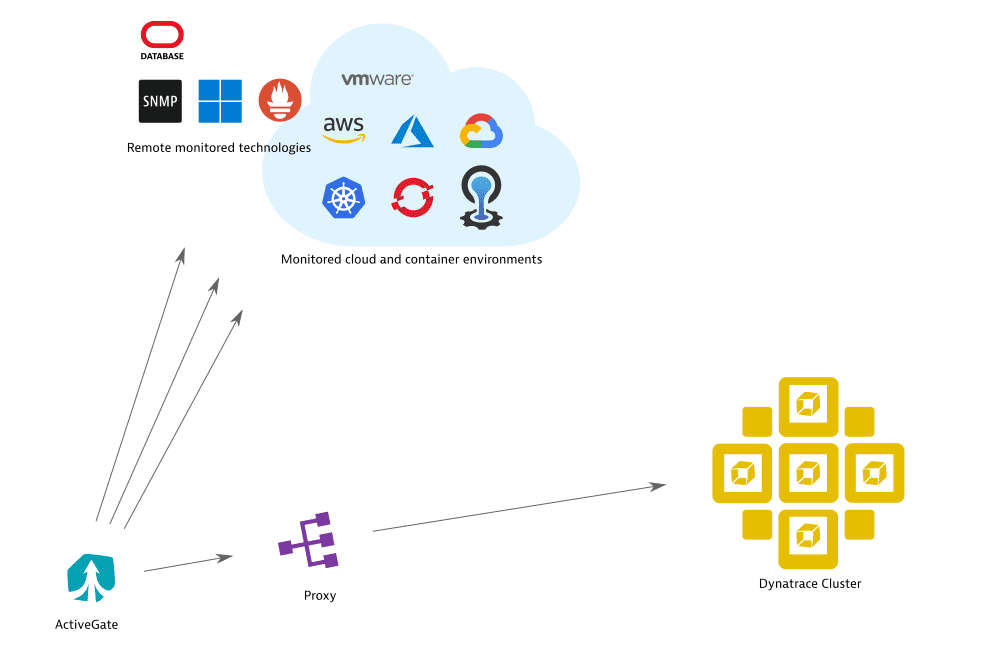
To set up a proxy specifically for Dynatrace Cluster, while allowing outgoing monitoring traffic to connect directly to monitored technologies, define proxy settings in the [http.client.internal] section of ActiveGate configuration.
[http.client.internal]proxy-server=127.0.0.1proxy-port=8080# basic authentication credentialsproxy-user=usernameproxy-password=password
ActiveGate version 1.247 and earlier For ActiveGate communication to function properly, after specifying the above settings, you will need to repeat non-proxy communication settings in http.client.internal or http.client.external and/or you will need to create sections http.client.internal or http.client.external. For more information see current limitations.
ActiveGate proxy for outgoing monitoring traffic, with direct connection to Dynatrace Cluster
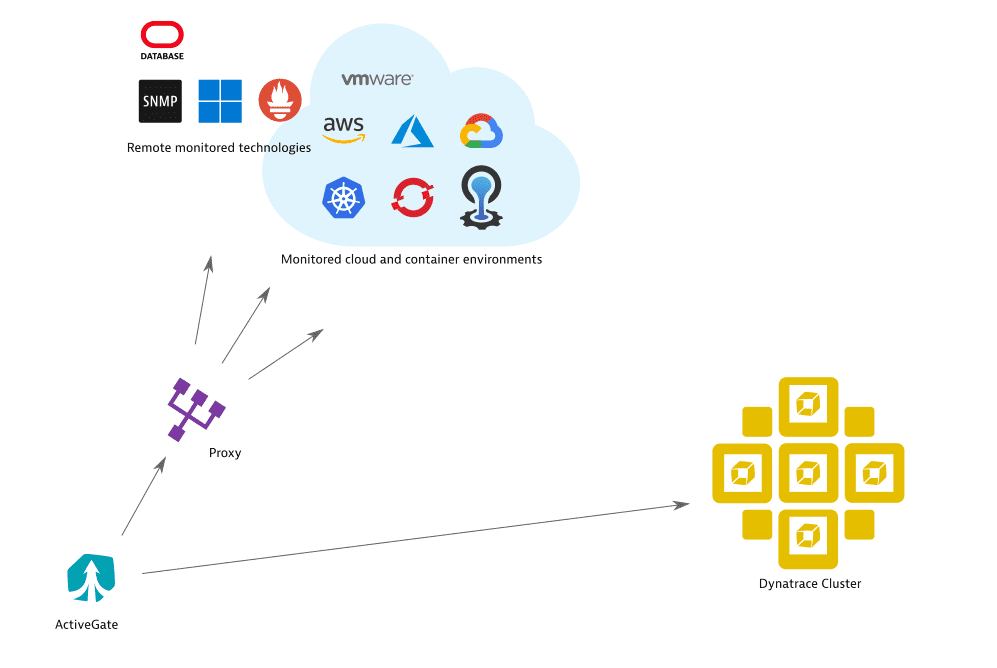
To set up a proxy specifically for outgoing monitoring traffic, but keep connection to Dynatrace Cluster direct:
- Specify proxy configuration in the
[http.client]section of thecustom.propertiesfile. - Turn proxy off in the
[http.client.internal]section.
For example
[http.client]proxy-server=127.0.0.1proxy-port=8080# basic authentication credentialsproxy-user=usernameproxy-password=password[http.client.internal]proxy-off=true
ActiveGate version 1.247 and earlier For ActiveGate communication to function properly, after specifying the above settings, you will need to repeat non-proxy communication settings in http.client.internal or http.client.external and/or you will need to create sections http.client.internal or http.client.external. For more information see current limitations.
Advanced proxy configuration scenarios for ActiveGate
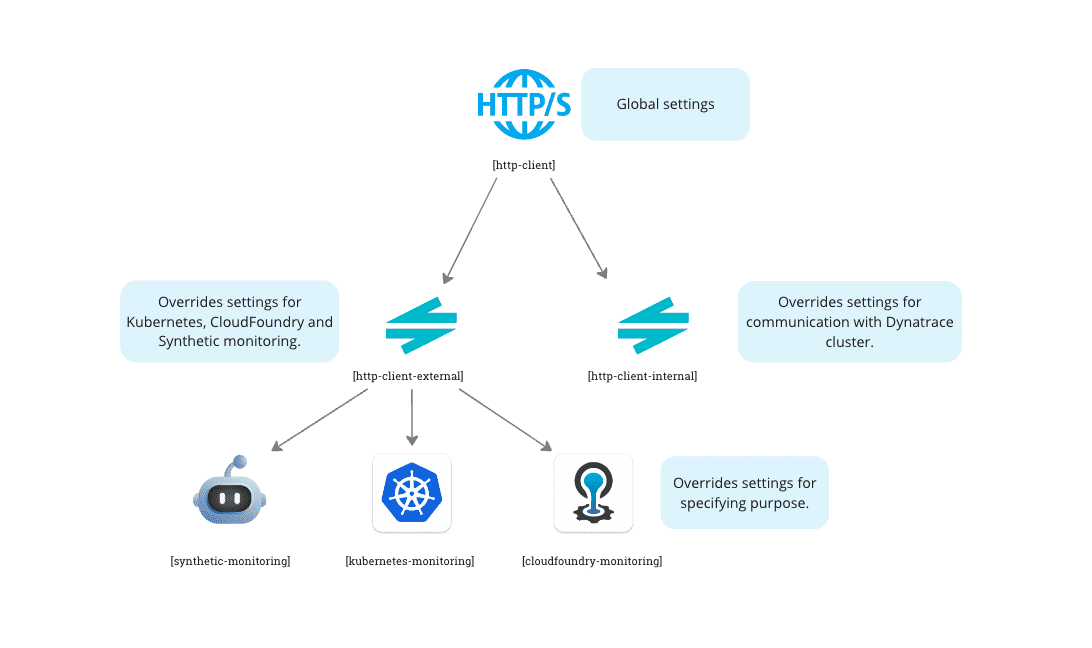
To set up a proxy for outgoing connections from ActiveGate—that is for connections to monitored technologies or to the Dynatrace Cluster—edit the custom.properties file and set properties in the appropriate section. Depending on the configuration section in which the properties are specified, the proxy (and other communication settings) affect only selected types of connections:
[http.client]—proxy settings for all ActiveGate outgoing connections, including the Dynatrace Cluster as well as all monitored technologies.[http.client.internal]—proxy settings specifically for the communication with Dynatrace Cluster. These settings override the settings specified in[http.client][http.client.external]—proxy settings specifically for monitored technologies: CloudFoundry, Kubernetes, private Synthetic monitoring. These settings override the settings specified in[http.client][<technology name>]—proxy settings specifically for the particular monitored technology, such ascloudfoundry_monitoring,kubernetes_monitoring,synthetic. These settings override the settings specified in[http.client]and[http.client.external]. Note that Settings for many of these technologies can be specified jointly in[http.client.external].
This precedence and inheritance of configuration settings between different configuration sections can be pictured graphically as follows:
ActiveGate proxy for Kubernetes, CloudFoundry, and private Synthetic Monitoring
You can specify proxy settings for a number of monitored technologies at once. Settings given in the http.client.external section affect Kubernetes, CloudFoundry, and private Synthetic monitoring (this set might be extended in the future):
[http.client.external]proxy-server=127.0.0.1proxy-port=8080# basic authentication credentialsproxy-user=usernameproxy-password=password
ActiveGate version 1.247 and earlier For ActiveGate communication to function properly, after specifying the above settings, you will need to repeat non-proxy communication settings in http.client.internal or http.client.external and/or you will need to create sections http.client.internal or http.client.external. For more information see current limitations.
Different proxies for Kubernetes, CloudFoundry and private Synthetic Monitoring
You can also specify dedicated proxy settings for a particular monitored technology:
- CloudFoundry in the
cloudfoundry_monitoringsection - Kubernetes in the
kubernetes_monitoringsection - private Synthetic Monitoring in the
syntheticsection
For example
[kubernetes_monitoring]proxy-server=127.0.0.1proxy-port=8080# basic authentication credentialsproxy-user=usernameproxy-password=password
See also: How to set up an ActiveGate proxy for private Synthetic monitoring
ActiveGate proxy settings for AWS role-based access
AWS-specific proxy configuration is described separately.
ActveGate version 1.247 and earlier
Repeat communication settings in [http.client.internal] or [http.client.external]
When specifying proxy configuration in either [http.client.internal] or [http.client.external], note that these sections affect various communication aspects not only proxy. When creating either of those sections, make sure to first copy content of the existing [http.client] section from the configuration.properties file (and customize it as appropriate):
- Open the
config.propertiesfile and copy all the properties from the[http.client]section to thecustom.propertiesfile, section[http.client.internal]or[http.client.external](as appropriate). - If there is an
[http.client]section in thecustom.propertiesfile, use the values listed there, to overwrite the above values (the values you have just copied fromconfig.properties).
For example
[http.client.external]# proxy settings as specific to http.client.external:proxy-server=127.0.0.1proxy-port=8080# basic authentication credentialsproxy-user=usernameproxy-password=password# communication settings copied from existing configuration:connection-timeout=5000socket-timeout=20000connection-request-timeout=5000idle-connection-timeout=15000max-total-connections=256max-connections-per-route=32certificate-validation=yeshostname-verification=yes