Notebooks
Latest Dynatrace
With Notebooks  , you can create powerful, data-driven documents for custom analytics.

Notebook capabilities
Notebooks are your go-to place for data exploration.
-
Custom analytics
Query, analyze, and visualize all your observability data such as logs, metrics, and events powered by Grail.
-
Extract fields
Use the DPL Architect tool to extract additional typed fields from the data in Grail.
-
Collaborate
Create and collaborate on interactive, data-driven, and persistent documents.
-
Fetch external data
Fetch and incorporate external data by running Dynatrace functions.
-
Give context
Annotate and add context with markdown.
Notebook sections
Notebooks can consist of multiple sections:
For Data and Code sections, you can control their display using the following tabs:
- Record list
List all the retrieved fields along with their values.
- Visualizations
When you select the Visualization tab, a
 Change visualization button is displayed above the visualization. Select it to choose a different visualization (if available). For information on available visualization types, see Edit visualizations for Notebooks and Dashboards.
- Raw response
See the actual returned data (rather than a visualization of the data).
Query section
The query sections allow you to easily query data from Grail and visualize the result in different ways.
The query section consists of a query input where you can write a DQL query. In the query input, use Ctrl+Space to trigger autocompletion at any time.
You can control the timeframe for the query via the timeframe dropdown list. If the timeframe is defined in the query itself, the dropdown list is disabled.
Code section
The code section enables you to fetch data for your notebook using Dynatrace functions.
Markdown section
A markdown section can be anything from a minor note about something on the dashboard to a whole page of formatted information with links and pictures.
To insert queries from your notebook with autocomplete, use Ctrl+Space.
Create a notebook
To create a new notebook
-
In the Dynatrace Launcher, select
Notebooks.The Notebooks app starts.
-
Select the
 in the app header.
New notebooks are always blank and created as drafts. Drafts are not saved automatically.
To save a notebook, select Save in the application header.
in the app header.
New notebooks are always blank and created as drafts. Drafts are not saved automatically.
To save a notebook, select Save in the application header.
Query Grail
The fastest and easiest way to explore your logs or metrics is with our new Explore tiles and sections. In a few seconds, you can find and analyze your logs or metrics. No DQL required!
To add data to a notebook
-
Open the
Add menu and select  Query Grail.
An empty section is added to the notebook and an Options side panel opens on the right.
-
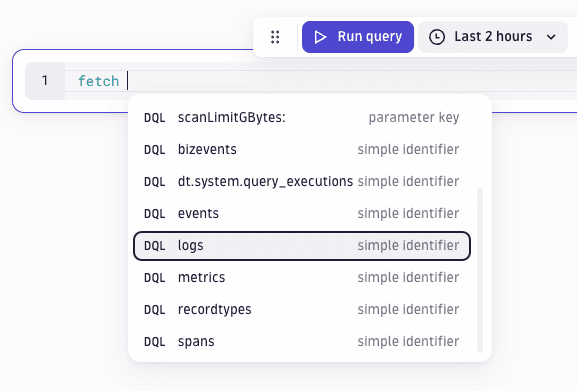
In the section edit box, use the Dynatrace Query Language (DQL) to define your query.
-
Select
 Run to execute the DQL query. The Notebooks app automatically visualizes the result.
 -
Select Add title to add the title header to this notebook section.
-
Select a visualization to display your results in your preferred format. Adjust visualization settings as needed.
Add code
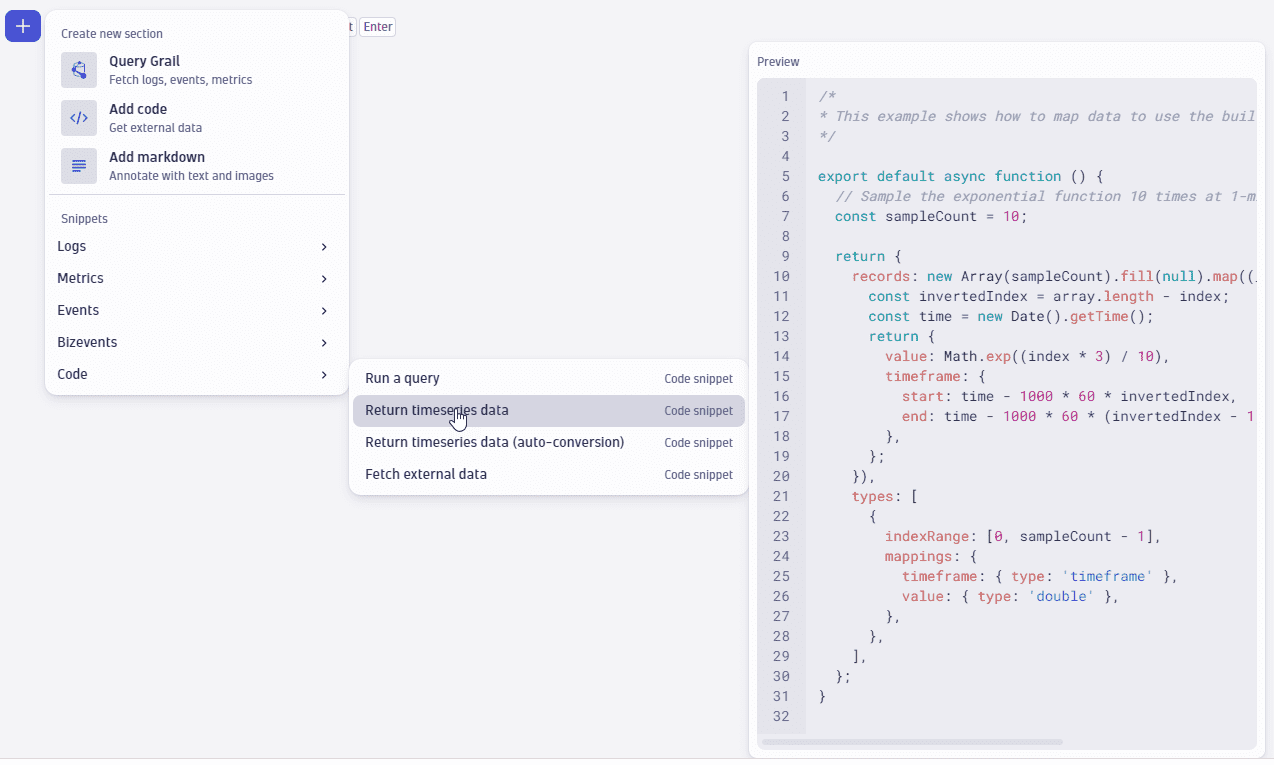
To add code fetching data for your notebook using Dynatrace functions
- Open the Add menu and select
 Add code.
 - Select Run query to execute code. The Notebooks app automatically visualizes the result.
- Select Add title to add the title header to this notebook section.
- Select a visualization to display your results in your preferred format. Adjust visualization settings as needed.
Add Markdown-formatted text
To add a Markdown-formatted annotation to a notebook
- Open the Add menu and select
 Add markdown.
 Enter your text. Use Markdown to format your text and add links and images. You can use the toolbar to insert common elements like a heading, bold text, or a link.
Edit a section
To see the edit commands for a section, select the section.
Copy to another document
Use Open with to copy a notebook section to another document (such as a different notebook or a dashboard).
An easy way to start a new notebook is to use Open with to copy reusable sections from existing notebooks to a new notebook and then edit the copied sections in the new notebook.
Example
To copy a notebook section to a dashboard (as a dashboard tile)
-
In the notebook, select the notebook section that you want to copy to a dashboard.
-
Select
 >
>  Open with.
 -
In the Open with… window, select the Dashboards option.
A Select destination box is displayed.
-
In Select destination, you can create a new dashboard or select an existing dashboard.
-
Select Add.
The dashboard opens with the selected section copied into it.
For details, see Open with.
Duplicate section
To create a copy of a section within your notebook
Select the section.
- Select >
 Duplicate section.
Move section
To move a section up or down within your notebook
Select the section.
- Select and drag
 the section to a new location within the notebook.
Alternate method:
Select the section.
- Select > Move section up or Move section down.
Delete section
To remove a section from your notebook
Select the section.
- Select >
 Delete section.
Run code
To run a code section
Select the section.
- Select Run code.
After you run a code section, you can clear the code results
Select the section.
- Select > Clear result.
Show or hide code
To display the code in a code section
-
Select the section.
-
Select Show code.
The code is displayed in a panel above the section.
To hide the code panel again, select Hide code.
Run query
To run a query section
Select the section.
- Select Run query.
After you run a query section, you can clear the query results
Select the section.
- Select > Clear result.
Show or hide query
To display the query in a query section
-
Select the section.
-
Select Show query.
The query is displayed in a panel above the section.
To hide the query panel again, select Hide query.
Options
To open the Options panel (where you can select and customize a visualization for your section)
Select the section.
- Select Options.
Copy section link
To copy a link to a section
Select the section.
- Select > Copy [section type] link.
Download result
To download (export) the result of the current dashboard tile or notebook section
-
Hover over the tile or section to display available commands.
-
On the command bar, select
More actions >  Download result > [format].
The result is downloaded to a local file in the selected format.
The selection of download formats available depends on the visualization.
- CSV: The result is downloaded to a local comma-separated values (*.csv) file
- JSON: The result is downloaded to a local JSON (*.json) file
Some visualizations offer no option for downloading the result.
Share a notebook
If you own a document (dashboard or notebook), you can share it.
There are two ways to share a document with other Dynatrace users in your company:
- Share access: Create and maintain a list of users and user groups that can access the document.
- Share links: Create links (URLs) pointing to your document and distribute the links through the channel of your choice (email, for example).
These methods are not mutually exclusive. For example, you can maintain a focused list of users for ongoing access to the document (maybe everyone in a certain group edits the document regularly) and you can create and distribute view-only links for a wider audience as needed.
In either case, you control whether people can edit the document or only view it.
For details on sharing documents, see Share documents.
You can also export a notebook as a JSON file and send the JSON to others. For details, see export/import.
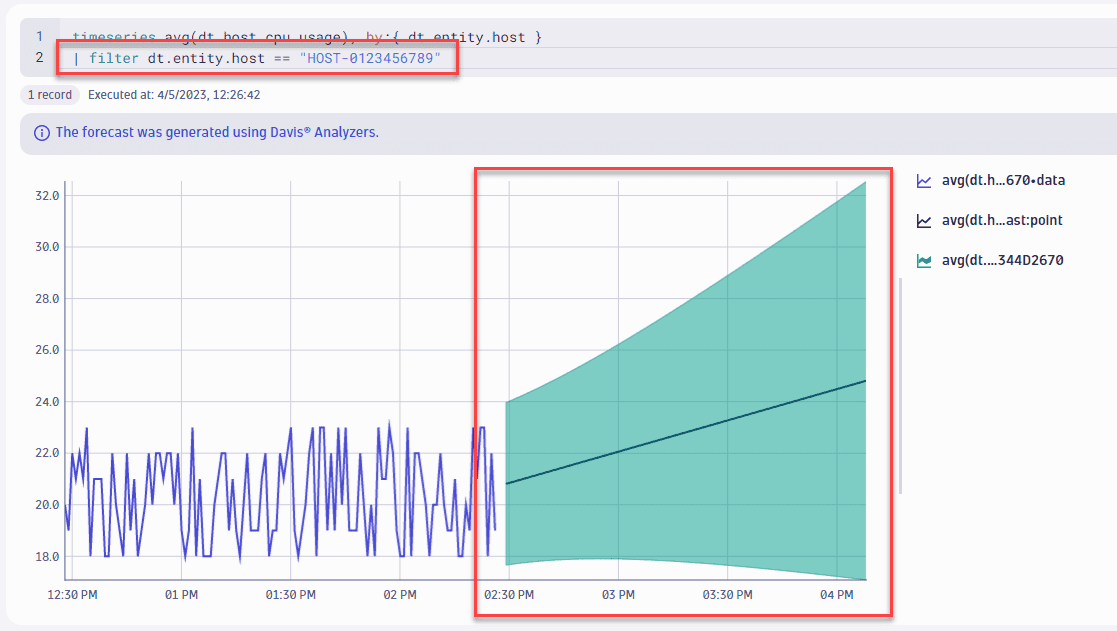
Start forecast analysis
From your notebook, you can trigger a series forecast analysis based on Davis AI.
In this example, we issue the following query:
timeseries avg(dt.host.cpu.usage), by:{ dt.entity.host }
and then run a forecast for a time series selected in the results.
-
In a notebook, select
> Query Grail. -
Enter a query such as
timeseries avg(dt.host.cpu.usage), by:{ dt.entity.host }to chart time series. -
Select Run query.
-
Hover over the required time series in the sidebar and select
> Filter and forecast.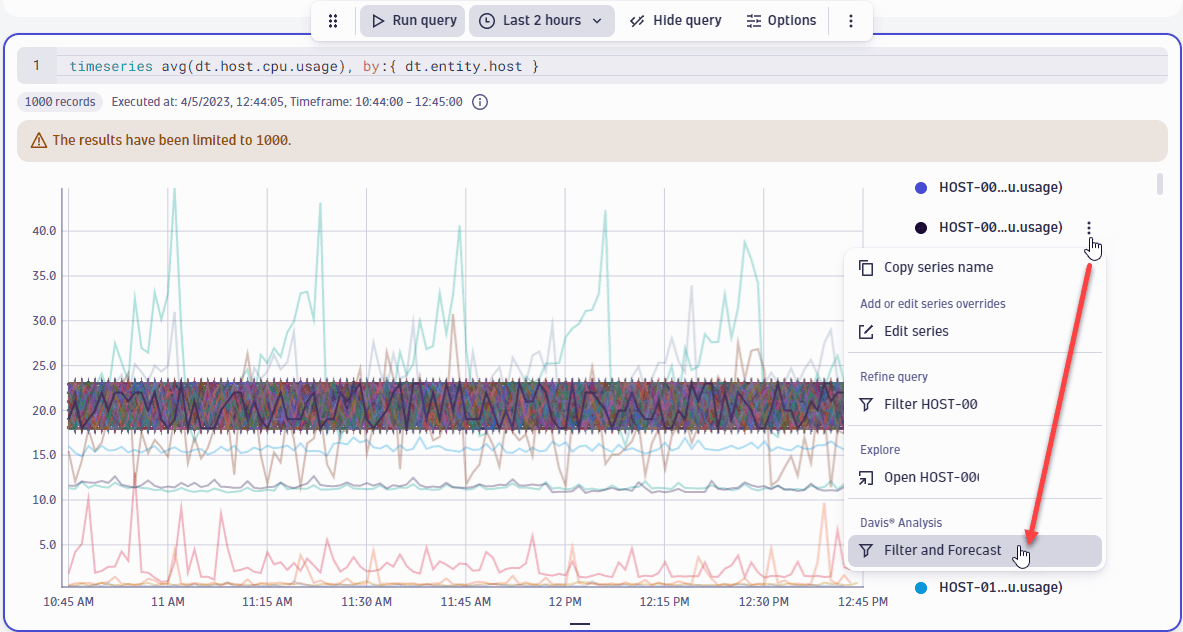
-
The query is automatically updated to filter by the selected time series and the chart is extended to show the projection for the selected series.
For details, see Davis® forecast analysis
Manage notebooks
Create, duplicate
To create a new notebook, see Create a notebook
To duplicate a notebook
- At the top of the notebook, select the notebook name
 to open the notebook management menu.
 - Select
 Make a copy from the menu.
Alternatively, you can also trigger the same action in the Recent section of the sidebar. Select > Make a copy.
Delete
To delete a notebook
- At the top of the notebook, select the notebook name to open the notebook management menu.
- Select Delete from the menu.
Alternatively, you can also trigger the same action in the Recent section of the sidebar. Select > Delete.
To delete multiple notebooks, select View all notebooks and use the buttons in the table.
Export
To export a notebook
- At the top of the notebook, select the notebook name to open the notebook management menu.
- Select Export as JSON from the menu.
Alternatively, you can also trigger the same action in the Recent section of the sidebar. Select > Export as JSON.
Import
To import a notebook from a JSON file
-
Select View all notebooks in the document sidebar.
-
In the upper-right corner of the page, select
 Import.
A file browser window opens.
Import.
A file browser window opens. -
Find and open the notebook JSON definition file.
The definition is imported as a new notebook and listed on the Notebooks page with Last modified set to the import date and time.
Search
The easiest way to search for a notebook is through the global search.
The search can be triggered from any context using the Cmd/⌘+K keyboard shortcut. Notebooks with matching titles will show up in the results.
Alternatively, select View all notebooks in the sidebar. Enter a search term to list only matching notebooks.
Copy a task from another document
Using Open with, you can copy tasks from other documents to reuse in your workflows.
Example
In this example, we have a Grail query in a dashboard that we want to run as a task in a workflow.
To copy a Grail query from a dashboard to Workflows as a task in a workflow
-
In the dashboard, select the query tile that you want to copy to a workflow.
-
Select
> Open with. -
In the Open with… window, select the Automate DQL Query Workflows option.
A Select destination box is displayed.
-
In Select destination, you can create a new workflow or select an existing workflow.
-
Select Add.
The Workflows application opens with the selected query added as a workflow task.
-
Edit the workflow as needed.
For more details, see Open with.