Upgrade your custom charts now
The dashboards discussed here are classic dashboards created using the dashboarding functionality integrated with previous Dynatrace.
- For more about classic dashboards, see Dashboards Classic.
- For more about dashboards created with the Dashboards app in the latest Dynatrace, see Dashboards.
- To improve your dashboard experience, you can upgrade existing dashboards from Dashboards Classic to the Dashboards app in the latest Dynatrace.
If you use Custom charts in your dashboards, you need to read the following text.
Immediate action required
-
What:
If you depend on custom charts, you need to upgrade them now.
Custom charts no longer receive fixes and enhancements.
Custom charts are no longer editable.
When you upgrade your custom charts to Data Explorer charts, you can edit your charts benefit from fixes and enhancements to Data Explorer features, and be ready to upgrade to the new platform.
-
When:
Dynatrace version 1.265 was the last Dynatrace release to support custom charts
Dynatrace SaaS version 1.271+ and Dynatrace Managed version 1.272+ completely disable custom chart editing and discontinue custom chart code maintenance
-
How:
You can upgrade tile by tile, dashboard by dashboard, or, using the API, all at once.
For details, see below.
Does this apply to me?
This does not apply to visualizations and dashboards created using Data Explorer. This applies only to our old Custom charts functionality, which predated Data Explorer and is now fully deprecated.
Check the Dashboards table
To see if you have any old-style custom charts to upgrade, filter the Dashboards table by Custom charts: Yes and see if any dashboards are listed.
-
Go to Dashboards or Dashboards Classic (latest Dynatrace).
-
optional To list only the dashboards that you own, add a filter for
Ownership: Mine.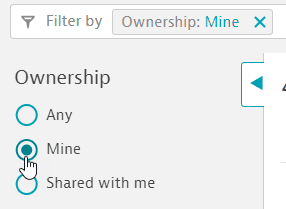
If you want to check all dashboards to which you have access, regardless of ownership, skip this step.
-
Add a filter for
Custom charts: Yes.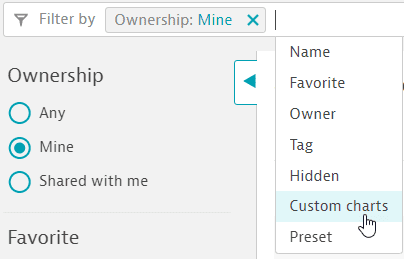
-
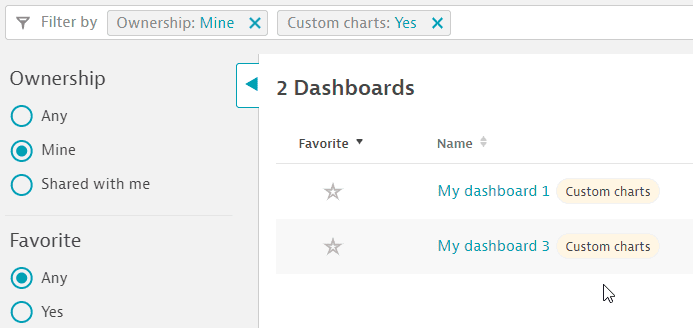
Check the table
-
If no dashboards are listed after you filter by
Custom charts: Yes, you have nothing to upgrade. You can stop here. -
If you don't filter by dashboard ownership, you may see some preset dashboards with owner
Dynatracelisted. You can ignore them. -
If any other dashboards are listed, they should each display the
Custom chartslabel because you have set theCustom charts: Yesfilter in the previous step.In the example below, you would have two dashboards to upgrade.
-
Check tiles on the dashboard
When you find a dashboard that has custom charts, open it and look for the following indicators that it has old-style custom charts that should be upgraded:
-
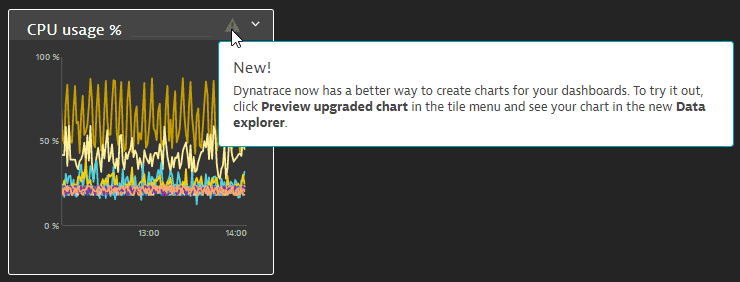
If a tile needs to be upgraded, it displays a warning icon and tooltip.
-
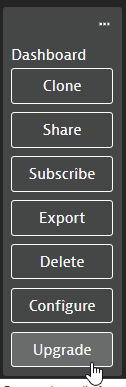
If the currently displayed dashboard still has at least one tile that needs to be upgraded, the dashboard menu in the upper-right corner of the dashboard has an Upgrade option.
How can I upgrade?
Before you do anything else, we recommend that you make backups of your most important dashboards. Then try to upgrade the backups so you get comfortable with the upgrading process before upgrading all of your remaining dashboards.
For example, pick any popular dashboard in your environment that you depend on, maybe one that has several advanced and complex Custom chart tiles (multiple metrics are used, and there are configurations for a unit, rates, etc.), and clone it. Then you can safely work on the clone and check whether everything upgrades correctly.
- Go to Dashboards or Dashboards Classic (latest Dynatrace).
This lists all dashboards you are permitted to view or edit. - Sort the table by the Popularity column.
- Go to Dashboards or Dashboards Classic (latest Dynatrace).
- In the table of dashboards, select More (…) > Clone for the dashboard you want to copy.
The copy opens in edit mode.
The original dashboard is unaffected.
You can upgrade:
In all cases, make backups before starting, and try it out first to familiarize yourself with the process.
Upgrade via web UI
In the web UI, you can upgrade one tile at a time or one dashboard at a time.
Upgrade one tile
To upgrade a single tile
-
Go to Dashboards or Dashboards Classic (latest Dynatrace).
-
Display a dashboard that has a tile that needs to be upgraded.
-
In the tile's menu, select Preview upgraded chart. The converted chart opens in Data Explorer in a new browser tab, so you can compare the old charts with the new visualizations.

-
Inspect the visualization to verify that it converted properly. Make changes as needed.
-
When you are satisfied with the conversion, select Pin to dashboard and pin the upgraded visualization to another dashboard or the same dashboard.
If you pin it to the same dashboard, you will now have the old and new tiles on the same dashboard. This gives you another opportunity to compare the tiles. If you are satisfied with the results, delete the old tile (the one with the warning icon) and drag the new tile into its place.
Upgrade entire dashboard
You can run the following procedures with or without creating clones (backups).
Faster but with no backup steps
To upgrade an entire dashboard (all tiles on the dashboard at once) without creating a clone (backup copy).
-
Go to Dashboards or Dashboards Classic (latest Dynatrace).
-
Find the dashboard in the table of dashboards.
-
In that dashboard's row, select > Upgrade. If no upgrade errors are encountered, the entire dashboard is upgraded.
Slower but with cautious backup steps
To create a clone (backup copy) of the dashboard and then upgrade the entire cloned dashboard (all tiles on the dashboard at once)
-
Go to Dashboards or Dashboards Classic (latest Dynatrace).
-
Find the dashboard in the table of dashboards.
-
In that dashboard's row, select > Clone. This creates a clone (copy) of the dashboard and opens it in edit mode. The original dashboard remains unchanged.
-
Select Done to leave edit mode and display the clone.
-
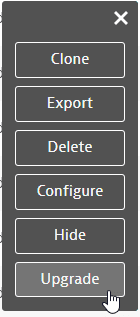
In the upper-right corner of the dashboard, select > Upgrade.
-
Inspect the upgraded dashboard.
To compare two dashboards side by side
- Go to Dashboards or Dashboards Classic (latest Dynatrace).
- Right-click the first dashboard's name in the Dashboards table and open the link in a new window.
- Right-click the second dashboard's name in the Dashboards table and open the link in a new window.
Arrange the browser windows side by side and then visually compare the dashboards.
-
After you are satisfied with the upgraded dashboard, you can delete the original.
Alternative procedure from the dashboard menu
You can run this procedure with or without creating a backup (see step 3).
-
Go to Dashboards or Dashboards Classic (latest Dynatrace).
-
Select the dashboard name to display the dashboard.
-
recommended If you haven't already made a backup, you can do so now: in the upper-right corner of the dashboard, select > Clone to create and display a copy of the dashboard. When you clone the dashboard, the clone is displayed and the original dashboard remains unchanged.
-
In the upper-right corner of the dashboard, select > Upgrade.
If you cloned the dashboard in the previous step, you are upgrading the clone in this step.
If you did not clone the dashboard in the previous step, you are upgrading the original dashboard in this step without making a backup.
When a dashboard upgrade is complete:
- The following message is flashed at the bottom of the dashboard: The dashboard was successfully upgraded!
The tiles on that dashboard no longer display a warning icon because they have all been upgraded to Data Explorer tiles
- The Upgrade option is no longer available in that dashboard's menu because it has already been upgraded
Check for more dashboards to upgrade
To check for more dashboards to upgrade
- Go to Dashboards or Dashboards Classic (latest Dynatrace).
- Filter the Dashboards page by
Custom charts: Yes.
Dashboards you have already upgraded should not be displayed
- Any dashboards that still have the
Custom chartslabel need to be upgraded.
For details on identifying dashboards and charts that still need to be upgraded, see the Does this apply to me? section above.
Upgrade via API
Dynatrace version 1.251+
Using the Dynatrace API, you can upgrade one dashboard at a time or all dashboards at once. In any case, the API will always conveniently skip dashboards that don't have any Custom charts on them, which removes the need to first filter out dashboards without Custom charts.
Upgrade one dashboard
To upgrade one dashboard via API, use the migrate endpoint.
https://{your-environment-id}/rest-api-doc/index.jsp?urls.primaryName=Configuration%20API#/Dashboards/migrateDashboard
Make sure to replace {your-environment-id} with your actual environment ID.
Upgrade all dashboards
To upgrade all dashboards via API
-
Use the GET endpoint to retrieve all dashboard IDs.
https://{your-environment-id}/rest-api-doc/index.jsp?urls.primaryName=Configuration%20API#/Dashboards/getDashboardStubsListMake sure to replace
{your-environment-id}with your actual environment ID. -
Loop over all IDs as described in Upgrade one dashboard above.
Node.js example script
To get you started quickly, feel free to adapt and use the following example Node.js script. We used it to bulk update all dashboards of our own development environment.
Before using the script, make sure you update both lines marked with // TODO with your own information:
- Replace
{your-environment-id}with your actual environment ID. - Replace
{your-api-token}with a valid API token with the proper scope.
import fs from "fs";import fetch from "node-fetch";async function migrateAllDashboards() {// create a backup directoryif (!fs.existsSync("./BACKUPS")) {fs.mkdirSync("./BACKUPS");}export const ENV_URL = "{your-environment-id}"; // TODO replace thisexport const AUTH_HEADERS = {Authorization: `Api-token {your-api-token}`, // TODO replace this};const dirName = `./BACKUPS/${new URL(ENV_URL).hostname.replace(".","_")}-${Date.now()}`;fs.mkdirSync(dirName);console.log("Fetching all the dashboards");const fetchAllUrl = `${ENV_URL}/api/config/v1/dashboards`;const response = await fetch(fetchAllUrl, { headers: AUTH_HEADERS });const dashboardsMetadata = await response.json();fs.writeFileSync(`${dirName}/_ALL_DASHBOARDS_METADATA.json`,JSON.stringify(dashboardsMetadata));const allDashboards = dashboardsMetadata.dashboards;console.log(`Saved the metadata of ${allDashboards.length} dashboards`);for (let index = 0; index < allDashboards.length; index++) {const db = allDashboards[index];const dbId = db.id;const fetchDB = `${ENV_URL}/api/config/v1/dashboards/${dbId}`;const response = await fetch(fetchDB, { headers: AUTH_HEADERS });const dbContent = await response.json();// save dashboard content to backup directoryfs.writeFileSync(`${dirName}/${dbId}.json`, JSON.stringify(dbContent));try {// attempt migrationconst migrateResponse = await fetch(`${ENV_URL}/api/config/v1/dashboards/${dbId}/migrate`,{method: "PUT",headers: {"Content-Type": "application/json",...AUTH_HEADERS,},body: dbId,});if (migrateResponse.status === 200) {if (migrateResponse.errors) {console.log(`X ${dbId} updated failed!);console.error(migrateResponse.errors);}} else {console.error(`X ${dbId} update failed!`);console.error(migrateResponse);}} catch (error) {console.error(`X ${dbId} update failed!`);console.error(updateResponse);}}}console.log("### Backup and Migrate\n");await migrateAllDashboards();console.log(`### Migration completed\n\n`);
Check for more dashboards to upgrade
To check for more dashboards to upgrade
- Go to Dashboards or Dashboards Classic (latest Dynatrace).
- Filter the Dashboards page by
Custom charts: Yes.
Dashboards you have already upgraded should not be displayed
- Any dashboards that still have the
Custom chartslabel still need to be upgraded.
For details on identifying dashboards and charts that still need to be upgraded, see the Does this apply to me? section above.
What should I do if an upgrade fails?
Depending on the complexity of the tiles involved, a dashboard upgrade could fail partially (some tiles on the dashboard upgrade successfully and others don't) or completely (no tiles on the dashboard upgrade successfully).
In any case, don't worry about losing data. Dashboards and tiles are visualizations of your data, not the data itself. Your data is never at risk during an upgrade.
Where can I get more information?
-
There's an ongoing Dynatrace Community thread you are welcome to participate in.
-
To start a conversation with a Dynatrace product expert, use live chat within your Dynatrace environment.
