
I’ve been blogging about excessive SQL executions for the past 10 years – since the time I have been working for Dynatrace. Whether it is the N+1 Query Pattern, inefficient SQL loading too much data, no caching of static data or requesting duplicated data, it seems like these problems don’t go away completely! I still keep getting links to Dynatrace Problem Tickets, Response Time Hotspots or Service Flows that make me cringe.
The following Response Time Hotspot was sent to me by my colleague John Kelly (aka Tech Shady), who is currently helping a customer migrate their Oracle WebLogic Commerce solution from on-premise (VMWare) to the Azure cloud. A “classical” Lift & Shift migration, where they move application server and Oracle Database onto Azure IaaS. The problem I see is that they also Lift & Shift the existing database access issues such as making 4.230 SQL Calls to the same SQL Query. Not only is this bad for performance and scalability, it is also bad for the costs as these queries now run against a database managed and run in the Cloud:
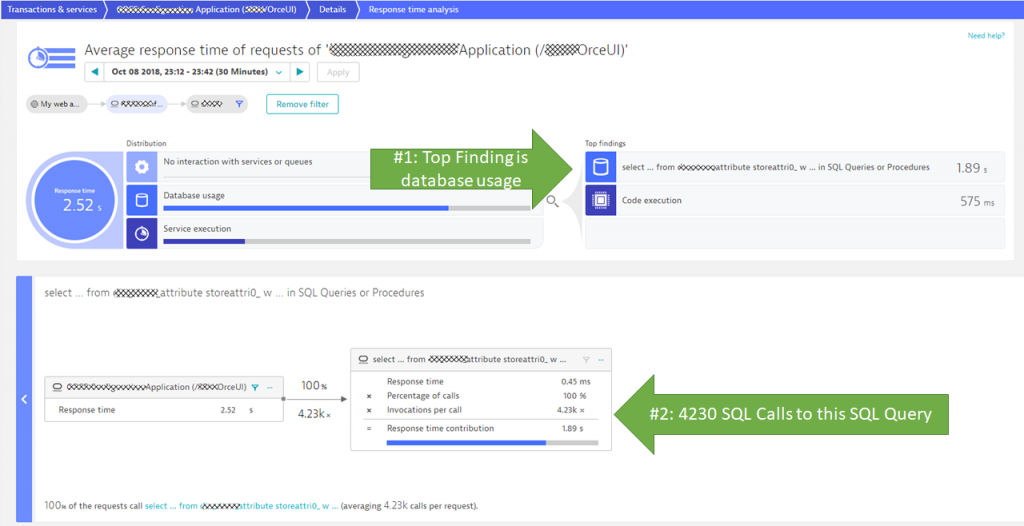
Thanks to Dynatrace OneAgent, all this data and analysis comes for free. My colleague simply installed the OneAgent on their Azure IaaS and then analyzed the hotspots for the selected timeframe when they ran their tests against the migrated application.
Tip: The longer I work with Dynatrace, the more I find myself moving to the Response Time Hotspot as fast as possible. As Dynatrace does all the heavy lifting in analyzing the underlying transactional PurePath data, it is the logical choice when analyzing hotspots.
Compare Lift & Shift in Dynatrace
If you are planning a cloud migration (Lift & Shift, Refactor, Re-platform, Re-purchase, …) then check out my recent blogs about Cloud Migration and how Dynatrace supports all migration scenarios.
In today’s case, the customer followed a best practice that allows Dynatrace to capture all data for On-Premises vs Cloud-Migrated version under a single Application. In most scenarios, this happens automatically anyway, because the migrated application is available under the same host name or has a similar URL pattern which Dynatrace can link to the same logical application. In the testing stage however, you will most likely end up with two separate applications in case testing (=cloud migrated instance) and production (=still on-premise instance) might have completely different host or URL patterns. If you are about to do a cloud migration project, feel free to reach out to me – happy to advice on monitoring strategies.
Now where do we get started? We start by opening the Service Flow from our Application. It nicely shows that most of the traffic already went to the Azure Deployment and only some went back to the On-Premise installation – that’s obviously due to the current test scenario:
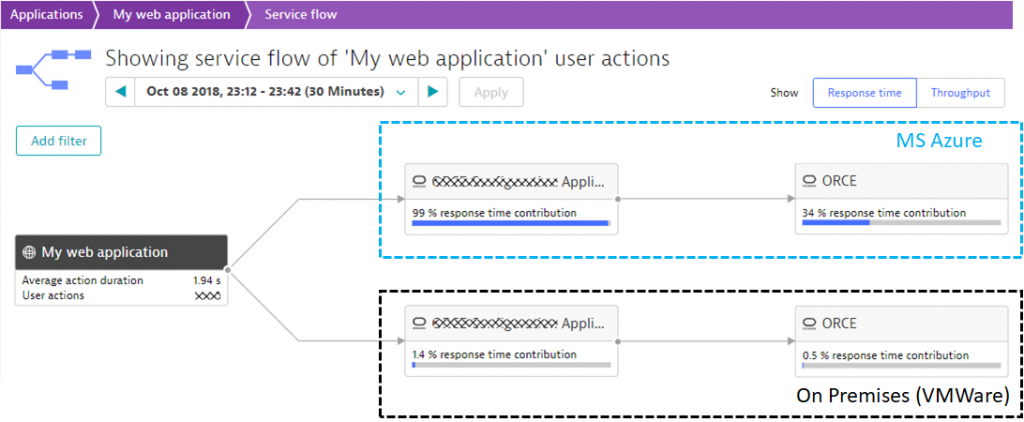
When clicking on each individual node in the Service Flow, you will see the actual number of requests (=throughput) that makes it to that node. You also get an option to analyze the underlying infrastructure which is how I knew which nodes run on Azure and which ones run On-Premises (this part is not included in the screenshot but would show up on the right side).
Tip: The filter options in the Service Flow (as well as other views in Dynatrace) allow you to filter on certain requests or allow you to focus on transactions that flow through a certain instance, e.g: you can easily filter only those requests hitting Azure vs On-Premises.
Detecting Issue in Origin System
The initial Response Time Hotspot we analyzed was using a filter that only analyzed the new Azure instances. From the Service Flow above, we can do the same analysis for the On-Premise transactions. We end up at a very similar Response Time Hotspot. Instead of showing you an almost identical screenshot, I went one step ahead and picked one of the PurePaths that show all the SQL Queries executed. We can see the same pattern in our On-Premise instance and can even observe more SQL queries to that one SQL query we identified earlier. Seems like the On-Premise database has a couple more rows in these tables which is why the N+1 query issue produces a couple more SQL roundtrips then the migration that was done to Azure:
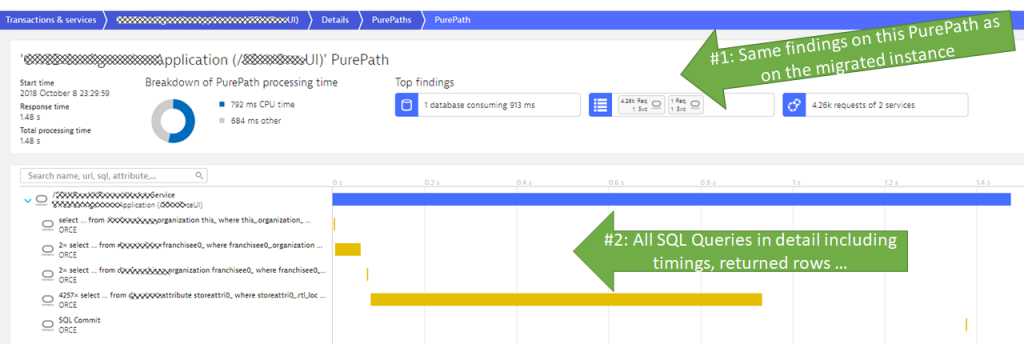
The PurePath view provides even deeper visibility when clicking on each individual node, e.g: we get to see the number of returned rows, method level information performance information or even exception stack traces in case there were any exceptions thrown.
Tip: While PurePath is a great view, I do not advice starting here. Remember what I said earlier: use the Response Time Hotspot and let Dynatrace do the data crunching for you. Another option is to use the Outlier Analysis and with that “zoom in” to a set of PurePaths that fall into a certain performance bucket.
Conclusion: Don’t Lift & Shift before you fix On-Premise Issues
If you are tasked with a migration project, DON’T just migrate and optimize your cloud instances after the migration. Before you start your migration, make sure you analyze your on-premise installation. If you have configuration, architectural or coding issues, you will just migrate them to another infrastructure. And issues like the one we discussed here will become very costly, as you now have to pay the cloud vendor potentially for every transferred byte or for every executed transaction. Be smart before starting your migration.
Give Dynatrace a shot. Get your Dynatrace SaaS Trial or contact our sales for an on-premises trial. The only thing else you need to do is install the Dynatrace OneAgent on your existing infrastructure. To learn more about how to use Dynatrace check out my Dynatrace OneAgent YouTube Tutorial Channel or simply reach out to me directly.


Looking for answers?
Start a new discussion or ask for help in our Q&A forum.
Go to forum