As co-host of the PurePerformance Podcast, I spend a lot of time with Andi Grabner. Naturally, I follow his blog posts carefully. Two of them caught my attention recently. The first is a post where he outlined ideas on how to adapt to the latest demands in being a performance engineer. Specifically, I was inspired by the ideas Andi relayed from another inspiring performance engineer, Wilson Mar. In particular, I was smitten by the line, “Pick a language you don’t already know and figure out how to automate your most manual, boring and time-consuming tasks.” As a former load tester with limited coding background, I took this as a challenge to level-up. After a successful experiment with Ansible, where I automated restarting applications and deleting log files, I found myself itching for another challenge. That’s when I happened upon Andi’s blog on Mean Time To Instrumentation (MTTI), a concept he learned from Dustin Hassemer.
I decided challenge myself to automate the deployment of the Dynatrace OneAgent with an application. We, at Dynatrace, tell everybody, “It’s so simple. You can install OneAgent in mere minutes and light up your entire stack”. It’s a great and true message. I’ve manually installed the agent and experienced the ease first hand, but I wanted more. Inspired by the MTTI blog, I wanted to create a way to show people how easy it is to instrument an application, from the web server all the way to the database, from the browser all the way down to the host, using automation.
In Part 1 of this blog, I’ll discuss how to automate a 5 minute deployment of a dockerized version of our easyTravel demo application on an AWS EC2 instance, complete with Dynatrace instrumentation. I’m sure many of you are much more advanced than I, so I challenge you to achieve this task quicker, more efficiently, maybe even on Azure, GCP or any other platform, and share your results.
In Part 2, I’ll discuss my level-up journey and what I learned in the process.
Deploying Full-Stack in 5 Minutes
Prerequisites
Here are the ingredients you’ll need to replicate what I’ve done:
- An AWS EC2 Account with a credit card on file. Don’t worry about the cost. If you destroy your EC2 instance after completion, this might cost one or two cents.
- An EC2 Key Pair in the EC2 region you wish to run your instance
- A Dynatrace tenant with install permissions. If you don’t have one, you can sign up for a free trial.
- My easyTravel-Dynatrace-Docker GitHub repository. You don’t actually have to do anything with this. Just know that this is the repository I’m using. Feel free to check it out and inspect all the container images it pulls to make sure I’m cheating in any way.
- The contents of the BW_EC2_Userdata.sh file in the aforementioned repository
The Userdata File
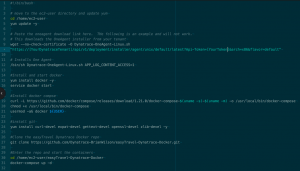
Let’s take a closer look at what I’m actually doing in the BW_EC2_Userdata.sh file. To many of you, it’s self-evident. For those of us who are just starting out on the automation journey, let’s examine how simple this is. Originally, I wanted to do this all using AWS Cloudformation, but as you’ll learn in part 2 of this blog, I ran into a roadblock. What I ended up is just is simple set of commands that get fed to the EC2 instance during start up. So, what do these commands do?

- It navigates to the ec2-user home directory – If you create the instance with a different user, you’ll have to modify this location
- It updates yum, a package manager
- It downloads and installs the Linux Dynatrace OneAgent – The script does not contain a valid URL. I’ll address how to update this below.
- It installs docker, docker-compose, and git
- It clones the easyTravel-Dynatrace-Docker repository to the user directory on the EC2 instance
- Enters the repository and issues the
docker-compose upcommand to create the containers.
That’s all there is to it. The Dynatrace OneAgent automatically discovers and instruments the processes in the containers that are created on this host.
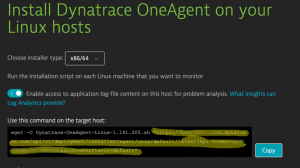
In order to make this script work, you’ll have to provide the URL for the OneAgent on your tenant. In your tenant, in the left navigation pane, go do Deploy Dynatrace. Once there, click on Start Installation and then Linux. Copy just the URL part from the first wget command (highlighted in yellow below) and replace the one in the script.

Making the Dream Come True
Now it’s time to give this a spin. In a few short steps, you’ll have 5 docker containers running on a single EC2 instance, fully monitored from the host all the way through the container services and out to the user’s browsers simply by deploying OneAgent on the host. Follow these simple steps:
- Log into your AWS account and navigate to the EC2 dashboard
- Click Launch Instance
- In Step 1: choose the Amazon Linux LTS Candidate 2 AMI
- In Step 2: Choose an Instance Type, pick t2.medium. You might get this running on a t2.small, but I’ve found that the 5 containers and traffic load overwhelms the instance very quickly. Unfortunately, the free-tier t2.micro is not an option as the task will not complete. Don’t worry about the price though. So long as you destroy the EC2 instance when you’re done, this will only cost a few cents. I’ve run this exercise numerous times and I’m at a grand total of 22 cents.
- In Step 3: Configure Instance Details – scroll down and expand Advanced Details. In the User data window, paste the contents of the BW_EC2_Userdata.sh you modified earlier. Alternately, you can upload the script.
- Skip right on through to “Review and Launch”
- Get your stopwatch ready
- Click Launch, select your key pair of choice, accept the terms.
- Start your timer and click Launch Instances.
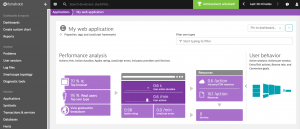
In an average of 5 minutes, the entire stack up to the end user will be lit up. Latency on the AWS side is an uncontrollable factor, so your results may vary. I like to consider the deployment complete when I see user actions in the Application view in Dynatrace.

Check out these other sections in Dynatrace for more views on what you just created. If you refresh them during the 5 minutes, you’ll see the environment building out:
- Host
- Here you’ll find your EC2 instance. Select it and the processes running in the containers.
- Technologies
- Here you’ll find all the process groups running. You can drill into them for a deeper dive.
- Services
- Here you’ll find all of the services that were auto-detected within the processes running in your containers.
- Smartscape
- Smartscape presents you with the auto-discovered dependencies between hosts, data centers, process, services, and applications, as well as the dependencies through each of those layers.
- Docker
- The docker view shows a lot of information about your Docker environment, including images, hosts, services, running containers, and more.
Conclusion
My example above shows how you and deploy an application, complete with Dynatrace full stack monitoring, in 5 minutes. I’d say that’s pretty good for an automation novice. I’ve been manually deploying agents for about 9 years now and I’ve never seen anything this easy. The Dynatrace OneAgent just works. It removes the instrumentation barrier to monitoring. To sound like a local cable commercial, “Don’t take my word for it, try it.”
I’d love to see your examples of automating this, especially if they’re better or involve different technologies or cloud providers. Be sure to either tweet me at @emperorwilson if you do.
Be sure to stay tuned to for part 2 of this blog in which I discuss leveling-up and what I learned in completing this goal.


Looking for answers?
Start a new discussion or ask for help in our Q&A forum.
Go to forum