Once upon a time, I set up an OpenStack cluster and experienced some strange connectivity problems with all my OpenStack instances. It was the perfect opportunity to learn more about OpenStack, perform a head-long deep dive into Neutron, and update my network troubleshooting skills.
The preliminaries
I set up my OpenStack cluster on 6 Dell OptiPlex 7040 machines, 1 router, 1 managed switch, and 1 unmanaged switch. True, this is not the usual enterprise hardware you would want for a production cluster, but I tend to take things literally, so I set up OpenStack on commodity hardware. In any event, my goal was to set up a portable OpenStack cluster for demo purposes, not for production use cases.
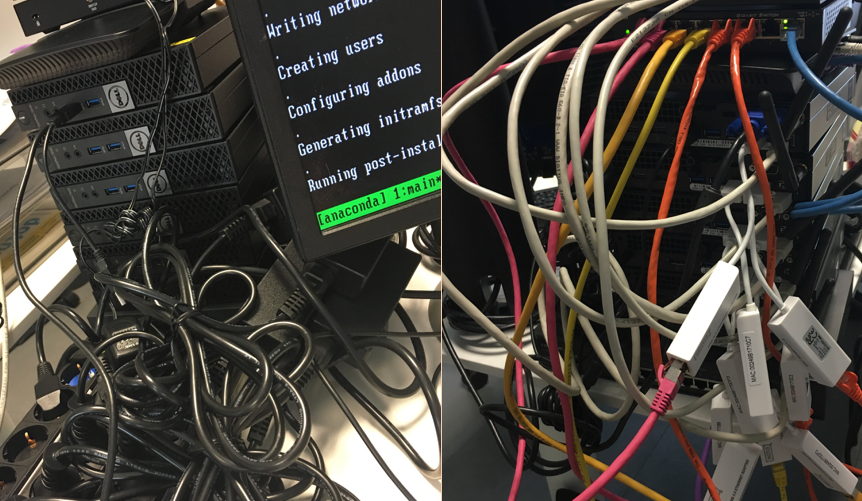
Since my cluster nodes only have one NIC and I wanted to have a multi-NIC setup, I considered my options and settled on a USB 3.0 to Gigabit Ethernet adapter as a second NIC. The adapter supports 802.1Q, checksum offloading, has drivers for Linux kernel 4.x/3.x/2.6.x, and it’s received positive reviews for running on Linux. Once everything was set up and the wiring was complete, I started the installation of Mirantis OpenStack 9.1 from a USB stick on my designated Fuel master node.
Hey, ho, let’s go!
My OpenStack cluster has an administration network that is also used for PXE on the onboard NIC. The second NIC is used for private, storage, and public networking via VLANs. Following the successful OpenStack deployment with Fuel, I started an instance on the private network using the cirrOS image to confirm that everything was working. I assigned a floating IP and was able to connect via SSH. I checked the network configuration and then decided to view the running processes using ps faux. After executing the command, the terminal showed some processes, but then the connection froze and became unresponsive. I killed the SSH session on my machine rather than wait for a timeout.
Go-Go Gadget troubleshooting
Suspecting that a series of unfortunate events had simply occurred, I tried again. Unfortunately, I got the same result: SSH, ps faux, freeze… Damn! I was able to ping the instance, connect to it, interact with it, but it seemed that the large amount of data I was attempting to transfer was breaking the connection. I started to investigate by pinging the instance again using different packet sizes. I received the following result:
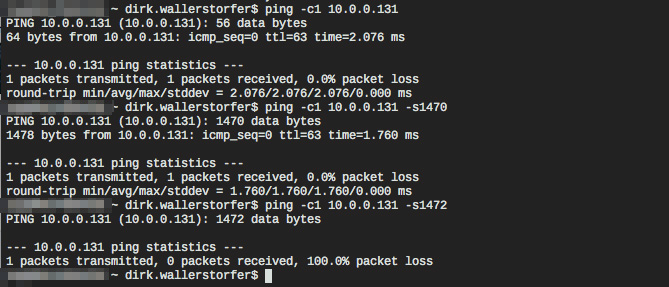
Interestingly, pings with large payloads weren’t answered. It was time to get to the bottom of this issue using some Network 101 analysis:
- Your average Ethernet frame is 1514 bytes long
- The Ethernet header takes up 14 bytes, which leaves 1500 bytes for payload
- The IP header is 20 bytes long
- The ICMP header is 8 bytes
- That should leave exactly 1472 bytes (1500 – 20 – 8 = 1472) for ICMP payload

The odd thing is, a payload of 1470 bytes works while a payload of 1472 bytes doesn’t work. This is only a 2-byte difference, which makes no sense. There is clearly a problem with large packets, but how on earth can it be off by 2 bytes? 2 bytes is essentially nothing; a VLAN header has 4 bytes and the link layer takes care of VLANs, so this doesn’t affect the payload size. Maybe IP options are the culprit? Nope, the IP header must be a multiple of 4 bytes. 2 bytes is simply inexplicable from a network protocol point of view. It’s time to send in tcpdump and Wireshark to the rescue.
Bring in the big guns
I start up Wireshark on my laptop and again ping the floating IP address of the OpenStack instance. No additional information; the last ping with a payload of 1472 bytes doesn’t receive a response.

The next step is to run tcpdump on the OpenStack controller node that also runs Neutron, the OpenStack networking component in my setup. Neutron takes care of capturing, NATing, and forwarding the ICMP message to the instance. To understand all the details of OpenStack networking in detail, please check out the official OpenStack Networking Guide. In short, OpenStack networking is a lot like Venice—there are masquerades and bridges all over the place!

Joking aside, the tcpdump on the controller reveals no further information.

However, it does show how many hops it takes to ping an OpenStack instance. The ICMP packet traverses the physical network from my laptop (10.0.0.100) to the floating IP address of the instance (10.0.0.131), several virtual interfaces and bridges, until it reaches the OpenStack instance on its private IP address (192.168.10.101), which in turn sends the response back to my laptop along the same route.

Once again, the ping with 1470 bytes of payload receives a response while the 1472-byte payload remains unanswered. However, we get some additional information. The packet vanishes before the destination address is changed to the private IP address of the instance and the packet is forwarded to the compute node that runs the instance. I checked the Neutron log files, Nova log files, and syslog, but couldn’t find anything. Eventually, I found something interesting in the kern.log file.

Remember the 2-byte difference we identified earlier? Here they are, causing the kernel to drop the packets silently because they’re too long. Now we have evidence that something is messing up the network packets. However, the questions remain; why and how? Analyzing the tcpdump with Wireshark sheds more light on the problem. Can you spot it in the image below?
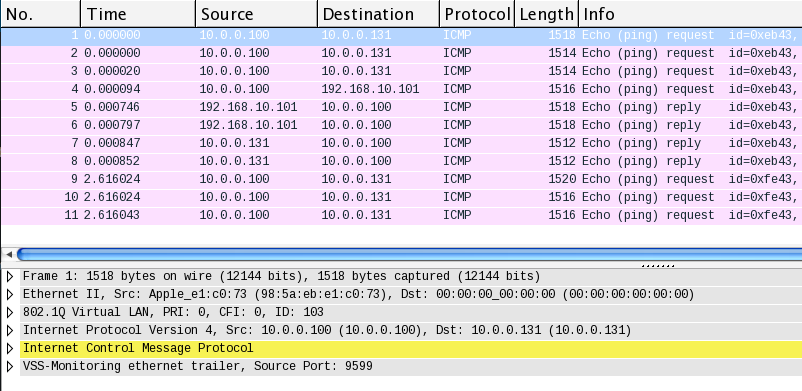
First, the destination MAC address is empty because we used tcpdump on “any” device. In that mode, tcpdump doesn’t capture the link-layer header correctly. Instead, it supplies a fake header. Secondly, the Ethernet frame No. 1 has a length of 1518 bytes, which is odd given the 1470 bytes of ICMP payload, 8 bytes of ICMP header, 20 bytes of IP header, and 18 bytes of Ethernet + VLAN header (1470 + 8 + 20 + 18 = 1516 bytes).
Have a look at the line VSS-Monitoring ethernet trailer, Source Port: 9599 in the Wireshark screenshot above, just below the yellow highlighted ICMP line.
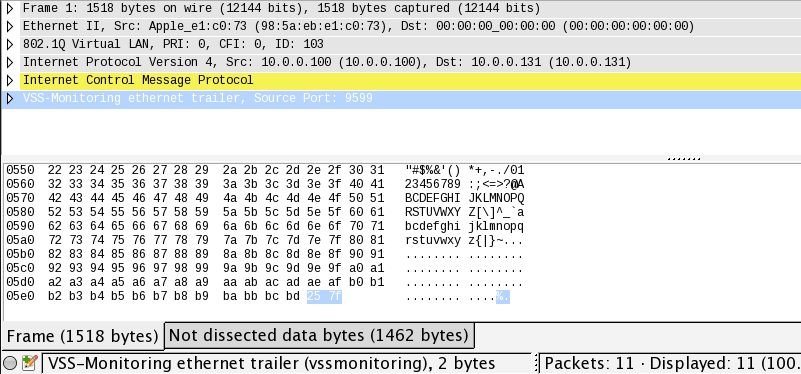
Finally, we’ve found the 2 additional bytes! But, where do they come from? Google tells us that this can be caused by the padding of packets at the network-driver level. I reconsidered my setup and identified the USB network adapter as the weakest link. To be honest, I suspected this might be the issue from the beginning, but I never imagined it would catch up with me in this way.
I downloaded and built the latest version of the driver and replaced the kernel module. Lo and behold, all my networking problems were gone! Pings of arbitrary payload sizes, SSH sessions, and file transfers all suddenly worked. In the end, my networking issues were caused by an issue with the driver that ships by default with the Linux kernel.
Lessons learned
I learned a lot while troubleshooting this issue. Here are my insights:
- First and foremost, use recommended/certified hardware for OpenStack and follow the recommendations of your distribution of choice. I spent a lot of time chasing down a bug that would have been avoided if I’d used appropriate hardware.
- Knowing computer networks and understanding OpenStack Neutron is mandatory for troubleshooting. Get familiar with the technologies you’re using.
- OpenStack works. There are huge setups out there working in production. When something doesn’t work as expected, the issue is likely not with OpenStack or its services.
- When troubleshooting, trust your experience and gut feelings!
- Have a monitoring solution in place that allows you to verify your assumptions!
How Dynatrace could have saved me time
If I’d used Dynatrace OpenStack Monitoring to troubleshoot this issue to troubleshoot this issue I’d have seen the impact on network quality on all of my monitored VMs. Additionally, I could have enabled Dynatrace log analytics to assist with troubleshooting from a log-analysis perspective. When your gut tells you that there may be troubles with MTU coming your way, you can proactively add the /var/log/kern.log file to Dynatrace log analytics and create a pattern-recognition rule (for example, over-mtu packet). With this approach, I could have received a notification each time this pattern appeared in the log files and I would have instantly known where to look for errors in the configuration… or in the network drivers.
Start a free trial!
Dynatrace is free to use for 15 days! The trial stops automatically, no credit card is required. Just enter your email address, choose your cloud location and install our agent.




Looking for answers?
Start a new discussion or ask for help in our Q&A forum.
Go to forum