Based on the result of the previous blog posts, we identified the microservice OrdersService that now has its own code repository and defines its own domain model. To launch this service in a staging (or pre-production) environment, it is not recommended to directly route traffic to this new service since we cannot fully ensure that it works as supposed. For this reason, we strangle the microservice around the monolith. In other words, all incoming requests will still be intercepted by the backend service, which forwards synthetic or live traffic to OrdersService.
In this blog post, we use feature flags to smoothly incorporate the new microservice into the monolith and utilize Apigee Edge to roll-out the new service gradually. In order to follow this part of the blog post series, you need three projects available on GitHub:
- backend-v2
- load-generation
- orders-service
Flashback and Goal for this Step
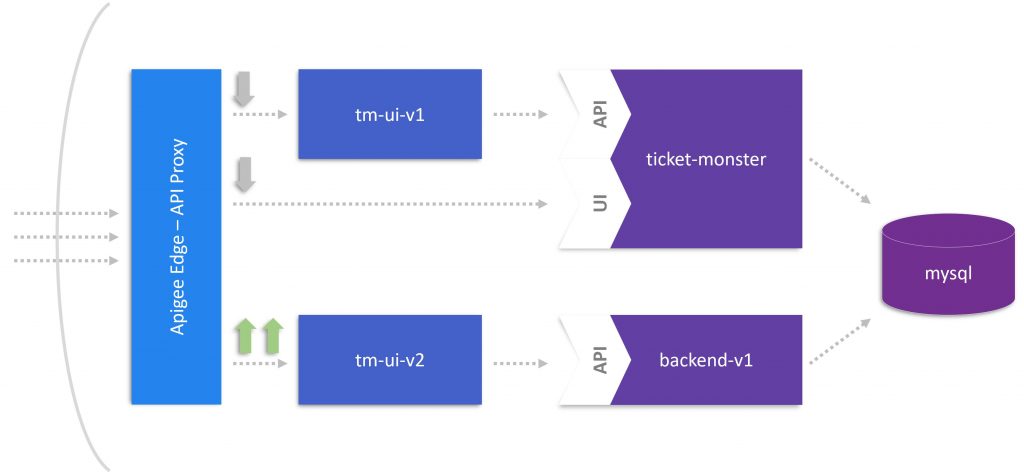
If you followed the storyline of our monolith to microservices journey, you will remember that we extracted the UI from TicketMonster in part 3. The below figure shows the final stage of part 3 illustrating the traffic redirected from tm-ui-v1 and ticket-monster to tm-ui-v2. This state concludes that the original monolithic application (ticket-monster) including the UI became obsolete because tm-ui-v2 with backend-v1 took over the entire load. In addition, we didn’t need the Apigee Edge API Proxy anymore because there was no need for rerouting UI calls.
In part 4, we leveraged Dynatrace to identify the microservice OrdersService, which we extracted from backend-v1. To introduce this microservice in a controlled manner, we follow the strangler pattern and created a new backend version (backend-v2) that intercepts requests to the microservice and calls the service depending on the business logic. The implementation of this feature is part of this blog and mentioned below.
With two backend versions in place, it makes sense to install an API Proxy in front of them. This proxy will implement the logic calling either backend-v1 or backend-v2 endpoints. In other words, we can control the calls of backend-v2 that uses OrdersService to process ticket bookings. The next figure provides an overview of the goal we want to achieve in this blog post.
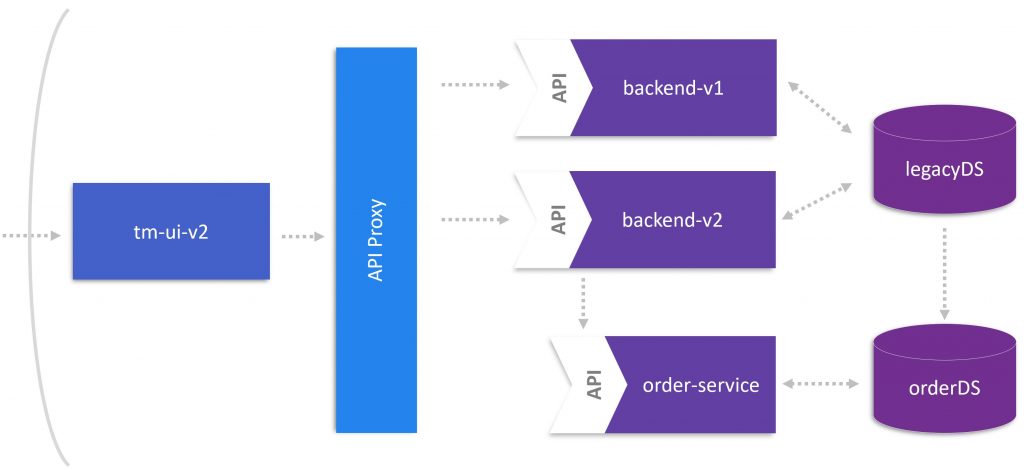
Strangling OrdersService around the Monolith
Launching the microservice OrdersService as self-living instance may end-up in a situation where we lose control and have a hard time finding issues related to the service’s behavior. Instead, we want to:
- send traffic to the new service in a controlled manner
- be able to direct traffic to the new service as well as the old code path
- instrument and monitor the impact of the new service
- deploy this new functionality to certain user groups
To address the above-mentioned concerns, Christian Posta recommends incorporating the microservice into the monolith in a way that allows to send no traffic, synthetic traffic, and live traffic to the microservice.
To implement this in code, Christian relies on the Feature Flags 4 Java (FF4J) framework that allows to define feature flags for the traffic control. Before putting feature flags in place, the functionality of the createBooking method in backend-v2 needs to be extracted to another method (createBookingInternal) since we don’t want to alter the existing code path. Besides, the functionality for calling OrdersService should be implemented in two additional methods: one for synthetic traffic (createSyntheticBookingOrdersService) and the second one for live traffic (createBookingOrdersService). Afterwards, refactoring createBooking would result in following method that is much smaller, more organized, and easy to grasp:
@POST@Consumes(MediaType.APPLICATION_JSON)public Response createBooking(BookingRequest bookingRequest) { Response response = null; if (ff.check("orders-internal")) { response = createBookingInternal(bookingRequest); } if (ff.check("orders-service")) { if (ff.check("orders-internal")) { response = createSyntheticBookingOrdersService(bookingRequest); } else { response = createBookingOrdersService(bookingRequest); } } return response;} |
To use FF4J, see the instructions on GitHub in project backend-v2. There, it is explained how to add the dependency and to declare the feature flag in the ff4j.xml configuration file. A deployment of backend-v2, as explained below, automatically starts the FF4J web console to en/disable the feature flags and to control how strong we incorporate the microservice into the monolith.
https://backend-v2.YOUR-SYSTEM-DOMAIN/ff4j-console
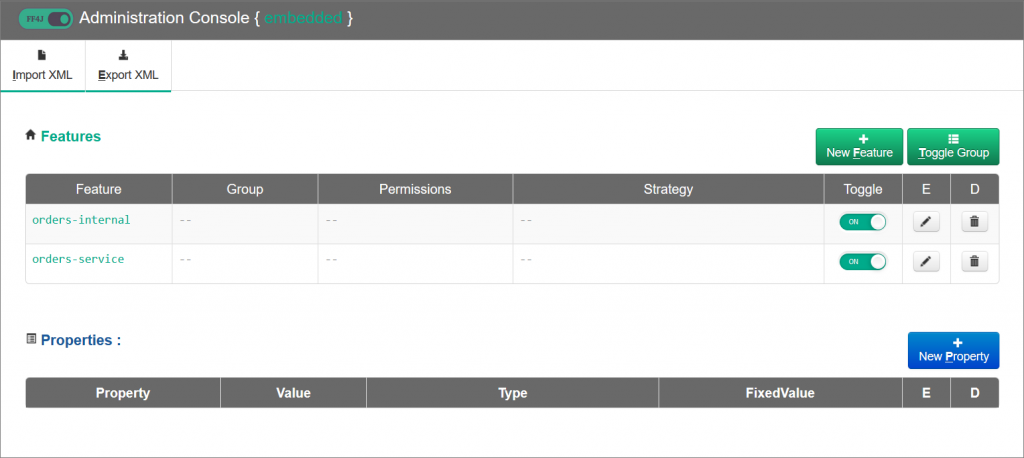
(Note: The features and their respective status (en/disabled) should be backed by a persistent store in any kind of non-trivial deployment.)
What we have now accomplished is a mechanism that provides flexibility in calling the new microservice. By default, we would deploy the backend with the orders-internal flag enabled sending no traffic to OrdersService. This should not change the service behavior. To start testing the new microservice, we would toggle the orders-service feature flag. With both flags enabled, a booking request is persisted by backend-v2 and synthetic traffic is sent to OrdersService. At the microservice’s side, we would process a ticket booking as implemented but rollback the data before completion. As a result, we can get a sense of how the new code path is executed and how it impacts the response time. Finally, and with enough confidence in how the microservice behaves, we can send live traffic to the microservice by disabling the orders-internal feature flag.

API Proxy for Backends
As stated above, an API Proxy in front of backend-v1 and backend-v2 is necessary to control the traffic to these endpoints. Therefore, we bind the Apigee Edge routing service to backend-v1 using the command cf apigee-bind-org.
This proxy is logically placed between the user interface and backend services of TicketMonster and can be altered using the following configuration settings.
<?xml version="1.0" encoding="UTF-8" standalone="yes"?><ProxyEndpoint name="default"> <Description/> <PreFlow name="PreFlow"> <Request> <Step> <Name>cf-get-target-url</Name> </Step> </Request> <Response/> </PreFlow> <Flows/> <PostFlow name="PostFlow"> <Request/> <Response/> </PostFlow> <HTTPProxyConnection> <BasePath>/backend-v1.YOUR.SYSTEM.DOMAIN</BasePath> <VirtualHost>default</VirtualHost> <VirtualHost>secure</VirtualHost> </HTTPProxyConnection> <RouteRule name="default"> <TargetEndpoint>default</TargetEndpoint> </RouteRule></ProxyEndpoint> |
Deployment of backend-v2 including orders-service
Back in part 3 of this blog post series, we scripted the deployment strategy for the new user interface. This script was sufficient until we had to implement a load balancer needed to deploy the user interface in a canary release manner. For the deployment of backend-v2, we now use the configuration settings Apigee Edge provides for ProxyEndpoints and TargetEndpoints to implement:
- a dark launch of backend-v2 to a selected user group
- a canary release of backend-v2 to end users.
Dark Launch
To model the dark launch, we add the following routing rule to the ProxyEndpoint definition. This rule checks whether the request header X-Dark-Launch is set to ‘internal’. If it is, the rule redirects the request to the target endpoint backend-v2.
... <RouteRule name="dark-launch"> <Condition>(request.header.X-Dark-Launch = "internal")</Condition> <TargetEndpoint>backend-v2</TargetEndpoint> </RouteRule> <RouteRule name="default"> <TargetEndpoint>default</TargetEndpoint> </RouteRule>... |
(Note: The default route rule is defined last in the list of conditional routes because rules are evaluated top-down in the ProxyEndpoint.)
Canary Release
To implement the canary release mechanism, we first define the target servers (backend-v1 & backend-v2) in the Environments settings of Apigee Edge ans as outlined in Load Balancing across Backend Services. Afterwards, we configure a new TargetEndpoint in our API Proxy as shown below. This configuration applies a weighted load balancing algorithm to route traffic to our target servers proportionally. In the example, 4 requests will be routed to backend-v1 for every 1 request routed to backend-v2.
TargetEndpoint-canary-release.xml
<?xml version="1.0" encoding="UTF-8" standalone="yes"?><TargetEndpoint name="canary-release"> <Description/> <FaultRules/> <PreFlow name="PreFlow"> <Request/> <Response/> </PreFlow> <PostFlow name="PostFlow"> <Request/> <Response/> </PostFlow> <Flows/> <HTTPTargetConnection> <LoadBalancer> <Algorithm>Weighted</Algorithm> <Server name="backend-v1"> <Weight>4</Weight> </Server> <Server name="backend-v2">a <Weight>1</Weight> </Server> </LoadBalancer> <Path>/{request.uri}</Path> </HTTPTargetConnection></TargetEndpoint> |
With this TargetEndpoint definition in place, we just need to change the second routing rule in the ProxyEndpoint. Hence, we rename it and set the target endpoint to canary-release.
ProxyEndpoint-canary-release.xml
... <RouteRule name="dark-launch"> <Condition>(request.header.X-Dark-Launch = "internal")</Condition> <TargetEndpoint>backend-v2</TargetEndpoint> </RouteRule> <RouteRule name="canary-release"> <TargetEndpoint>canary-release</TargetEndpoint> </RouteRule>... |
Use Dynatrace to Stay in Control
You want to see the deployment strategy in action? Perfect, let’s use Dynatrace that provides the insights therefore. To illustrate the scenario, we use a load generation script provided on GitHub in load-generation. Just follow the instructions and you can create real-user traffic on tm-ui-v2 that will be forwarded to the API Proxy. The next screenshot depicts a user traffic of approximately 130 requests per minute.
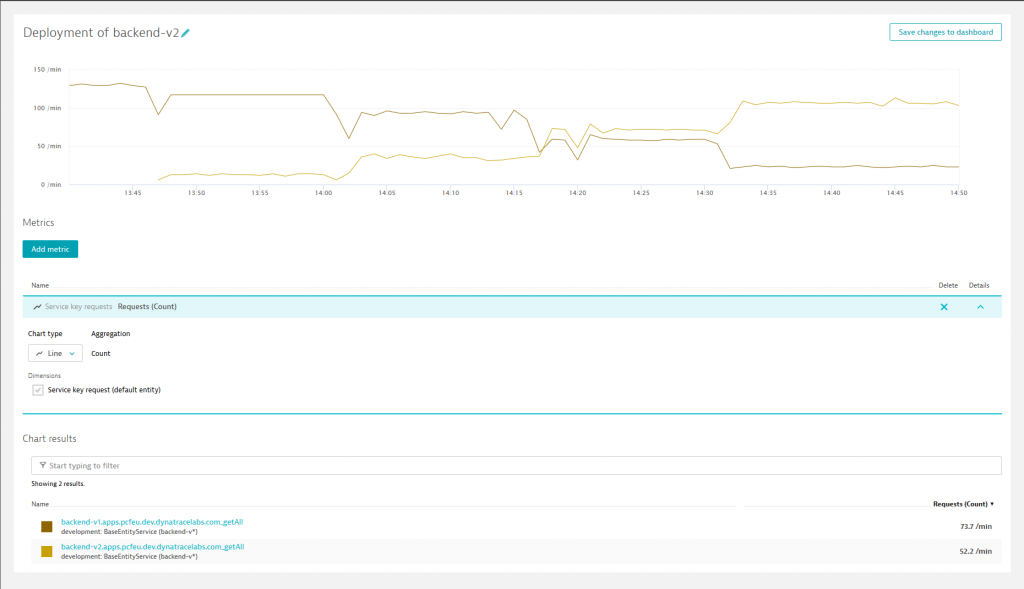
Around 1:47pm the dark launch was activated, routing users with the request header X-Dark-Launch set to ‘internal’ to backend-v2. This traffic represented about 10%. Since we did not notice any issues with backend-v2 and gained more confidence, we started a canary release shortly after 2:00pm. First, 25% (1/4 weights in canary-release.xml) of the remaining traffic were redirected to backend-v2. Afterwards, the weights were changed to take off 50% of backend-v1’s load around 2:15pm.
While we deploy the second version of the backend service, Dynatrace automatically recognizes backend-v2 as new service instance and adds it to the corresponding process group that already contains backend-v1. Consequently, two service instances are now displayed when opening the BaseEntityService details page and we can compare the number of processed requests and the response time of each instance.
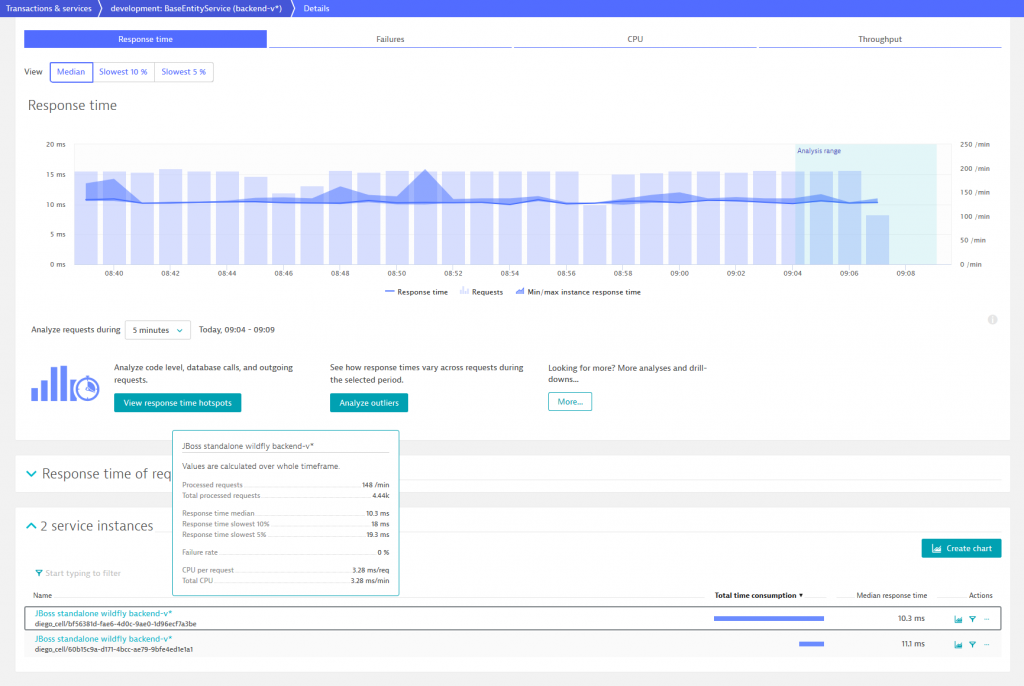
As we know, the new backend-v2 is supposed to call OrdersService when a user books a ticket on TicketMonster. Before we consider our new microservice, we make sure that the custom service detection rule, which was used to “virtually” break the monolith, is disabled and the orders-service feature flag is enabled. After checking these two conditions and booking a couple of event tickets the service flow of TicketMonster looks as follows.
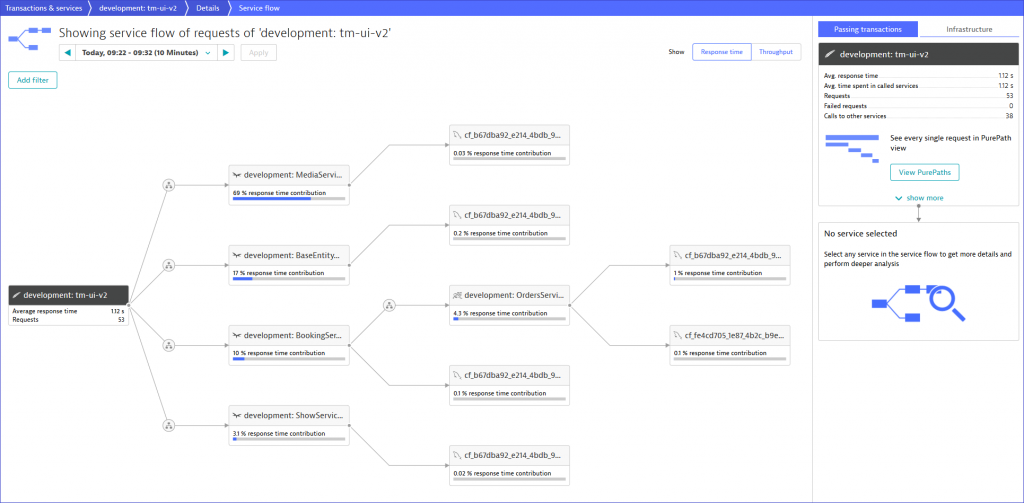
Great, our microservice is alive! Hence, we can see that BookingService calls OrdersService which has dependencies to two databases. These two dependencies were defined in the previous blog post where we built the domain model of the microservice composed of TicketMonster’s legacy and the microservice’s own database.
Wrap up and Outlook
Let’s pause a minute – it’s time to summarize our achievements. First, we implemented a mechanism that incorporates OrdersService into the monolith by using feature flags. Second, we released the new backend version with the microservice applying a dark launch and canary release strategy. We have already used this deployment approach in previous stages of the journey, but today we relied on native Apigee Edge means. Based on that, we release backend-v2 and orders-service in a controlled way and continuously monitored by leveraging Dynatrace.
The further steps could focus on identifying and extracting the next microservice. Before going this way, it is important to reconsider that there are two remaining issues regarding OrdersService. First, we introduced technical debt into the backend represented by the features flags that becomes obsolete as the microservice matures. Second, the database of the microservice is indirectly linked with the legacy database. To let OrdersService run as self-living component and to have a clean code solution, it is important to fully decouple the database from the monolith and to clean up the technical debt.
What’s next? Your monolith to microservices journey! This blog series introduced concepts, best practices, and effective techniques for you to conquer your own monolith and to break it up into microservices. Go ahead and take on the challenge! If you do so, you can let us know (@braeuer_j) – all the best with your own journey!




Looking for answers?
Start a new discussion or ask for help in our Q&A forum.
Go to forum