
Making applications observable—relying on metrics, logs, and traces to understand what software is doing and how it’s performing—has become increasingly important as workloads are shifting to multicloud environments. OpenTelemetry, the open source observability tool, has become the go-to standard for instrumenting custom applications to collect observability telemetry data.
In the first part of this series, The road to observability with OpenTelemetry part 1: Identifying metrics and traces with OpenTelemetry, we took a look at the concept of observability, what it is, and how it can help us better understand the performance and runtime details of our applications. For that, we focused on OpenTelemetry as the underlying technology and showed how you can use the available SDKs and libraries to instrument applications across different languages and platforms. We also introduced our demo app and explained how to define the metrics and traces it uses.
The second part, The road to observability with OpenTelemetry part 2: Setting up OpenTelemetry and instrumenting applications, covers the details of how to set up OpenTelemetry in our demo application and how to instrument the services.
For this third and final part of our series, we saved the best for last: How you can enhance telemetry data even more and with less effort on your end with Dynatrace OneAgent.
The next level of observability: OneAgent
In the first two parts of our series, we used OpenTelemetry to manually instrument our application and send the telemetry data straight to the Dynatrace analytics back end. As Dynatrace natively supports the OpenTelemetry protocol OTLP out of the box, that worked seamlessly and only required access credentials and the right API URLs. With that, we could make use of the full set of OpenTelemetry’s features to instrument and monitor our applications in the Dynatrace back end, including traces with spans and metrics.
However, this method limited us to instrumenting the code manually and collecting specific sets of data we defined upfront. While this worked fine for our applications, there certainly are many more interesting data points about the environment that the OpenTelemetry-only method misses.
Think about items such as general system metrics (for example, CPU utilization, free memory, number of services), the connectivity status, details of our web server, or even more granular in-application tasks like database queries. We have not collected any of that yet, even though all of this data may be particularly useful when debugging an issue. And that’s where Dynatrace OneAgent comes in.
What is OneAgent?
OneAgent is the native telemetry data collector and monitoring solution of Dynatrace. It is available for the major OS and cloud platforms (for example, Windows, Linux, Solaris, AWS, Azure, and more) and only requires the deployment of a single service to monitor its environment.
The beauty of OneAgent is it’s a drop-in solution and monitors every supported technology (for example, .NET, Java, PHP, Node.js) with little to no manual work required from your side.
OpenTelemetry support
Before we look at the wider monitoring capabilities of OneAgent, let’s first install OneAgent and quickly enable it with our existing OpenTelemetry setup.
You may not be surprised to learn that OneAgent actually works out of the box with OpenTelemetry. Once you enable OpenTelemetry as one of the OneAgent technology categories on the Dynatrace dashboard, OneAgent will automatically detect your application’s traces and metrics and route them automatically to your Dynatrace account.
To enable OpenTelemetry in the dashboard, go to Manage > Settings > Preferences > OneAgent features, select OpenTelemetry, and enable ingestion for the relevant platforms. In our case, we’ll choose the following two:
- OpenTelemetry (Node.js)
- OpenTelemetry (PHP)
Tip: Restart services
After you installed OneAgent, please restart the services you would like it to monitor, in this case, the two services that make up our app. OneAgent can only monitor applications that were launched after its own initialization.
With OneAgent now listening to OpenTelemetry, we should be all set and our OpenTelemetry data should be captured by OneAgent. How can we verify that? By disabling the two OTLP exporters (for traces and metrics) in our PHP and Node.js initialization files. With them disabled, OneAgent should still collect the data and it should show up in your Dynatrace dashboard.
Beyond application instrumentation: Ingesting contextual telemetry data
Although this setup is good, just automatically ingesting OpenTelemetry data is not our goal. We’d like to get deeper insight into the host, the underlying operating system, and any third-party services used by our application.
Let’s take a look at what kind of additional telemetry data we will have at our fingertips with OneAgent.
Host monitoring
We start off with the very first layer: the host itself.
Heading over to `Infrastructure` / `Hosts` in your dashboard, you should now have an entry for the host where you installed OneAgent.
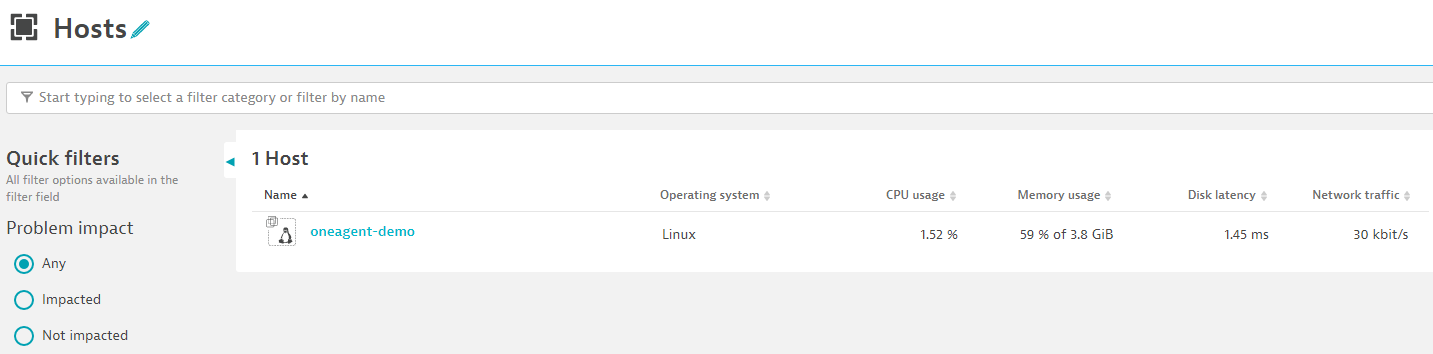
From here, you can drill down further, all the way to the OpenTelemetry traces.
Let’s select that entry now, and we should get a page similar to the following:
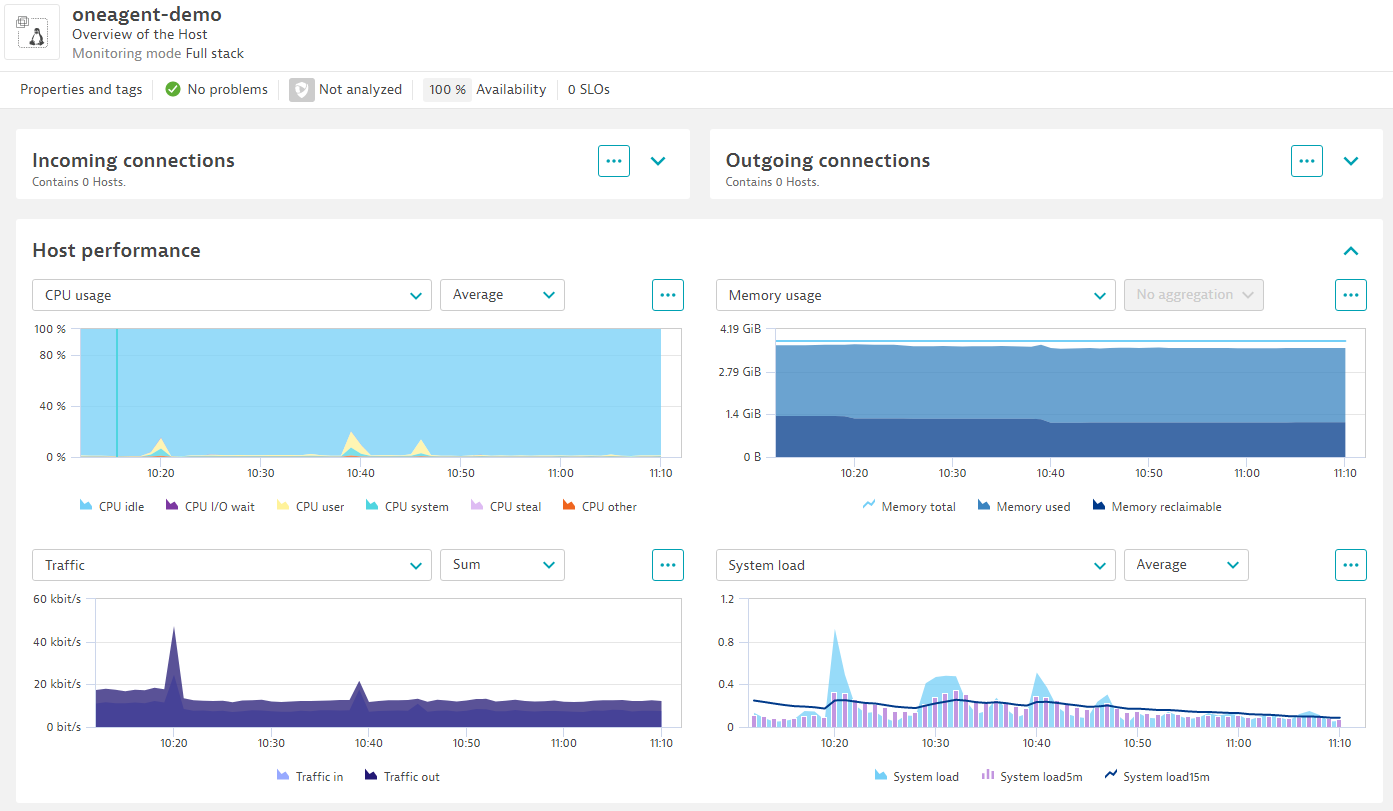
Here, we find at a glance details and metrics about our host machine and its service state, such as the following:
- Incoming connections
- Outgoing connections
- Host performance
- Process analysis
- Disk analysis
- Network analysis
- Memory analysis
- Events
- Logs
“Host performance”, for example, provides us with an overview of basic machine statistics like CPU utilization, memory usage, disk throughput, network traffic, and more. This allows us to quickly tell whether the network link may be saturated or the processor is running at its limit.
The other sections on that page (such as Disk analysis) provide further information and charts on topics such as available disk space, latency, dropped network packets, refused connections, and more.
Application and service monitoring
What will be of particular interest to us here is “Process analysis”.
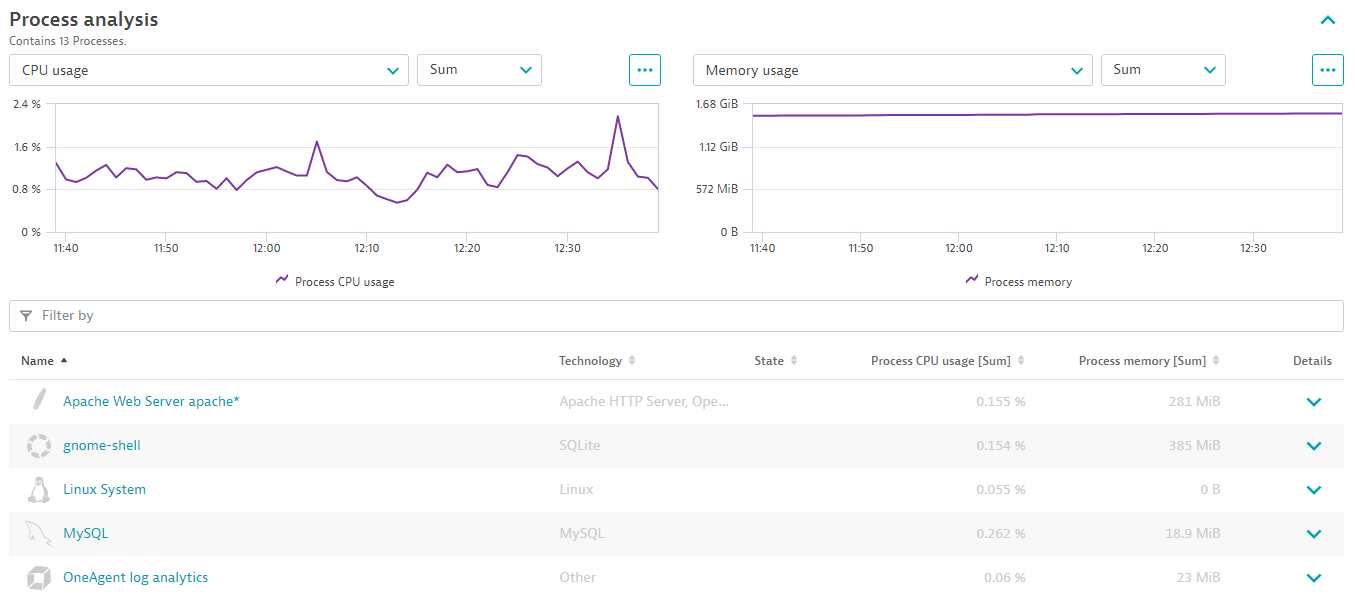
One of the key features of OneAgent is not only its ability to monitor the host itself and the system metrics but also to gain deep insight into the applications and services the machine is running.
This is not just a list of running processes and their CPU and memory details (“top” came to mind), but OneAgent can instrument (almost) any application on your system—automatically.
Let’s take our previous screenshot as an example. While we did instrument our two applications and successfully got their telemetry data, we did not tell OneAgent (let alone configure) anything about Apache or MySQL. Yet, we have two entries for these two services in our list.
Apache and MySQL are among the technologies supported by OneAgent. Hence it could detect, instrument, and monitor them. Let’s click “Apache Web Server apache” now.
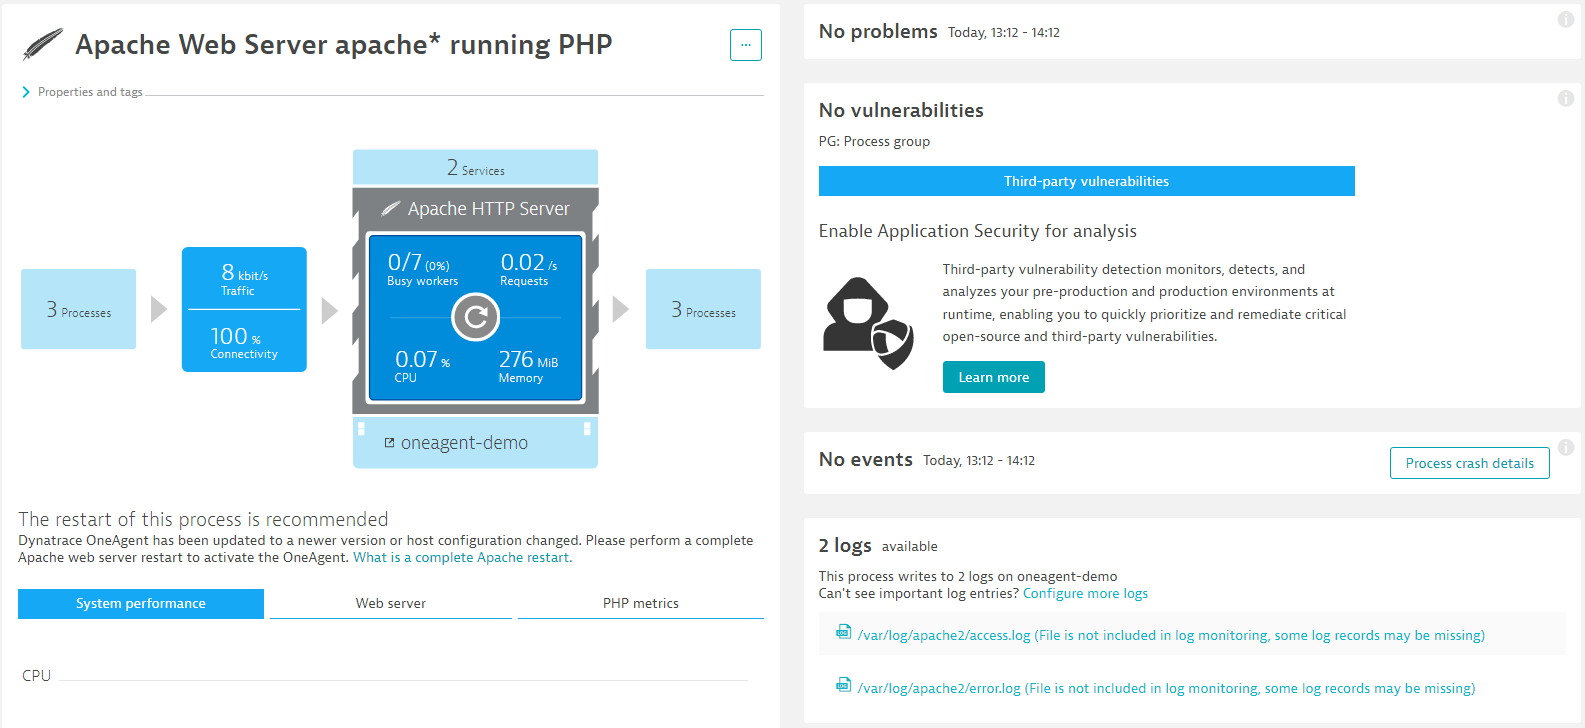
This leads us to the process page of our specific Apache instance. Process pages show basic runtime information about the process (such as uptime, memory usage, CPU utilization, and number of threads) and additional information. That additional information is always specific to the type of process and the telemetry data OneAgent can gather.
In the case of Apache, for example, we also get charts and statistics on the number of requests and traffic per second, the workload distribution across worker threads, and even details on the PHP runtime, like OPcache and garbage collection data.
On the other hand, if we checked out the process page for our Node.js instance, we’d find details on suspension times and used heap memory.
But that’s not all yet, next we’re going to open a nice bottle of RUM – arr!
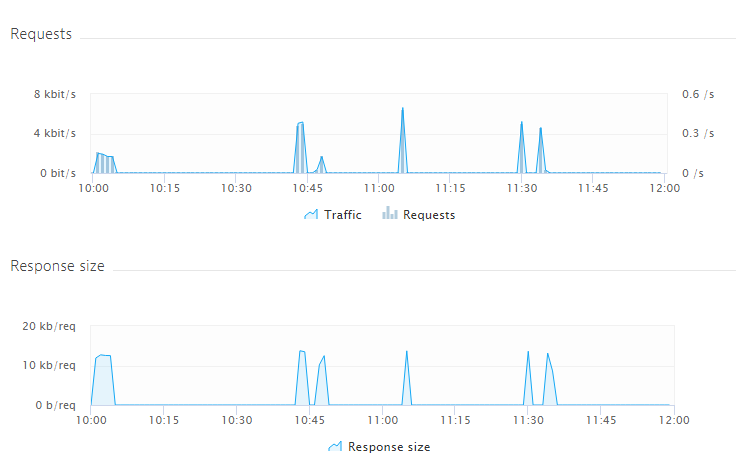
Analyzing telemetry data: RUM – Real User Monitoring
If you go to `Applications & Microservices > Frontend`, you’ll notice that we now have one new entry there.

This will get us straight to the application page, where we get more insight on how our front end actually performs.
Tip: RUM adds a JavaScript snippet
RUM – or real user monitoring – adds a snippet of JavaScript code to your site, which allows for the monitoring of the interactions your visitors perform on your site in the browser. This provides a very elegant and transparent solution to observe how your visitors use your site and to easily record typical usage patterns and potential errors.
Among the usual details, like the top N errors and pages, we’ll find here the two main areas for performance analysis and user behavior.
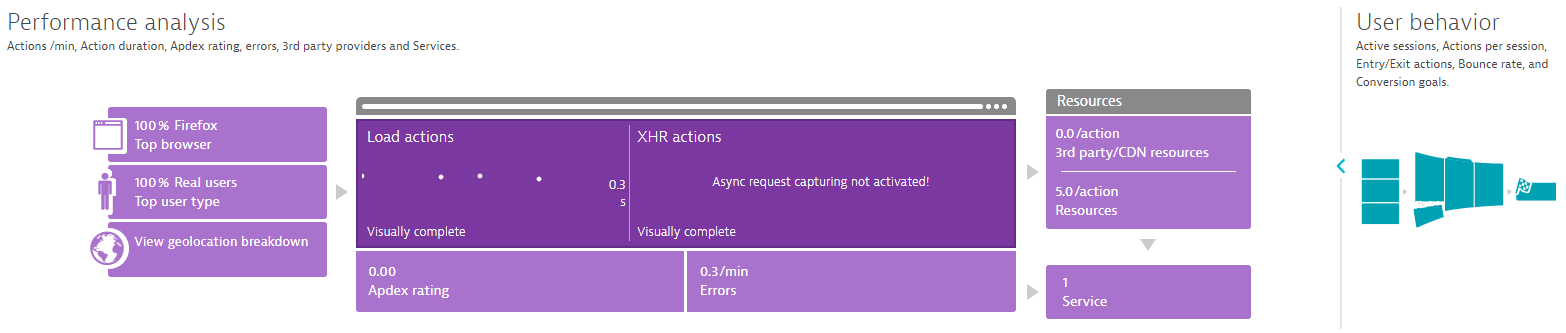
Performance analysis covers the technical aspects of the service, such as error rates, geo-locations, XHR actions, and user-bot ratio. User behavior, on the other hand, provides us with details on user retention, sessions, bounce rates, and user engagement.
All of which, without the need to access or analyze web server logs. Most importantly, this information does not only cover the server side, but, thanks to RUM, also the client side and events in the browser.
In the top right corner, you can also click `Analyze user sessions` to drill down into individual sessions and get detailed insight into how a particular user experienced the visit (note the replay feature, please).
Database monitoring
Once more, under Applications & Microservices, we’ll also find Databases. This part of the dashboard lists the database instances OneAgent found and started monitoring. This did not require any manual configuration on our side., OneAgent managed to find and identify the instances automatically.
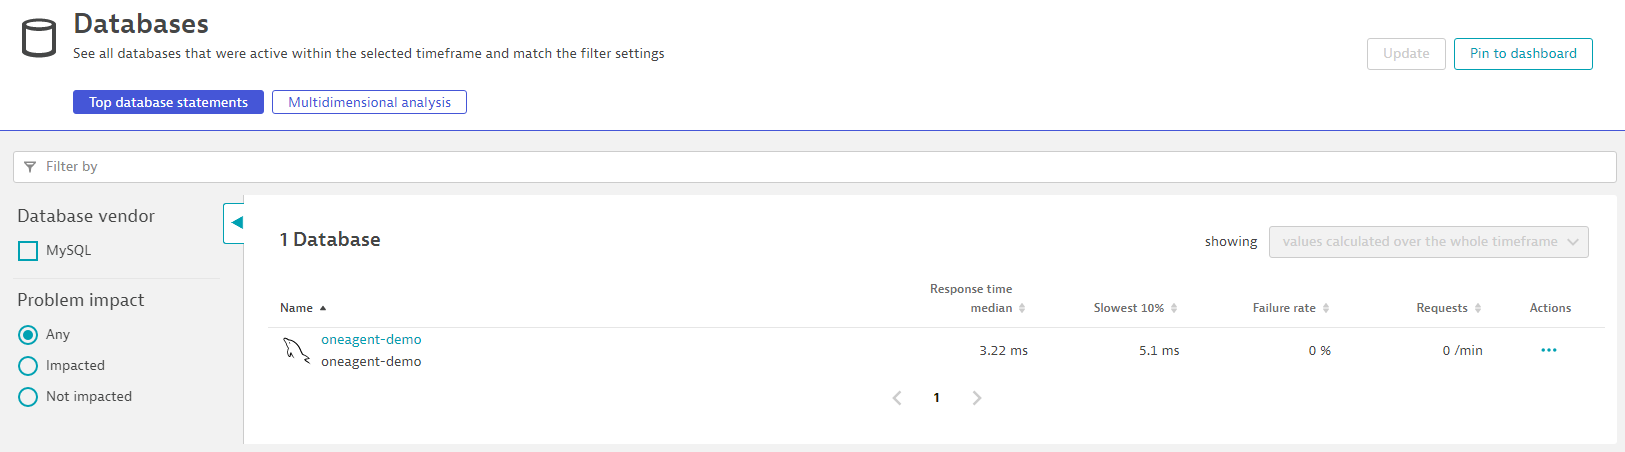
Because we’re using MySQL as the data store for our application, we’ll find its entry here; selecting it shows us the details.
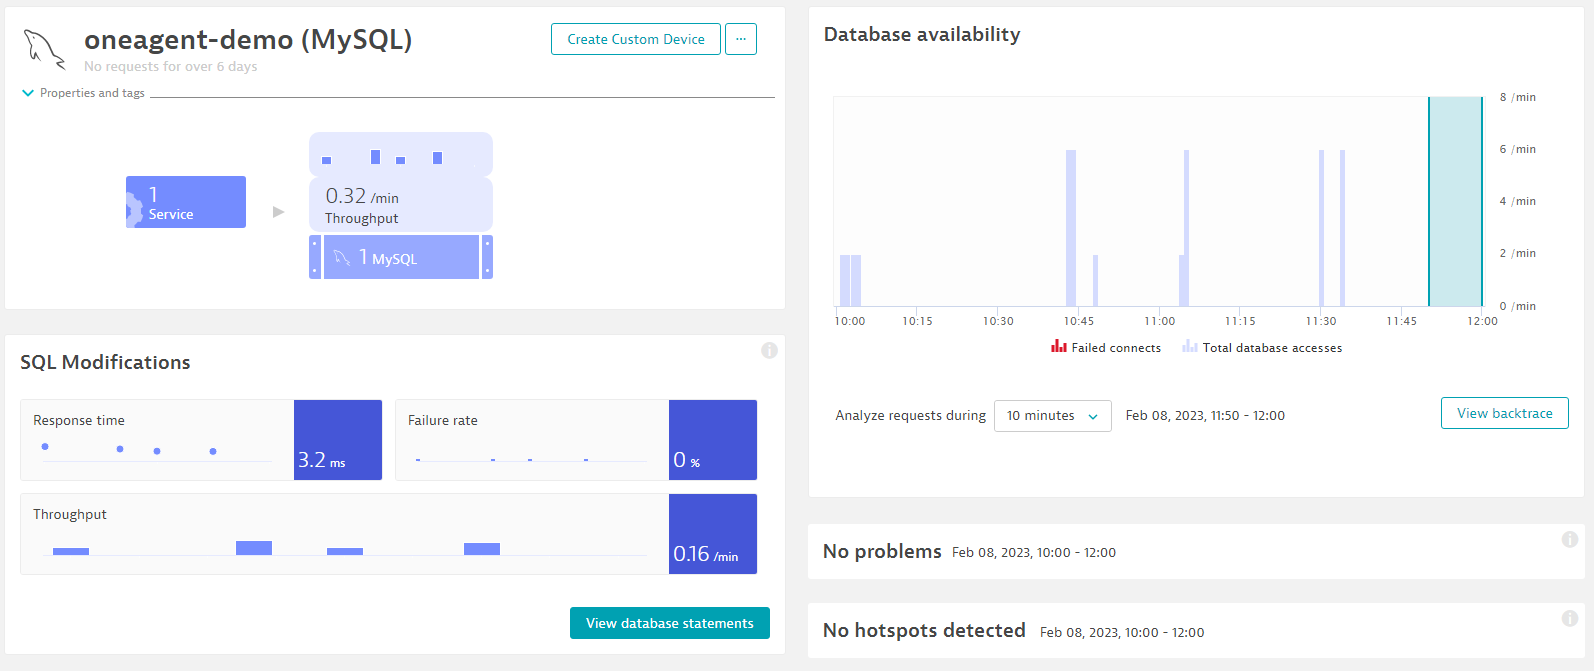
Here, we can find statistics on the overall availability of the database, connections, queries, and errors. Each tile allows us to further go down and find out more about the specific topic.
For example, `View database statements` will provide details on the individual database queries, their average execution duration, and possible errors. This alone can already greatly help in identifying slow query hot spots and speed up your platform by making sure queries are optimized. Who wouldn’t like to avoid the infamous missing column index?
Analyzing telemetry data: Metrics, metrics, and more metrics
Last but not least: metrics
If we visit Observe and explore > Metrics, we’ll notice there are now quite a few more metrics than before.
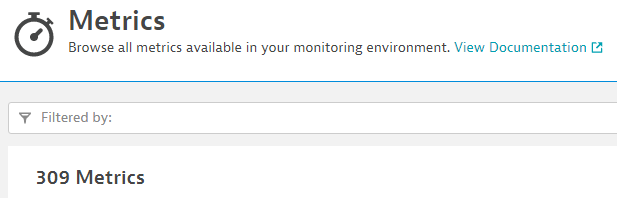
Not bad! Now let’s take a look at a couple of examples of what OneAgent delivers here out of the box.

CPU usage tells us how busy our CPU was over the selected period. In our screenshot, we went up to almost 50% utilization. By clicking the spike, we can drill down to learn what caused it so we can know whether we need to take further action. Tracking CPU usage helps identify performance bottlenecks, optimize resource utilization, plan for scalability, detect performance degradation, and monitor overall system health.
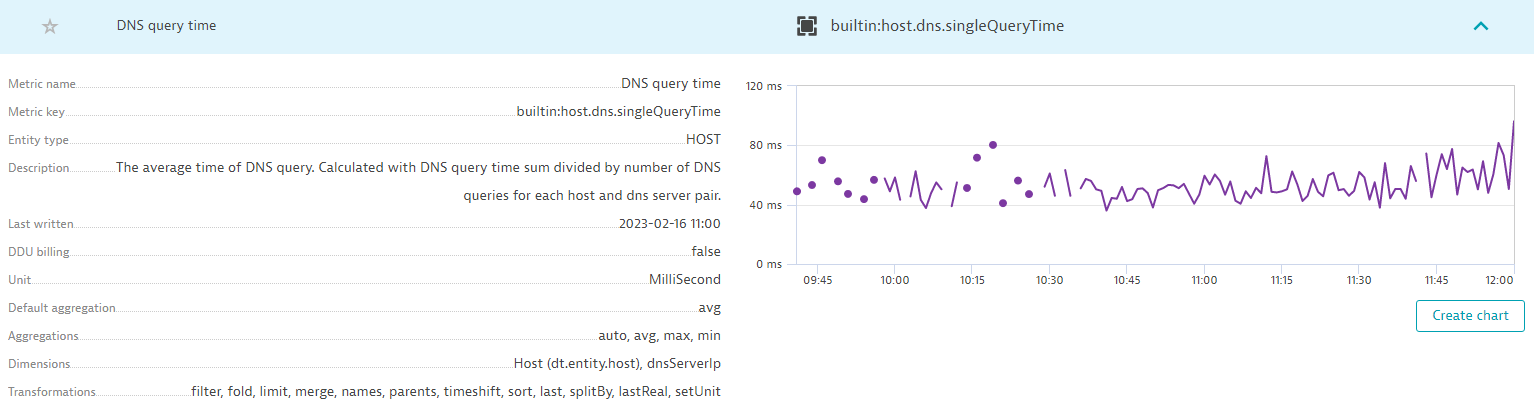
DNS query time indicates the average response times of DNS requests across the system. Monitoring DNS query time is important for understanding network latency, ensuring that services are available, troubleshooting issues, and optimizing application performance. It helps you identify and address DNS-related problems that can impact the overall performance and availability of your application, which can improve the overall user experience.
HTTP 400s
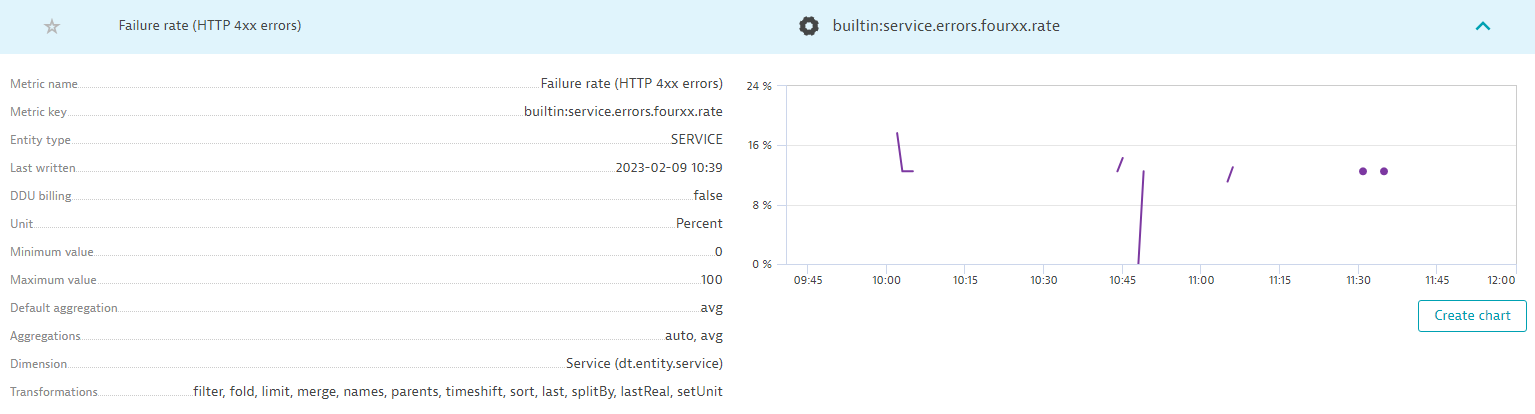
HTTP 400s shows the number of HTTP 400 codes (client errors) our system experienced. Tracking HTTP 400 errors helps you identify errors, which improves user experience, ensures application stability, and optimizes performance.
Garbage collection count
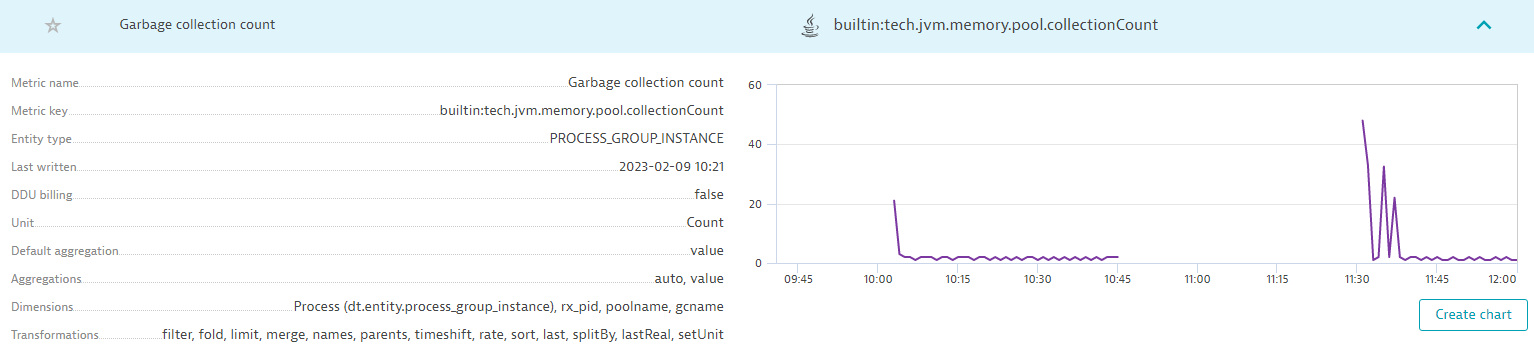
Garbage collection is JVM related and indicates how often the Java GC ran. Monitoring garbage collection rates provides insights into memory management, helps detect memory leaks, assesses performance impact, facilitates tuning and optimization, and aids in capacity planning.
Time spent in database calls
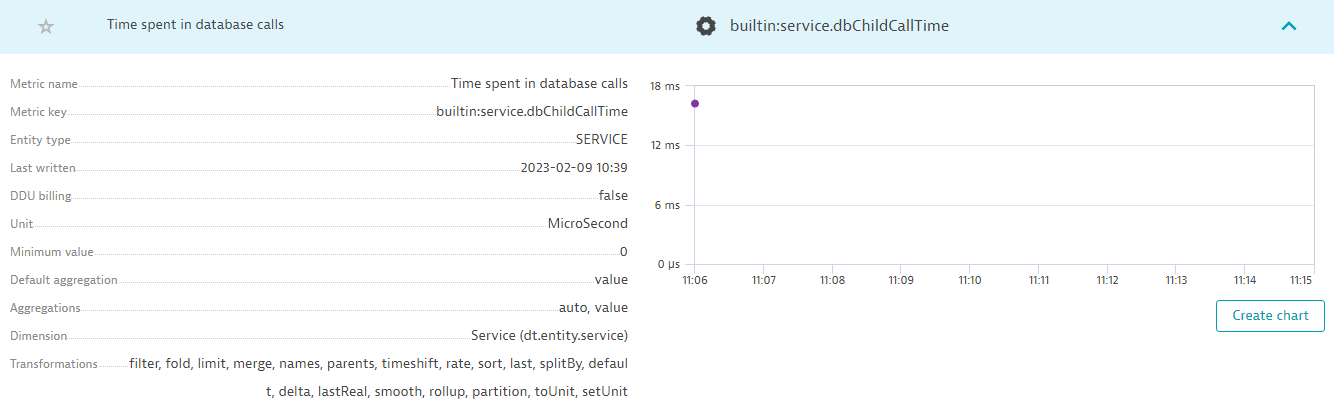
Time spent in database calls indicates how much time our database calls took. By monitoring the time spent in database calls, you can analyze response time to identify and address database-related performance issues, such as insufficient resources, disk I/O problems, or locking and concurrency conflicts.
This list is, of course, just a fraction of metrics computed and supplied by OneAgent, But it shows that the understanding of the system goes beyond traditional system monitoring and, instead, tries to get a full picture of the system and services (such as collecting JVM specific information).
OpenTelemetry + OneAgent = Full Observability
When we started our adventure in The road to observability with OpenTelemetry part 1: Identifying metrics and traces with OpenTelemetry, our application employed the usual approach of logging status information line by line. By introducing observability with OpenTelemetry, we already managed to get a much clearer picture of what is going on, as we can literally trace each request. This became particularly useful when we managed to make traces work across services, as that gave us the opportunity to follow workflows end-to-end, from when we receive a request all the way to when we send the response.
While this provided better and much more detailed insight, we still missed out on quite a bit of other runtime information, which can substantially enrich the set of information we might need when we analyze our service.
That’s exactly where OneAgent came in, as its seamless, on-the-fly approach to monitoring and observability managed to complete that very picture by providing a broad range of metrics and data points, which would have been difficult to impossible to obtain with vanilla OpenTelemetry instrumentation.
I hope the three parts of this series gave you a good overview of observability, tracing, metrics, OpenTelemetry, OneAgent, and the Dynatrace platform overall and explain why observability can be an essential tool in understanding and debugging your applications and systems better.
Observability Clinic, OpenObservabilty without boundaries with Dynatrace
To learn more about how Dynatrace connects all of your observability data from any source, join us for the on-demand Observability Clinic with Dynatrace observability expert, Henrik Rexed.


Looking for answers?
Start a new discussion or ask for help in our Q&A forum.
Go to forum