
When migrating applications to the cloud, we apply one of the 6-R Migration Patterns for each app: Retain, Retire, Re-host, Re-platform, Re-purchase or Re-architecture. Monoliths that get migrated often end up in the Re-Architecture bucket which involves breaking the monolithic code base into smaller components and potentially replacing some parts with existing cloud services.
Earlier this year, I wrote an 8 Step Recipe to break Monoliths and my colleagues Johannes and Jürgen followed with a Hands-On Tutorial blog series targeted to move Fearlessly from Monoliths to Microservices on Kubernetes/OpenShift and Cloud Foundry platforms.
After presenting our story several times at different Cloud conferences we were pleased to hear that Mandus Momberg and Carmen Puccio picked up our approach and started advocating it in their communities. In August they reached out to us and invited us to co-present at AWS re:Invent 2018 in Las Vegas.
The following 8 minute demo video is one we used at re:Invent. We picked our sample application easyTravel, broke that 2 piece monolith (frontend and backend) into containers, deployed it on AWS Fargate and optimized it until it provided better performance as the monolith. The video shows the necessary steps to learn more about the monolith, virtually break it, bring it into the containerized world (in our case AWS Fargate), compare it with the monolith and optimize it until it provides the desired business and technical outcome:
As we had to cut the demo video short to fit into the time budget we had for re:Invent I thought to give you a bit more background on each step. If you are up for it, try breaking any monolith yourself by simply replicating what I did with our sample application easyTravel. Also wanted to say Thank you to my colleague Nico Stehle for helping me with the video editing!
Step 1: Installing OneAgent
I started with installing easyTravel on an EC2 Linux machine. Then I signed up for a Dynatrace SaaS Trial and installed a Dynatrace OneAgent on that EC2 machine. I automated that step by baking it into the launch scripts of my EC2 machine. In case you don’t run on Linux or EC2 no worries, the OneAgent is available for Windows, Linux as well as PaaS Platforms such as CloudFoundry, OpenShift, Azure or any flavor of Kubernetes. Simply follow the steps for Deploying a Dynatrace OneAgent and you should be all set!
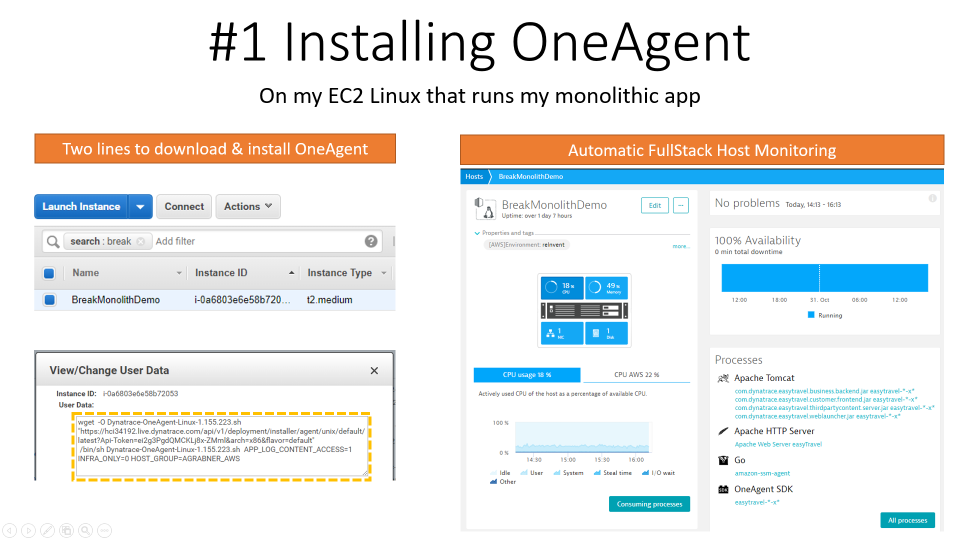
Tip: I always use the host monitoring insights (CPU, Memory, Disk, Network) as input for upcoming sizing activities. And even if you don’t end up moving the monolith – you may find out that you are currently running it on an over- or under-provisioned infrastructure -> a situation you can fix right away!
Step 2: Explore Dynatrace Data
By default, Dynatrace gives you FullStack horizontal (who talks to whom) and vertical (what runs on what) dependency visibility as part of Dynatrace Smartscape! All without a single line of code or configuration change – just by installing the OneAgent. Through the AWS CloudWatch Integration, we can pull in extra metrics and meta data such as Tags. The same capability is available for other Cloud and PaaS Platforms!
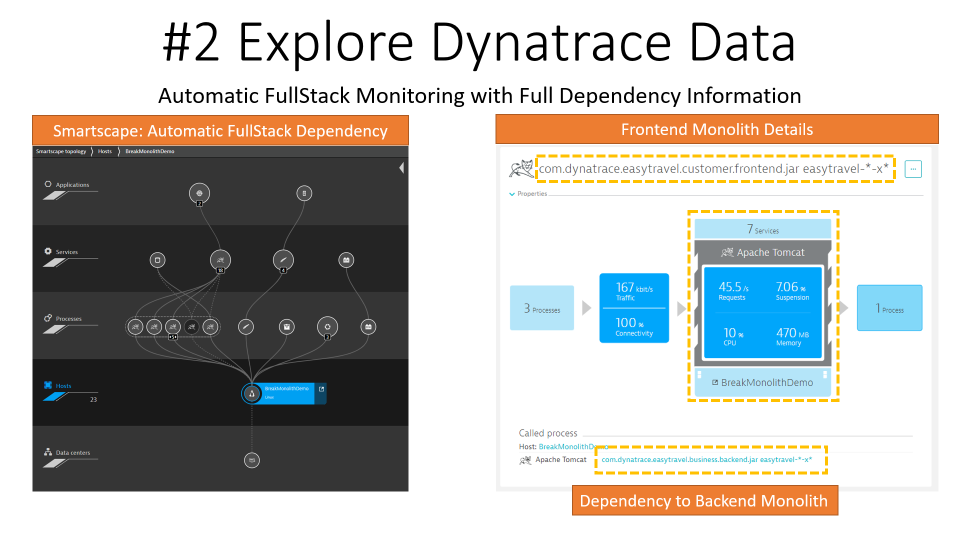
Tip: Seeing which processes make up the monolith has been an eye-opener for many teams I have done this exercise which. “Oh – we completely forgot about the dependency to this legacy process we introduced 5 years ago!” – that’s a common thing you hear!
Step 3: Understanding the Monolith
Next step is to learn about the Top APIs and Endpoints that the monolith exposes and how requests per endpoint are flowing through the monolithic architecture. Dynatrace provides this information out-of-the-box. The auto-service detection even virtually breaks our monolithic code-base into smaller logical services and detects any dependencies to databases, queues or external services:
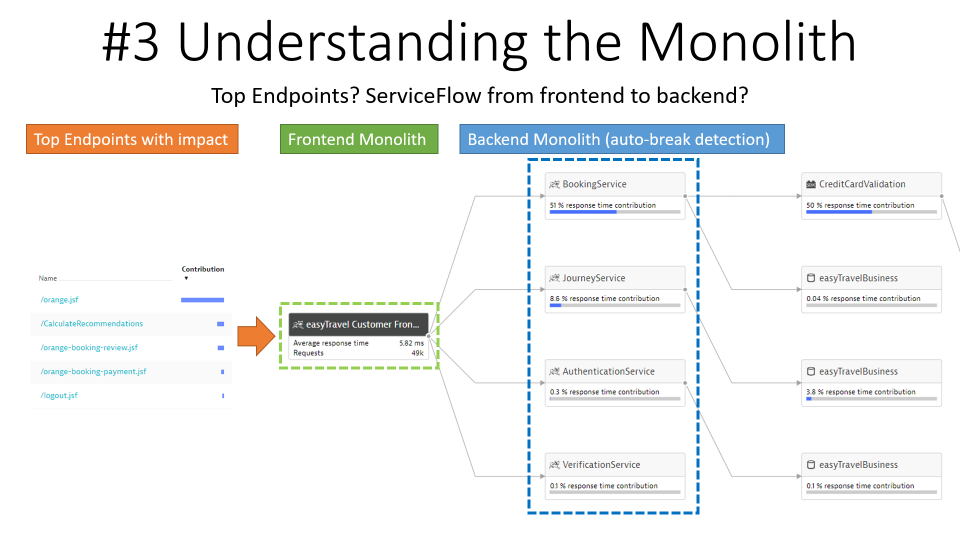
Tip: I always look at the Top Endpoints and analyze them by Throughput and CPU consumption. This allows me to think about extracting those endpoints first that either have a high volume or that consume a lot of CPU. Extracting those “heavy hitters” from the rest of the monolith and optimizing them separately is much more efficient than taking random guesses on what to extract and where to start optimizing.
Step 4: Virtually Break the Monolith
In Step 3, I already got insights into the Backend service as the OneAgent automatically detected the BookingService, JourneyService, … – this is done through Dynatrace’s built-in auto service detection rules. Dynatrace allows me to extend these rules by defining my own “Custom Service Entry Point” rules. These rules can be defined for class or interface methods that I consider “good candidates for extraction”.
Once defined, Dynatrace treats calls to these methods as a call into a separate “virtually extracted service” following them end-to-end through the monolith. In the case of easyTravel I defined custom entry points for the Find Journey Bean and then learned more about the dependencies of that piece of the monolithic codebase to other parts of the monolith. I also learn which endpoints are calling that service as I can leverage the Backtrace feature which shows the details of the originating request, e.g: URL, Parameters …:
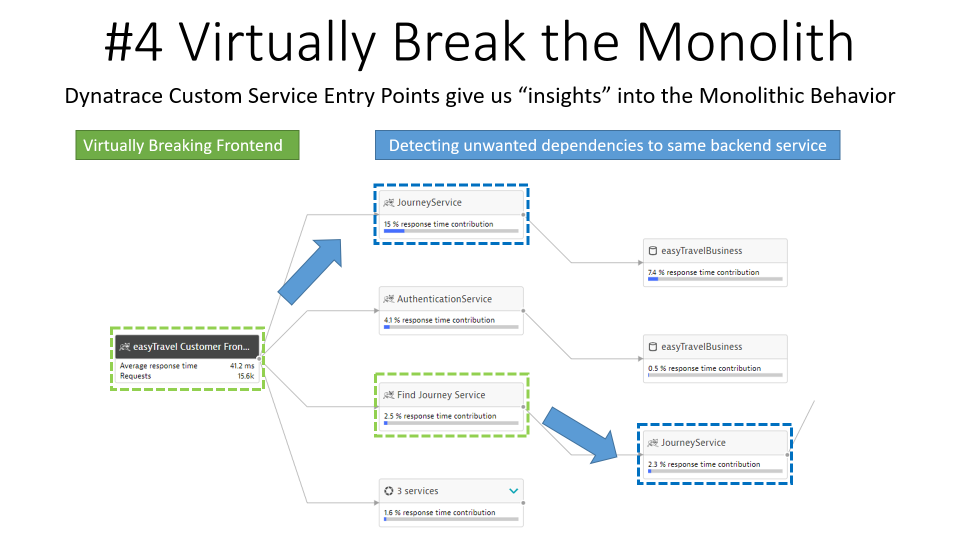
Tip: For easyTravel, it was easy to find entry points as I am quite familiar with the code base. When working with our customers I try to involve architects and developers in that conversation as they typically have their own ideas on where to break the monolith. Another option I use often is the CPU Hotspots Analysis to pinpoint methods in custom code packages that consume a lot of CPU. Once I found a method I backtrace the call stack until I find the first method in that code package. That’s then my candidate for a custom service entry point! I explained that in more detail in the 8 Step Recipe blog.
Step 5: Containerize, Deploy, Monitor
For our demo at re:Invent, we wanted to show how we can take the gained insights in Steps 1 through 4, refactor the app, put it into containers and then run it on Fargate.
The good news for us was that our easyTravel dev team already built containers for the key components of easyTravel: Frontend, Backend, Database & Load Generator. Carmen Puccio then helped me with a CloudFormation Template that created my AWS ECS Cluster and deployed the containerized version of easyTravel on Fargate. The only thing I had to do is add the Dynatrace OneAgent to these containers. Thanks to my colleague Alois Mayr and our Cloud Platform Engineering Teams for making this as easy as adding two lines to the Dockerfile. This will download and activate the OneAgent as documented here:
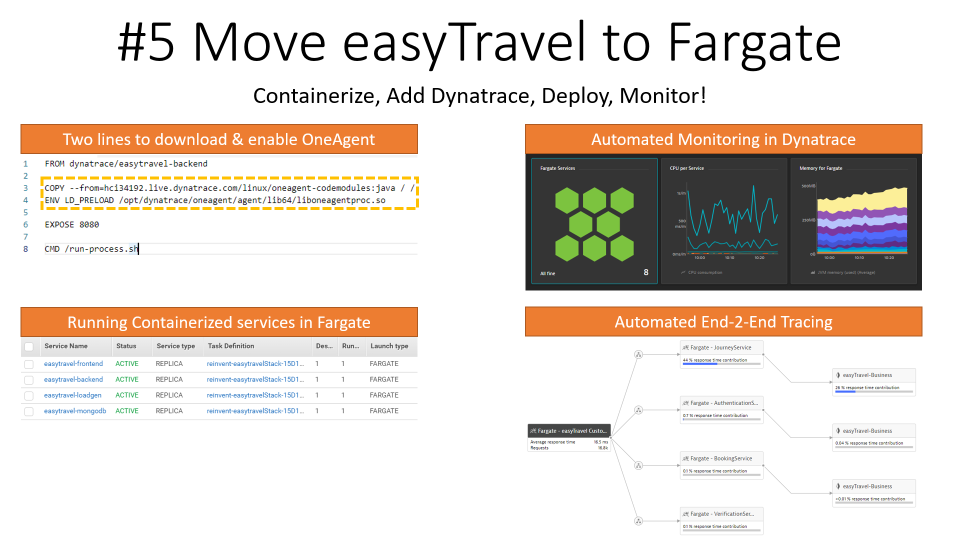
Tip: In my case we moved to AWS Fargate but Dynatrace will work with any Containerized platform. If you run on CloudFoundry, OpenShift, Azure, GCP, Kubernetes or any other platform check out how to deploy the OneAgent to monitor containers on these platforms. For most platforms you don’t need to modify the Dockerfile.
Step 6: Before vs After – Who is Better?
The last step of migration is to validate that the migrated version is at least as good, preferably better than the initial monolith. In case that is not the case you want to keep refining your “extraction/breaking points”. Thanks to Dynatrace we have FullStack and Code Level Visibility for both architectures and can easily compare the difference:
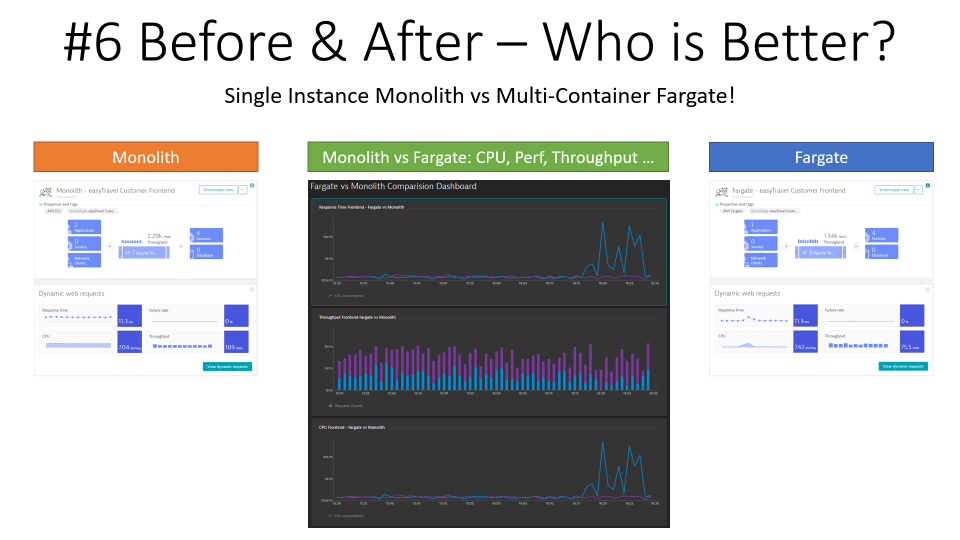
Tip: I made sure to run the same load against both versions. This helps you to better analyze any differences in resource consumption and performance behavior. When we did our first migration we had no clue about how to properly size the containers. That was something that came out of running these two versions side-by-side and gradually coming up with the correct configuration.
Try it yourself: Reach out for help
If you have your own monolith to migrate to the cloud simply sign up for the Dynatrace SaaS Trial and walk through these steps. While it might look “easy” with easyTravel this approach is not too hard on any other monolith. You will see how much insights you gain of your monolith and how that leads to better decisions when starting to re-factor your code base.
If you have any questions or want my opinion on some of your decisions let me know. Happy to help


Looking for answers?
Start a new discussion or ask for help in our Q&A forum.
Go to forum