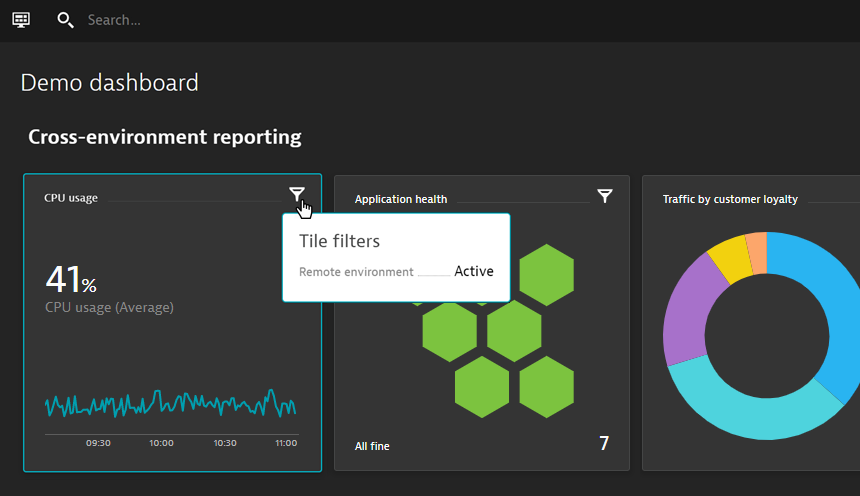
With remote-environment dashboards being available on all Dynatrace environments as an early-adopter feature as part of version 1.182, please find a full documentation on how to set up remote environments via configuration API on Dynatrace Help
Monitoring the cloud poses many challenges when it comes to scale. How do you, for instance, manage to keep an eye on all your AWS instances, Kubernetes nodes, on-premise VMs, and the entirety of user-experience KPIs of all your public and internal applications across multiple staging environments? With growing complexity and variety, you’ll likely want multiple Dynatrace environments so that you can take full advantage of the benefits of segmentation and scale.
For these scenarios, we’ve just made it significantly easier to conveniently report monitoring data without having to build multiple dashboards in separate environments. With Dynatrace version 1.172, we proudly announce Preview availability for cross-environment dashboard capabilities.
Authorize remote environment access
Before you can start to report remote KPIs on your dashboards, a connection between two environments will initially need to be set up. An important consideration is that these connections are unidirectional by design. The eventual dashboard must always reside on a “master” environment, which needs to be permitted to pull remote monitoring data. The environment from which data is pulled acts as a “replica,” and access to it needs to be authorized. Note that this functionality is not limited by cluster boundaries.
The first step is to create an authentication token bearing the RestRequestForwarding scope on the replica environment. The Dynatrace token API allows you to do this in an automated fashion. Simply request a new token with the required scope and a token display name of your choice using the POST /tokens endpoint:
{
"name": "XENV REMOTING",
"scopes": [ "RestRequestForwarding" ]
}
The second step is to configure a remote environment connection on the master environment. The POST /remoteEnvironments endpoint requires three parameters to be specified:
- A display name
- The full URI of the replica environment
RestRequestForwarding—the token generated above
Once this initial setup is complete, remote environment access between master and replica is configured. All requirements for cross-environment dashboards are in place.
Configure dashboard tiles to fetch monitoring data from the remote environment
Once the remote environment connection is set up, the only thing left to do is to build cross-environment dashboards. To do this, begin by building a regular dashboard that visualizes the local monitoring data on your master environment. After that, you may configure any number of dashboard tiles to fetch data remotely instead of locally. For this, you’ll want to leverage the recently introduced Dashboards API.
The first step is to pull the configured dashboard via the GET /dashboards/{id} endpoint to retrieve the dashboard JSON document.
The second step is to add a remoteEnvironmentUri property to selected dashboard tiles, which tells the tiles to fetch data from the remote environment:
"tiles" : [ {
"name": "Custom chart",

"tileType": "CUSTOM_CHARTING",

"configured": true,

"remoteEnvironmentUri": "https://remote-env.example.come",

...

} ]
Be aware that only certain tile types are currently supported for cross-environment access. These include all variants of custom charts set up to fetch any given metric and all variants of health state tiles (aka “honeycombs”).
Remote filtering for advanced cross-environment dashboards
Setting up finer-grained filters for remote-environment dashboard tiles can become a little trickier than in the example above. The best approach for such scenarios is to:
- Build a dashboard with the desired visualizations on the replica environment.
- Export that dashboard over the replica environment’s Dashboards API.
- Copy/paste the respective tiles from that dashboard’s JSON document to your eventual master environment dashboard.
- Don’t forget to add the
remoteEnvironmentUriproperty described above.
Timeframe and management zone filters will work just as they do for regular dashboard tiles. An important detail in terms of cross-environment management zone filters is that you need to keep these management zones in sync across your separate environments. But fear not, we’ve got you covered!
Version information
- Cross-environment dashboards are available in a Preview in Dynatrace SaaS or Dynatrace Managed version 1.172.
Limitations
- Remote environment access is supported for custom chart and health state tiles only (Host health, Application health, Service health, Synthetic monitor health, Database health, Data center service health)
- Remote environment access is authorized by an access token that provides access to all available cross-environment dashboard capabilities on the replica environment. No user restrictions apply. This means, that the master (remote environment) has full control in deciding which data to show on the dashboard.
- Drilling down into the remote environment isn’t supported in this Preview version (the click action is blocked for remote dashboard tiles).
- Configuration of remote access is only possible via the Dashboards API.
- Read our Previews disclaimer.
How can I get this feature?
If you want to participate in this Preview, please register here.
What’s next
We’ll be adding remote drill-down, user permission handling, and capabilities to configure cross-environment dashboard tile settings via the Dynatrace UI. We eagerly await your feedback!


Looking for answers?
Start a new discussion or ask for help in our Q&A forum.
Go to forum