Recently, in the Dynatrace Innovation Lab, we have been developing best practices and demo applications to showcase delivering software through an automated, unbreakable delivery pipeline using Jenkins and Dynatrace. A couple of weeks into our project, Dynatrace helped us discover that we were part of “one of the biggest mining operations ever discovered”.
In this blog post, I want to highlight the pitfalls when it comes to implementing demo or sample projects, how to set them up, and how to keep them alive without getting hijacked.
Our Setup
We develop most of our demos on public cloud infrastructure and for this particular demo we decided to go with the Google Kubernetes Engine (GKE) on the Google Cloud Platform (GCP). To allow the reproduction of the setup, we scripted the provisioning of the infrastructure and the project on top of it by utilizing a combination of Terraform (for infrastructure provisioning), custom shell scripts (for user generation and utility tasks), and Kubernetes manifests to deploy our application. The cluster itself was of decent size with auto-scaling enabled to fully exploit the power of Kubernetes when it comes to application scaling.
Along with the application, we also installed the Dynatrace OneAgent via the Operator approach on our GKE cluster to get full-stack end-to-end visibility for all our workloads as well as all supporting tools (e.g: Jenkins) running on the cluster.
Our next step was to install Jenkins in our Kubernetes cluster to have the possibility to build, deploy, and deliver our application. This can be done easily via the public Jenkins repository. Just pick any version, download, and run it. Next step: login and create the pipelines.
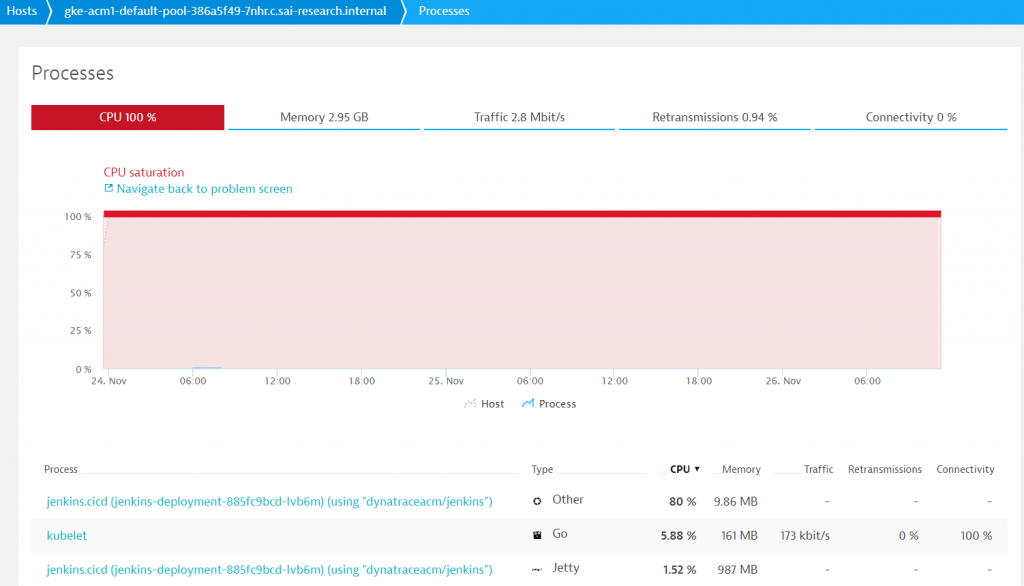
We started working on our pipelines, installed plugins, managed multi-staged pipelines, and built our own Kubernetes pod templates. Everything worked as expected. A couple of weeks into our project, Dynatrace started alerting on a spike in CPU saturation on one of our Kubernetes nodes. As you can see from the screenshot below, Dynatrace automatically created a problem ticket due to this unusual resource behavior.
As Dynatrace not only monitors the host, but all its processes and containers, it was easy to spot that the Jenkins.cicd pod was responsible for taking about 80% of the available CPU on that host. We got suspicious since Jenkins was not actively building any of our artifacts at that time; in fact, it was idle – waiting for new builds to be triggered. But why did it eat up all our CPU?
Let’s dig deeper!
Luckily, Dynatrace provides detailed information on the processes running on our monitored hosts. When clicking on the problematic Jenkins.cicd process, we can investigate a couple of useful properties. Some of them might be technology related, e.g., Kubernetes namespace or pod names, while others tell us more about the executables that have been started. Let’s look at the suspicious Jenkins.cicd process:
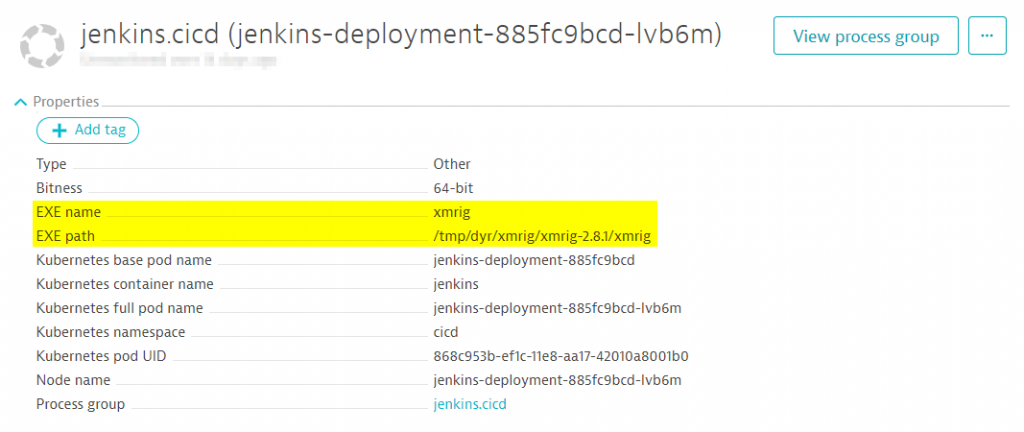
The EXE that was actually started, xmrig, wasn’t one we have ever seen before – neither did it look like something that was native to Jenkins. A quick internet search reveals the purpose of this executable:

What the hell, someone hijacked our Jenkins instance to inject a crypto miner named xmrig! But who did this? And how could it be started in our Jenkins?
Since Dynatrace also tells us the path of the executable, this was is first place to start our search. We found the config.json in the executable path that reveals some of the configuration details of the process:
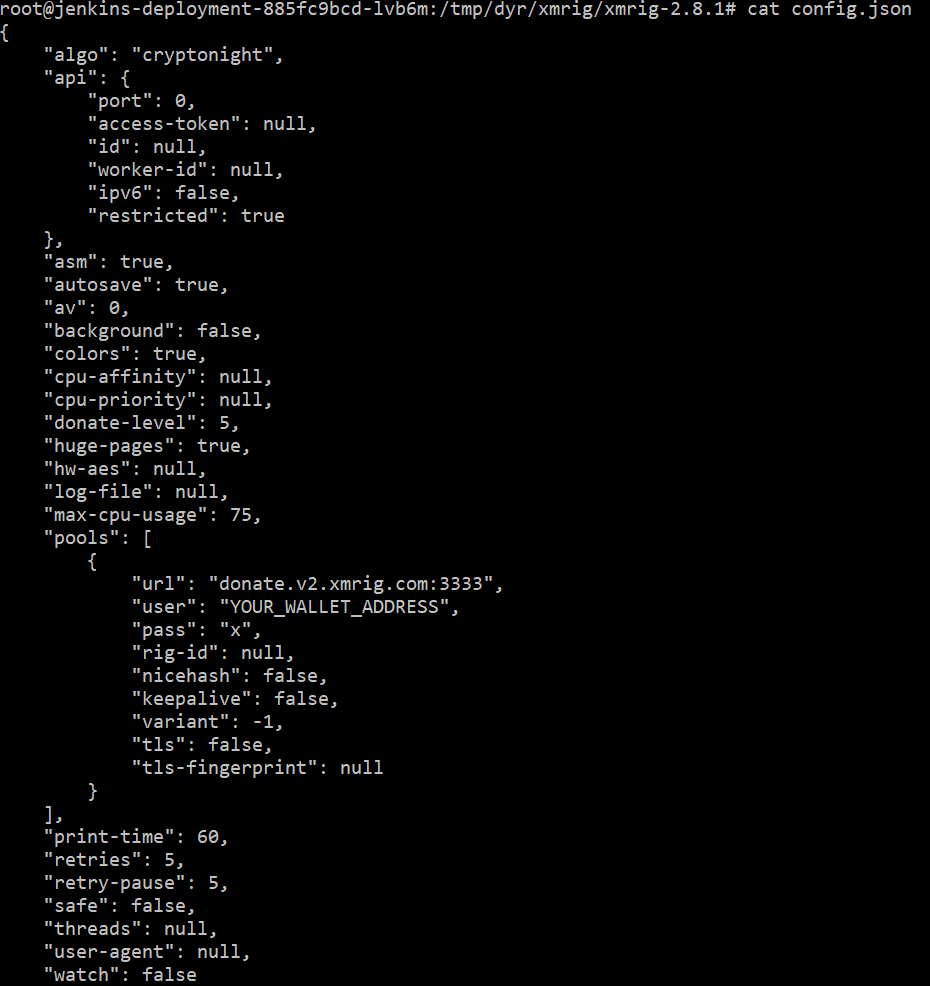
Taking a closer look at the configuration and looking for a particular user that has broken into our Jenkins, we only see a placeholder “YOUR_WALLET_ADDRESS”, unfortunately. Next thing we can try is to find the started process with the name xmrig on our host:
root@jenkins-depl-lvb6m:/tmp/dyr/xmrig/xmrig-2.8.1# ps -aux | grep xmrig
root   4939   162   0.1 475868 10100 ?    Sl  Nov23  5755:39  /tmp/dyr/xmrig-2.8.1/xmrig -p qol -o pool.minexmr.com:80 -u
42VFYNy7c7bYe4dqRwXJmQXenkTUx2QsQ5hdHejNvbEt6F3UH2gJEwQ9byN4vgAgdpNP9gDgybz9b7P2YkAZXRxY8nRRjJB -k
Hello, here you are user “42VFYNy7c7bYe4dqRwXJmQXenkTUx2QsQ5hdHejNvbEt6F3UH2gJEwQ9byN4vgAgdpNP9gDgybz9b7P2YkAZXRxY8nRRjJB”, glad we have found you! With a quick verification we can see that it is a valid wallet id:

From the detected anomaly it took a couple of clicks and two internet searches to not only identify the root cause but also the crypto miners identity (well – at least his wallet id). Let’s think about why this could happen and how to prevent it in the future.
Secure your applications!
When we saw the problematic crypto-mining process running on our cluster we were kind of surprised, frankly speaking. Our project was not revealed or advertised to the public, although accessible via public IPs and we have made one of the most ordinary mistakes when using third-party software: we never changed the standard password! Oh gosh, why did this happen to us?
Well, in our work in the Innovation Lab we spin up, tear down, and recreate cloud instances several times a day. Sometimes, they don’t live longer than a couple of minutes, sometimes we keep clusters up for a longer period of time if we keep working on them. In this particular case we didn’t change the standard password since we didn’t even know in the beginning if this Jenkins configuration will be the one that will survive one single day. Thus, we stuck to the default password: What a big mistake! On top of this, Jenkins was also available via the standard port on a public IP.
But why could the process be started without being noticed that a plugin has been installed or any other configuration has been changed in the Jenkins instance? The answer is quite easy. A security issue in Jenkins earlier this year was exploited that allowed to inject arbitrary software to your Jenkins. In fact, it was one of the biggest mining operations ever discovered and hackers made $3 million by mining Monero (not on our cluster, obviously). If you want to read more about this security hole you can find more information in the National Vulnerability Database, vulnerability CVE-2017-1000353.
What could we have done to prevent?
I don’t want to leave you without our lessons learned from this security incident, to help you secure your applications and prevent them from being hijacked.
- Don’t ever use standard passwords, even for your demo applications. This might sound obvious, but how often do we just start a demo without taking the effort to change the password? I bet this happened to some of you and my advice for the future is to make the password change to one of the first things you do, even if it’s just a small demo application.
- Make sure to use the latest software versions. When setting up new projects, make sure to invest some time to find the version of the software with the latest security patches. In addition, make sure to keep your software as well as all installed plugins updated to prevent old security holes from being exploited.
- Think about those services you want to expose to the public and those you want to keep private or available only from inside your cluster. A practice we have adopted in the Innovation Lab is the usage of a bastion host, to limit the public access of resources. In addition, review your network configuration and limit open ports or change standard ports of your applications.
- Have monitoring in place to detect suspicious activities on your infrastructure. Without Dynatrace we wouldn’t have found the intruder or at least it would have taken lot longer. Why? In the GCP Dashboard we didn’t receive any notification on the state of our cluster since the cluster in total was doing fine. There was only one node that suffered from CPU saturation, but this didn’t affect the overall performance of our application since it was distributed on 10 nodes, from which 9 were doing just fine.
- Pets vs Cattles: In case you got hijacked despite taking precautions, keep in mind that with public cloud resources, sometimes it’s easier to just throw them away and spin up new instances and fix the vulnerability immediately when starting a new one, instead of trying to secure an already compromised instance. This is also why we invested some time in scripting the provisioning of resources as I’ve highlighted in the beginning of this blog post. However, it is obvious that this might work better for demo applications that for production use cases. For the interested reader, there is also a more extensive list on essential security practices.
Summarizing
Despite the fact that we got hijacked by a crypto miner and let him mine some coins on our cluster for a weekend, this incident actually allowed us to learn how to build our demos right in terms of security. The experts in our Innovation Lab are always keen to build better software, which also means to leverage and integrate third-party software. Having a tool like Dynatrace got us covered to detect any malicious activities on our infrastructure makes our every day job a lot easier!


Looking for answers?
Start a new discussion or ask for help in our Q&A forum.
Go to forum