

Deploy automated honeytokens in Kubernetes with Koney: set traps for attackers, detect file access with eBPF and Tetragon, and forward alerts to Dynatrace.
Imagine an attacker has breached your perimeter. They’ve gained access to a container in your Kubernetes cluster and are now searching through the file system, looking for secrets (credentials, tokens, keys) that they can use to further the attack.
What if those secrets were fake? What if, the moment the attacker attempts to read a fake credential, you get an alert? That’s the idea behind honeytokens: small, realistic-looking files placed in strategic locations to catch unauthorized access attempts. When someone touches them, you may have a very strong indicator of compromise (IoC) that warrants investigation because legitimate users would never interact with these decoys.
In this blog post, we introduce Koney, an open source research project that integrates seamlessly with Dynatrace. Koney is a Kubernetes operator that automates the deployment of honeytokens across your cluster. We’ll walk through the setup from scratch: installing Koney, writing your first deception policy, watching it scale across containers, and forwarding alerts directly to Dynatrace.
What is Koney?
Koney is a Kubernetes operator developed by the cloud-native security research team at Dynatrace, together with Matteo Golinelli from the University of Trento. It lets you define deception policies that describe which traps to deploy, where to deploy them, and how to monitor them. Currently, the open source version of Koney supports placing honeytokens in the file system. You can download or contribute on GitHub.
Why cyber deception?
Traditional security approaches focus on building walls and closing gaps: scanning for vulnerabilities with Runtime Vulnerability Analytics (RVA), blocking attacks in real-time with Runtime Application Protection (RAP), and fixing misconfigurations with Security Posture Management (SPM). These are all essential. But they share a common limitation: defenders must close every hole, while attackers need to find just one.
With the rise of Generative AI, this asymmetry is getting worse. Attackers can increasingly use AI-assisted tools and automation to accelerate portions of the attack lifecycle.
Instead of trying to keep attackers out, cyber deception places traps on the inside. Now, the attacker, whether human or automated, must watch their steps to not trigger an alert. Honeytokens are one of the simplest deception techniques. Unlike noisy intrusion detection systems, a honeytoken generates a signal only when something truly suspicious happens: properly configured legitimate processes generally should not access a decoy credentials file planted by your security team.
Deception has a rich history in information security. Researchers like Lance Spitzner popularized the concept of honeypots in the early 2000s. Academic research has demonstrated that deception techniques can help detect and slow attacker activity in specific scenarios.
But widespread industry adoption has been held back by the operational burden: manually creating, deploying, monitoring, and rotating honeytokens across dozens of containers is tedious and error prone. Koney solves this by letting you express your deception strategy as a Kubernetes custom resource (a DeceptionPolicy object) and handling everything else automatically.
Using Koney for deception
When you apply a DeceptionPolicy, Koney:
- Deploys the trap (the “decoy”) by mounting a volume or executing a shell command in the container.
- Sets up monitoring (the “captor”) using Tetragon’s eBPF-based tracing policies to detect file access.
- Collects alerts, logging them and optionally forwarding them to external systems like Dynatrace.
When you update a policy, Koney updates the traps. When you delete a policy, Koney removes them. When you spawn new pods that match the policy, Koney automatically deploys traps there too. It’s deception-as-code for Kubernetes.
Walkthrough: Honeytokens with Koney and Dynatrace
For this walkthrough, you’ll need:
- A Kubernetes cluster.
kubectlinstalled and connected to your cluster.helm, to install Koney and Tetragon.
Step 1: Install Koney
Install Koney with Helm in the koney-system namespace:
helm install koney --create-namespace -n koney-system --wait oci://ghcr.io/dynatrace-oss/koney/charts/koney --version 0.2.1Verify that the Koney controller is running:
kubectl wait --for=condition=ready pod -n koney-system -l control-plane=controller-managerThat’s it. Koney is now watching for DeceptionPolicy custom resources in your cluster.
Step 2: Install Tetragon
Koney uses Tetragon for eBPF-based monitoring. Tetragon watches for file access events at the kernel level.
Add the Cilium Helm repository and install Tetragon:
helm repo add cilium https://helm.cilium.io
helm repo update
helm install tetragon cilium/tetragon -n kube-system --set dnsPolicy=ClusterFirstWithHostNet
The dnsPolicy=ClusterFirstWithHostNet setting is required so that Tetragon can resolve the addresses of Koney’s internal services to forward alerts. If you have Tetragon already installed, make sure to set this option.
Verify that Tetragon is running:
kubectl get pods -n kube-system -l app.kubernetes.io/name=tetragonStep 3: Deploy a sample application
To see Koney in action, we need an application running in the cluster. Create and apply a demo-app.yaml manifest with label honeytoken: “true” set in the pod labels. Alternatively, you can also use any existing application in your cluster; just make sure the relevant pods carry the label honeytoken=true. We’ll use this in our deception policy to select which containers get honeytokens.
# demo-app.yaml
apiVersion: apps/v1
kind: Deployment
metadata:
  name: demo-app
spec:
  selector:
    matchLabels:
      app: demo-app
  template:
    metadata:
      labels:
        app: demo-app
        honeytoken: "true"
    spec:
      containers:
      - name: nginx
        image: nginx
kubectl apply -f demo-app.yaml
At this point, there are no honeytokens in the container. Let’s verify that:
kubectl exec -it deploy/demo-app -- ls /run/secrets/You’ll only see the standard Kubernetes service account token but no traps … yet.
Step 4: Write a DeceptionPolicy
A DeceptionPolicy is a custom resource that describes what to deploy and where.
We’ll place a decoy credentials file at /run/secrets/.aws/credentials. This is a common path that attackers look for when hunting for cloud provider secrets. Credential files in well-known paths are among the first things attackers look for after gaining a foothold.
Here’s the full policy:
# honeytoken.yaml
apiVersion: research.dynatrace.com/v1alpha1
kind: DeceptionPolicy
metadata:
  name: aws-credentials-trap
spec:
  strictValidation: true
  mutateExisting: true

  traps:
    - filesystemHoneytoken:
        filePath: /run/secrets/.aws/credentials
        readOnly: true
        fileContent: |
          [default]
          aws_access_key_id = FZWGQYZRVMVQKCWXWJ
          aws_secret_access_key = ToDNS2V5wkEuPmfocmNDHiVBspaywo
          region = us-east-1

          [staging]
          aws_access_key_id = BPDHLBUJTYMKRVBMNB
          aws_secret_access_key = Jf4mTvTG5zbLksf464nYwEVyDkbjdp
          region = eu-central-1

          [prod]
          aws_access_key_id = GQRMYWAXADTVUPFMZJ
          aws_secret_access_key = gUFQzyJWJSkMkWpay4Umxzg4oFkkju
          region = us-east-1

      match:
        any:
          - resources:
              selector:
                matchLabels:
                  honeytoken: "true"

      decoyDeployment:
        strategy: containerExec
      captorDeployment:
        strategy: tetragon
Let’s break this down:
filesystemHoneytokendefines the trap type and sets path and content for a realistic credentials file.matchtells Koney which containers should receive this trap. Here, we target any pod with the labelhoneytoken: “true“. You can also match by namespace, container name, and more. The full matching syntax is documented in Koney’s documentation file.decoyDeploymentdefines how the trap is placed. ThecontainerExecstrategy injects the file by running a shell command inside the container. Koney also supports other strategies, such asvolumeMount, which mounts a Kubernetes volume instead.captorDeploymentdefines how the trap is monitored. Thetetragonstrategy creates a TetragonTracingPolicyto detect file access using eBPF.
Apply the policy:
kubectl apply -f honeytoken.yaml Step 5: Verify the deployment
Koney should have deployed the honeytoken within seconds.
First, let’s look at the policy status:
kubectl describe deceptionpolicy aws-credentials-trap In the status conditions, you should see that the policy was found and both the decoy and captor have been deployed successfully.
Now, let’s look inside the container:
kubectl exec -it deploy/demo-app -- cat /run/secrets/.aws/credentials You should see the decoy AWS credentials we defined. This file was injected by Koney; it wasn’t in the original container image. An attacker stumbling onto this file would see what looks like valid credentials and try to use them. The moment they read the file, an alert is already triggered.
Scales automatically, stays transparent
The deception policy applies to all matching containers. If you add new workloads or scale up your deployment, every new pod also automatically receives the honeytoken. This is one of the key advantages of expressing deception “as code.” Let’s test it by scaling up our deployment:
kubectl scale deployment demo-app --replicas=3 Koney also tracks what it deployed using a koney/changes annotation. Let’s inspect it:
kubectl get pod -l app=demo-app -o
jsonpath="{.items[0].metadata.annotations['koney/changes']}" | jq
You should see something like this:
[
  {
    "deceptionPolicyName": "aws-credentials-trap",
    "traps": [
      {
        "deploymentStrategy": "containerExec",
        "containers": ["nginx"],
        "createdAt": "2026-03-27T15:24:26Z",
        "updatedAt": "2026-03-27T15:26:18Z",
        "filesystemHoneytoken": {
          "filePath": "/run/secrets/.aws/credentials",
          "fileContentHash": "feb7302a35b1031040d1151c6cc5c9f7",
          "readOnly": true
        }
      }
    ]
  }
]
Step 6: Trigger an alert
Now let’s simulate an attacker finding and reading the honeytoken. Open a shell in the container and access the honeytoken:
kubectl exec -it deploy/demo-app -- bash
$ cd /run/secrets/.aws
$ ls -ll
$ cat credentials
To see the alert, check the logs of the Koney alerts container:
kubectl logs -n koney-system -l control-plane=controller-manager -c alerts -f --since 1h | jq You’ll see a JSON alert with rich context:
{
  "timestamp": "2026-03-27T15:24:43Z",
  "deception_policy_name": "aws-credentials-trap",
  "trap_type": "filesystem_honeytoken",
  "metadata": {
    "file_path": "/run/secrets/.aws/credentials"
  },
  "pod": {
    "name": "demo-app-68ff4cbb88-4bxbx",
    "namespace": "default",
    "container": {
      "id": "a28a42618599...",
      "name": "nginx"
    }
  },
  "node": {
    "name": "ip-10-20-30-40.ec2.internal"
  },
  "process": {
    "uid": 0,
    "pid": 1061063,
    "cwd": "/",
    "binary": "/usr/bin/cat",
    "arguments": "/run/secrets/.aws/credentials"
  }
}
This tells you exactly where the access happened (pod, namespace, container), who did it (process binary, PID, UID), and which policy was triggered.
Step 7: Forward alerts to Dynatrace
Seeing alerts in logs is fine for testing, but in production, you’ll want them in your security platform. Koney supports forwarding alerts to Dynatrace using a DeceptionAlertSink resource.
To set this up, you’ll need a Dynatrace API token and environment URL stored in a Kubernetes secret. The detailed instructions for creating the token with the correct scopes are in Koney’s documentation on alert sinks.
Once you have the secret, create a DeceptionAlertSink (assuming your secret is named dynatrace-api-token):
# dynatrace-sink.yaml
apiVersion: research.dynatrace.com/v1alpha1
kind: DeceptionAlertSink
metadata:
  name: deceptionalertsink-dynatrace
  namespace: koney-system
spec:
  dynatrace:
    secretName: dynatrace-api-token
    severity: HIGH
Apply it:
kubectl apply -f dynatrace-sink.yaml When configured successfully, honeytoken access alerts can be forwarded to Dynatrace as security events.
See it in Dynatrace
After setting up the alert sink, trigger a few more access events to generate findings in Dynatrace:
kubectl exec -it deploy/demo-app -- cat /run/secrets/.aws/credentials Then open the Threats & Exploits app in Dynatrace. You’ll see the detection findings with all the contextual information.
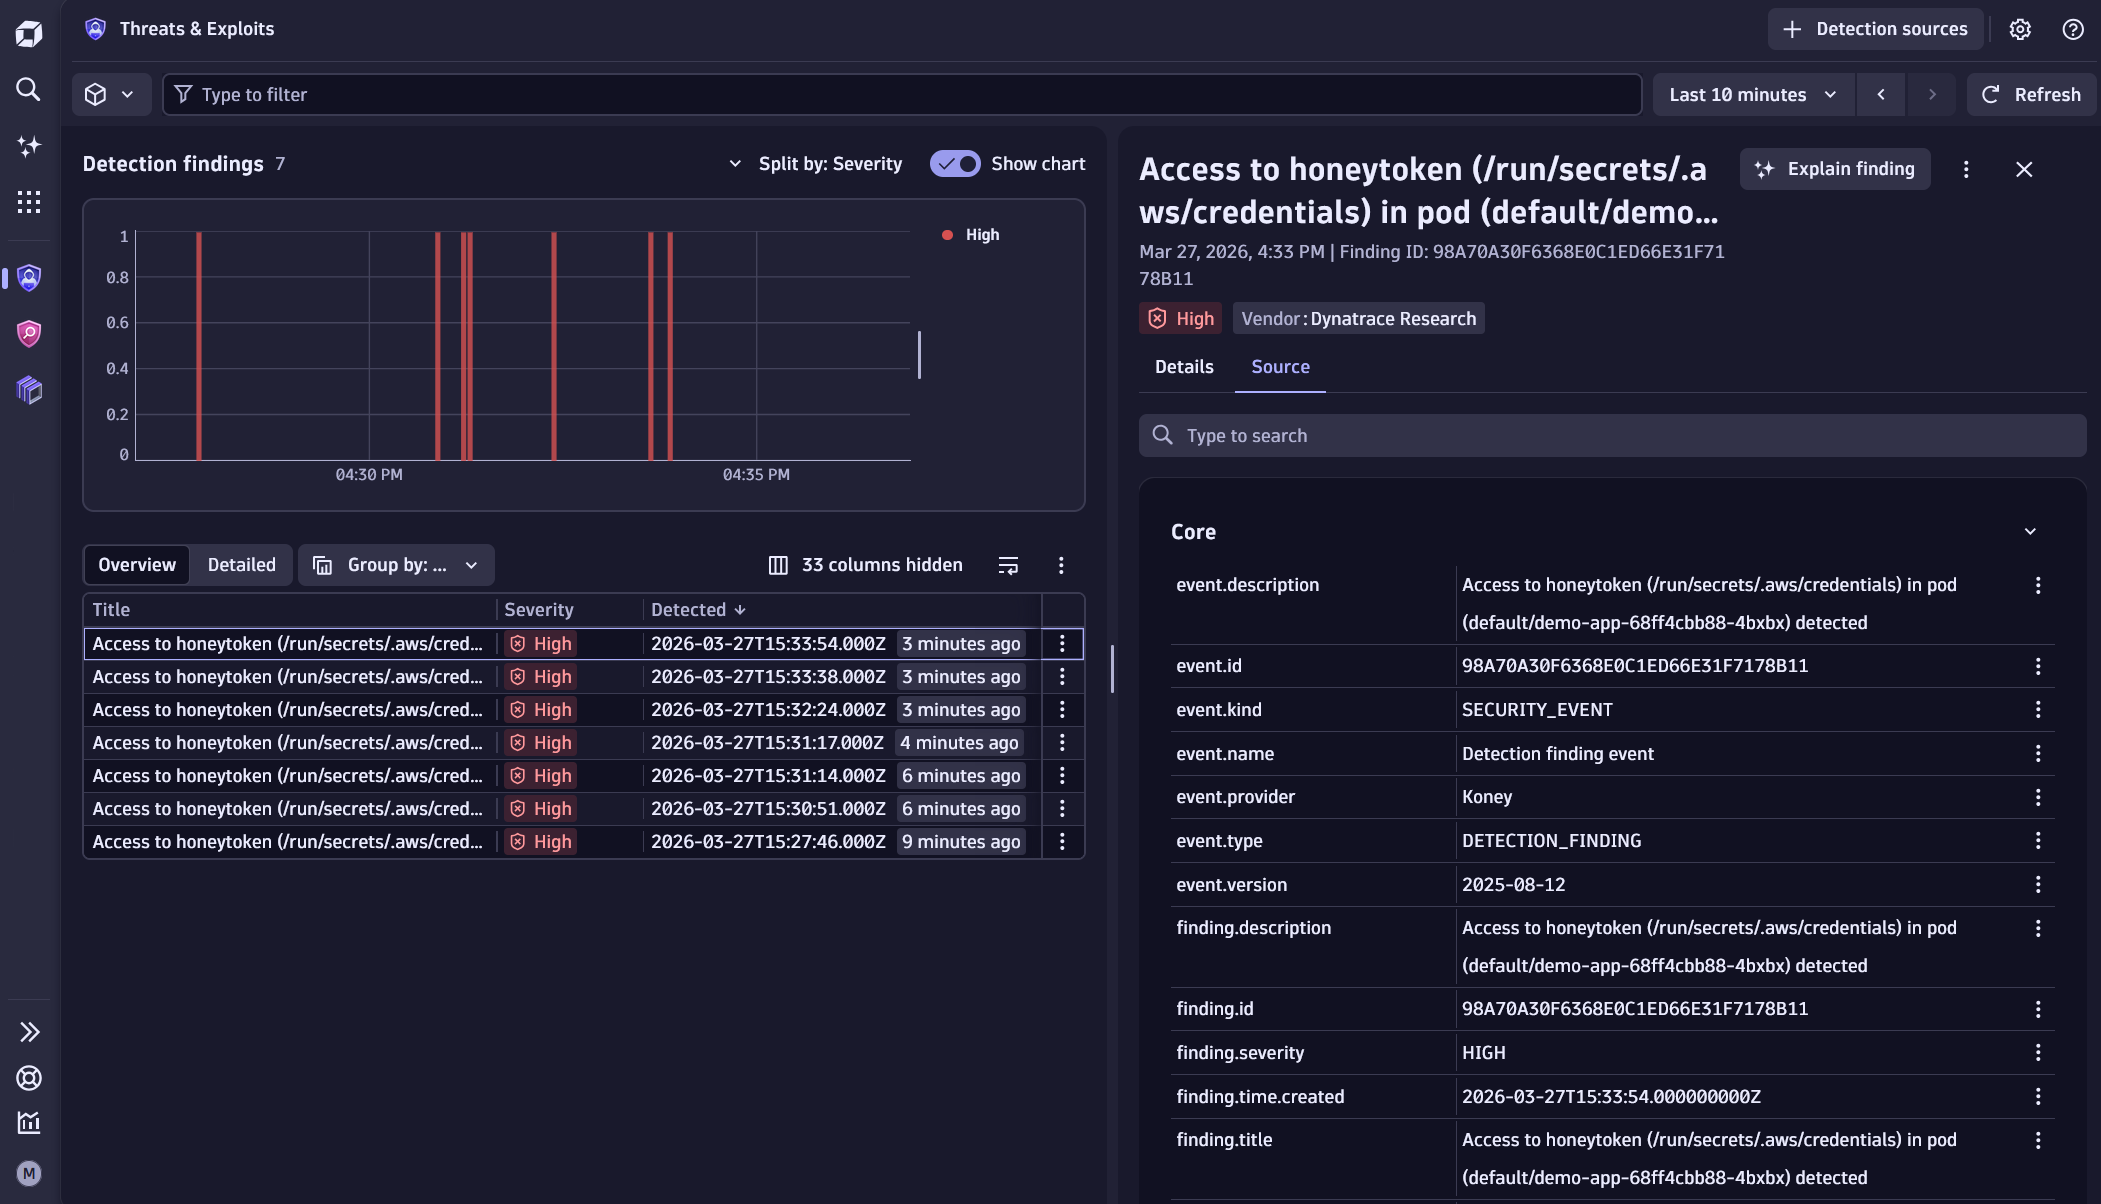
Each finding includes structured fields like koney.deception_policy_name, koney.trap_type, k8s.pod.name, and process.executable.name. This means you can write Dynatrace Query Language (DQL) queries to further analyze and correlate events with Investigations.
fetch security.events
| filter event.provider == "Koney" 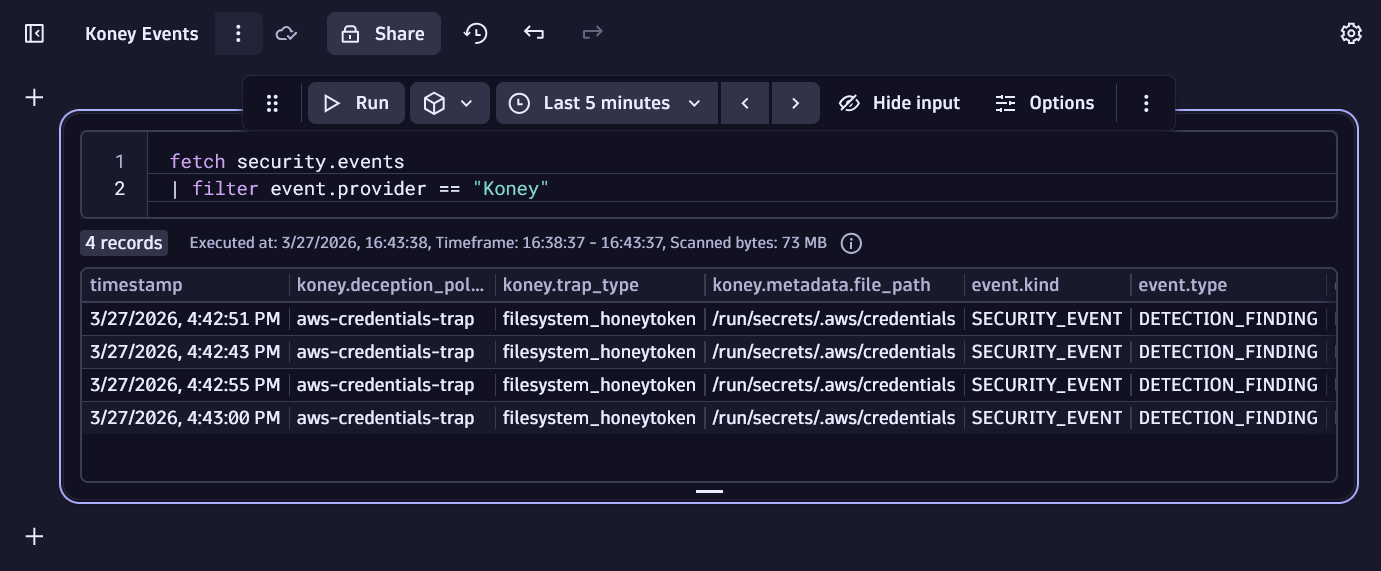
Step 8: Update and remove policies
One of the most practical benefits of Koney is that deception policies are living resources. You can update them at any time.
Try changing the fileContent field in your honeytoken.yaml and re-apply the policy:
kubectl apply -f honeytoken.yaml
Koney will update the honeytoken across all matching containers. This enables dynamic deception strategies.
When you’re done, delete the policy:
kubectl delete -f honeytoken.yaml Koney automatically cleans up all deployed honeytokens from every container.
What’s next
Koney currently supports filesystem honeytokens, but the project is designed to support additional deception techniques in future versions. including deceptive HTTP endpoints and payloads that can lure vulnerability scanners and redirect them to honeypots.
Once alerts are flowing into Dynatrace, the possibilities go further. For example, you could build a Workflow that triggers on Koney alerts, looks up the owner of the affected namespace using the Ownership app, and creates a ticket for the security team. We previously demonstrated this kind of end-to-end security automation in the blog post, Context-aware security incident response with Dynatrace Automations and Tetragon, but now with Koney, even more steps are automated.
If you’re interested in the research behind Koney, we recommend reading the Koney paper, published in the 4th Workshop on Active Defense and Deception (AD&D), co-located with the 10th IEEE European Symposium on Security and Privacy (EuroS&P ’25).



Looking for answers?
Start a new discussion or ask for help in our Q&A forum.
Go to forum