Share documents
Latest Dynatrace
If you own a document (dashboard or notebook), you can share it with other users in your Dynatrace environment.
Sharing options
To share a document with other Dynatrace users in your company, you (as the document owner) have two options.
- Share access:
Better for ongoing sharing, where you want certain people or groups to always have access to the document.
Better granularity over who has access to the document—you can add, change, and revoke access per user and user group.
You need to maintain a list of users and user groups that have access.
- Share link:
- Better for ad hoc sharing. Just generate a URL (with View or Edit permissions) and forward it to people who should access the document.
- If you share a document link, recipients can share it with others.
Be careful when using the Share link method of sharing documents.
If you a share a document link with other people in your Dynatrace environment, link recipients could forward the link to others. No one outside your Dynatrace environment could use the link to access your document, of course, but anyone in your Dynatrace environment could use it, and they would have the same permissions (Can edit or Can view) that you selected when you created the link.
The Share access method gives you tighter control (with a granularity down to the person) over who can view or edit your documents.
If you need to revoke access for one person, you need to revoke access for everyone (disable the link you distributed) and then create and distribute a new link for people who should have acccess.
Note that you can use a combination of both sharing options for the same document. For example, you might want to maintain a list of people who need regular access to the document (collaboration and joint editing), and you might also want to occasionally send out an access link to a wider audience (people who only need to view the document).
Regardless of how you share your document, you also need to specify the permission level of your sharing:
-
If you give someone Can view permissions, they can view the document but they can't edit it. For example, they can't add or delete components.
-
If you give someone Can edit permissions, they can do anything that the owner of the document can do except share or delete it.
For details on document permission levels, see the Permissions section below.
Share access
To share a document by creating a list of users and user groups with View or Edit access
-
Display the document that you want to share.
-
At the top of your document, select Share to open the Share document window.
If you don't see a Share option in the document, you don't own the document, so you can't access the share settings.
-
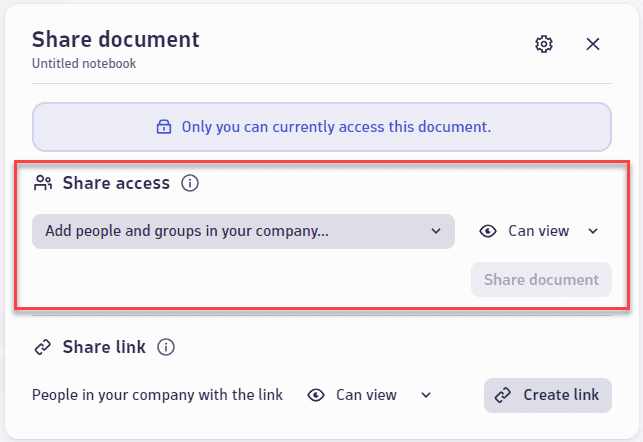
In the Share access section of the Share document window, specify one or more people and groups with whom you want to share the document, and select the permission level they should have (Can view or Can edit). Repeat this part of the procedure as many times as you need:
-
Select Add people or groups in your company, and then find and select one or more people and groups with whom you want to share the document. You need to type at least three characters to get valid search results.
-
Select the permission level (Can view or Can edit) that you want to give to the selected people and groups.
-
Select Share document. This adds the selected people and groups to a list of people with whom you can share the document. It includes the permission level (Can view or Can edit) that was displayed when you selected Share document.
Don't give Can edit access to people if you don't want them to change your copy of the document.
For a list of what people can do with Can view and Can edit permission, see the Permissions section below.
-
Share link
To share a document by generating and distributing links (URLs)
-
Display the document that you want to share.
-
At the top of your document, select Share to open the Share document window.
If you don't see a Share option in your document, you don't own the document, so you can't share it.
-
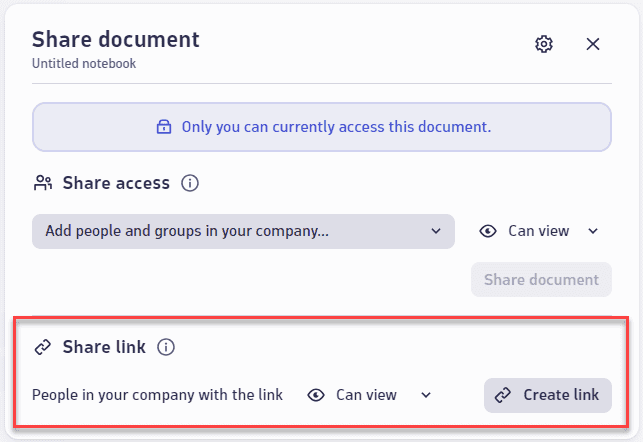
In the Share link section of the Share document window, select a permission level (Can view or Can edit) and then select Create link. This creates a URL (with the selected permission level) and copies it to your clipboard.
-
Paste the link to a company communication channel (email, for example) and send the link to Dynatrace users in your company with whom you want to share the document. Recipients will be able to use the link to open your document with the selected permission level.
Manage access
To manage sharing permissions for your document
-
Display the document.
-
Select Share.
If you don't see a Share option in the document, you don't own the document, so you can't access the share settings.
-
In the Share document window, select
 in the upper-right corner.
-
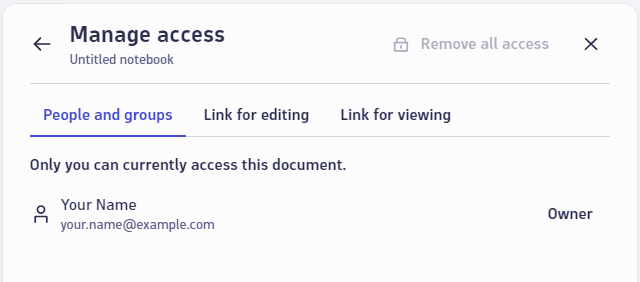
In the Manage access window, select the kind of sharing you want to manage.
Remove all access
Sometimes you need to quickly and easily remove all shared access to a document.
To revoke all shared permissions for your document
-
Display the document.
-
Select Share.
If you don't see a Share option in the document, you don't own the document, so you can't access the share settings.
-
In the Share document window, select
in the upper-right corner. -
In the Manage access window, select Remove all access and confirm your choice.

After you remove all access, only you can view or edit your document.
No other people have individual access
Access is not granted to anyone through membership in any groups
- Previously shared Can view and Can edit links to your document no longer work
Verify all access
After you change sharing settings, it's a good idea to verify them.
Quick check: the icon before the Share button at the top of your document indicates whether the document is already shared.
 = shared
- = not shared
If you just updated your share settings, you might need to refresh your document to display the correct icon.
If your document is shared, you can check to see who has access to it.
-
Display the document.
-
Select Share.
-
In the Share document window, select
in the upper-right corner. -
Review the three tabs in the Manage access window.
People and groups
Link for editing
Link for viewing
Permissions
When you create a document, you are the document owner and you can do anything listed in the Owner column of the permissions table below. All other people have Can edit or Can view permission as determined by the document owner.
The document owner (creator) has all permissions.
- Someone with Can edit permission can do anything the owner can do except delete the document or access the share settings.
- Someone with Can view permission can do the limited set of read-only things listed in the Can view column.
Be careful when using the Share link method of sharing documents.
If you a share a document link with other people in your Dynatrace environment, link recipients could forward the link to others. No one outside your Dynatrace environment could use the link to access your document, of course, but anyone in your Dynatrace environment could use it, and they would have the same permissions (Can edit or Can view) that you selected when you created the link.
The Share access method gives you tighter control (with a granularity down to the person) over who can view or edit your documents.
| Permission | Can view | Can edit | Owner |
|---|---|---|---|
| View the document | |||
| Adjust the timeframe of the displayed data | |||
| Refresh the document | |||
| Adjust the automatic refresh rate | |||
| Adjust the filter settings | |||
| Maximize and minimize tiles | |||
| Copy one or more tiles to the clipboard | |||
| Save a copy of the document | |||
| Export the JSON definition of the document | |||
| Import the JSON definition of the document | |||
| Edit the document | |||
| Change the layout | |||
| Rename the document | |||
| Add, change, and delete data | |||
| Add, change, and delete code | |||
| Add, change, and delete markdown | |||
| Add, change, and delete variables/filters | |||
| Share the document | |||
| Delete the document |