Manage users and groups with SAML in Dynatrace SaaS
Dynatrace SaaS enables authentication through your organization's identity provider (IdP). If you want to use your organization's corporate credentials for authentication in Dynatrace, you can set up SAML to delegate authentication to your IdP.
- For definitions of unfamiliar terms, see the glossary.
- For background information such as an overview of federation types, use cases, and algorithms, see Federation concepts.
Requirements and specifications
Identity Provider (IdP)
Your IdP needs to follow some basic SAML specification and security requirements to be compliant with Dynatrace SSO:
- The entire SAML message must be signed (signing only SAML assertions is insufficient and generates a
400 Bad Requestresponse). - The SAML protocol version is
urn:oasis:names:tc:SAML:2.0:protocol. - The
NameIDformat isurn:oasis:names:tc:SAML:1.1:nameid-format:emailAddress. - IdP response
NotBeforeandNotOnOrAfterassertion timestamps must consider system clock skew and must be set to at least 1 minute before and 1 minute after the current time (this particularly concerns AD FS default settings). - The IdP response status code must be
urn:oasis:names:tc:SAML:2.0:status:Success. - The
SignatureMethodalgorithm ishttp://www.w3.org/2001/04/xmldsig-more#rsa-sha256. - The
DigestMethodalgorithm ishttp://www.w3.org/2001/04/xmlenc#sha256. No assertion encryption.
Service Provider (SP) - Dynatrace SSO
Just-in-Timeprovisioning is supported.- Session timeout is
1hour and is not configurable.
SSO metadata
- For global federation, Dynatrace SSO SP metadata is provided at https://sso.dynatrace.com/sso/metadata. If your IdP requires manual configuration and you don't have any XML parser extensions installed in your Chrome browser, we recommend that you view the metadata in Firefox.
For account or environment federation, you download unique SP metadata during SAML configuration as described below.
Depending on the IdP type, these endpoints need to be configured as follows.
Global federation
https://sso.dynatrace.com:443/saml2/loginfor Entity ID (Audience Restriction).https://sso.dynatrace.com:443/saml2/sp/consumerfor Single Sign On URL, Destination URL, Recipient URL.https://sso.dynatrace.com:443/saml2/sp/logoutfor Single Logout Service URL.
If your IdP configuration screen contains the option to set SAML bindings for sign-in or sign-out, set it to urn:oasis:names:tc:SAML:2.0:bindings:HTTP-POST.
Account or environment federation
-
https://sso.dynatrace.com/identity-federation/federation/<configuration-UUID>for Entity ID.In the XML metadata file, look for
md:EntityDescriptorand find the value ofentityID. -
https://sso.dynatrace.com/identity-federation/sp/consumer/account/<account-UUID>/federation/<configuration-UUID>for Assertion Consumer Service (ACS).In the XML metadata file, look for
md:AssertionConsumerServiceand find the value ofLocation. -
https://sso.dynatrace.com/identity-federation/sp/logout/account/<account-UUID>/federation/<configuration-UUID>for Logout URL.In the XML metadata file, look for
md:SingleLogoutServiceand find the value ofLocation.
SAML federated IdP configuration
To set up SAML for your domain
Create a fallback user account

Verify your ownership of the domain

Configure SAML

Test your configuration

Create a fallback user account
Your fallback account must be a non-federated user account belonging to a group that has View and manage users and groups permission and isn't covered by the federated sign-in.
-
For global federation, when a user signs in, Dynatrace checks the domain part of your corporate email address to determine whether SAML was configured for that domain. If there's a match, the sign-in is redirected to your company’s IdP for authentication. For a fallback, you need an email address that won't be redirected like this.
If you are using global federation, you must create a fallback user account so you won't be locked out if you have configuration troubles.
-
To sign in without using Account or Environment federation, open
https://sso.dynatrace.comin incognito mode and sign in using credentials. (If you sign in using credentials, however, you won't have any SAML group assigned in your session.)If the user belongs to any global federation, however, they are redirected to the global federation IdP, not signed in using their credentials.
To create a fallback account
- Go to Account Management > your account > Identity & access management > People and select Invite user.
- In the User email step, enter a non-federated email address (an email address with a different domain from the one for which you are setting up SAML) and then select Next.
- In the Add to groups step, add the user to a group that has View and manage users and groups permission and then select Next.
- In the Confirm permissions step, confirm that you have added the correct permissions and then select Invite.
Verify your ownership of the domain
Before you can configure the domain for which you want to set up SAML, you need to prove ownership of the domain.
-
Go to Account Management > your account > Identity & access management > Domain verification.
-
In the Add domain section, enter the domain (for example,
mycompanyname.com) for which you want to set up SAML and select Add to add it to the Pending domains table.If users in your organization use more than one domain to sign in (for example,
@mycompanyname.comand@uk.mycompanyname.com), you can add additional domains in additional rows and start verifying them all in parallel. Enter each domain in a different row. -
For each domain you are verifying, in the Pending domains table, select Copy (in the Value column) and add the copied TXT resource record to your domain’s DNS configuration.
-
For each domain you are verifying, in the Pending domains table, select Actions > Verify so that Dynatrace can verify that the record was added to your domain’s DNS.
It typically takes a few minutes for a record to propagate through the DNS system and the value to become available for Dynatrace to verify. In some cases, it may take up to 24 hours.
-
Each verified domain is added to the Verified domains table.
Configure SAML
Go to Account Management > your account > Identity & access management > SAML configuration to list all SAML configurations for the selected account. This is your starting point for managing SAML configurations.
| Action | How to do it |
|---|---|
Find | To find a SAML configuration, use the filter controls above the table. You can filter by Search table (text), Scope, and Domain. |
Create | To create a new SAML configuration, select the New configuration button above the table. |
Edit | To edit an existing SAML configuration, find the configuration in the table and, in the Actions column, select |
Disable | To disable an existing SAML configuration, find the configuration in the table and, in the Actions column, select |
Delete | To delete an existing SAML configuration, find the configuration in the table and, in the Actions column, select |

After you create a fallback user account and verify your ownership of the domain, go to Identity & access management > SAML configuration and select New configuration to create a new SAML configuration.
-
Federation type: select one of the three federation types and then select Next.
After a SAML configuration is created:
You can't change the type from Global to Account or Environment, or from Account or Environment to Global.
You can change the type from Account to Environment, or from Environment to Account.
Account-specific federation federates your user's identity based on the domain part of the email address. The scope is limited by your account. Your configuration does not impact any other accounts from your company using the same domain. It's valid only within the boundaries of your account and environment.
Environment-specific federation also federates your user's identity based on the domain part of the email, but the scope is limited to one or more environments. You can, for instance, enable identity federation for your dev monitoring environment using your dev IdP instance.
Global cross-account federation also federates your user's identity based on the domain part of the email address. Its scope is global: it affects all other accounts in Dynatrace sharing the same domain part of the user's email. If your company has several Dynatrace accounts and you are using the same domain to sign in for all of your accounts, then the other accounts inherit the federation configuration automatically and use your identity provider for authentication.
For details, see Federation types.
-
SAML metadata: configure the SAML metadata and then select Next.
-
Name or description for configuration
Enter the name for your configuration that you want to display in the Configurations table on the SAML configuration page.
-
Dynatrace service provider metadata:
If you're creating an Account or Environment type federation, the Generate SP metadata button in this step creates a disabled, blank configuration in the account that's needed to register a new virtual Service Provider instance, which is required for generating the SP metadata. If you select Generate SP metadata and then you want to abandon the configuration, be sure to delete the blank SAML configuration.
Select Download SP metadata to download the service provider (SP) metadata from Dynatrace.
This gets the metadata from Dynatrace that you need to use on the IdP end of this configuration.
-
Register this data at your IdP.
-
From your IdP, get the metadata of your IdP in XML format.
You need this file in the Identity provider metadata section below.
Exact details of the activities involved in this step depend on your IdP's interface and requirements.
IdP-specific instructionsDynatrace supports all IdPs that support the SAML 2.0 standard. For frequently used IdPs, we have IdP-specific instructions for registering the SP data at your IdP and getting the IdP metadata. These examples were correct at the time of writing, but Dynatrace has no control over changes that may be made by your IdP.
The
X509Certificateappended to metadata needs to be signed using one of the following algorithms:SHA256withRSA,SHA384withRSA, orSHA512withRSA. -
-
Identity provider metadata
Select Choose file to specify the metadata file you received from your IdP.
-
Attribute mapping optional
Specify where to get the attribute values when Dynatrace reads SAML payloads.
Attribute Location Firstname For Microsoft Azure: http://schemas.xmlsoap.org/ws/2005/05/identity/claims/givennameLastname For Microsoft Azure: http://schemas.xmlsoap.org/ws/2005/05/identity/claims/surnameFederated The groups/roles of a user from your IdP. You need this value if you want to use SAML authorization. In this example:
- First Name:
Sandy - Last Name:
McSample - Federated attribute:
http://schemas.microsoft.com/ws/2008/06/identity/claims/groups - Security Group Claims:
5ab67c8d-9e0f-1ghi-23j4-56klmn7o8p9q, etc.
<AttributeStatement><Attribute Name="http://schemas.microsoft.com/identity/claims/tenantid"><AttributeValue>70ebe3a3-5b30-435d-9d67-7716d74ca190</AttributeValue></Attribute><Attribute Name="http://schemas.microsoft.com/identity/claims/objectidentifier"><AttributeValue>c72581d1-f178-4a50-9816-504ee495bc15</AttributeValue></Attribute><Attribute Name="http://schemas.microsoft.com/identity/claims/displayname"><AttributeValue>McSample, Sandy</AttributeValue></Attribute><Attribute Name="http://schemas.microsoft.com/ws/2008/06/identity/claims/groups"><AttributeValue>5ab67c8d-9e0f-1ghi-23j4-56klmn7o8p9q</AttributeValue>(...)<AttributeValue>5ba67c8d-9e0f-1ghi-23j4-56klmn7o8p9q</AttributeValue></Attribute><Attribute Name="http://schemas.microsoft.com/identity/claims/identityprovider"><AttributeValue>https://sts.windows.net/70ebe3a3-5b30-435d-9d67-7716d74ca190/</AttributeValue></Attribute><Attribute Name="http://schemas.microsoft.com/claims/authnmethodsreferences"><AttributeValue>http://schemas.microsoft.com/ws/2008/06/identity/authenticationmethod/password</AttributeValue><AttributeValue>http://schemas.microsoft.com/claims/multipleauthn</AttributeValue></Attribute><Attribute Name="http://schemas.xmlsoap.org/ws/2005/05/identity/claims/givenname"><AttributeValue>Sandy</AttributeValue></Attribute><Attribute Name="http://schemas.xmlsoap.org/ws/2005/05/identity/claims/surname"><AttributeValue>McSample</AttributeValue></Attribute><Attribute Name="http://schemas.xmlsoap.org/ws/2005/05/identity/claims/emailaddress"><AttributeValue>Sandy.McSample@dynatrace.com</AttributeValue></Attribute><Attribute Name="http://schemas.xmlsoap.org/ws/2005/05/identity/claims/name"><AttributeValue>Sandy.McSample@dynatrace.com</AttributeValue></Attribute></AttributeStatement> - First Name:
-
-
Validation: validate your configuration and then select Next.
Validation starts automatically when you move to the validation step. If you select Previous to go back and change settings, validation will restart when you select Next to return to the validation step.
During validation, you are redirected to the federated IdP for sign-in, and then sign-in results are displayed for you to review. The configuration passes validation when you sign in through the federated IdP and Dynatrace resolves the user sign-in from the SAML message.
The validation step prevents any misconfiguration that could result in account lock-out and ensures that users can sign in.
-
Scope assignment: assign scopes and then select Next.
Account federationAccount-specific federation federates your user's identity based on the domain part of the email address. The scope is limited by your account and your configuration will not impact any other accounts from your company using the same domain. It is only valid within the boundaries of your account and environment.
Verify the federation type you have selected. If you need to change it, use Previous to go back to the Federation type step and then use Next to return to this step.
Then specify one of the following:
Select this option to specify each of the domains from which you want to allow authentication.
When this is selected:
- If you have selected Allow users from all other domains to authenticate via your IdP, it is now cleared.
Only users whose email address matches one of the selected domains will be authenticated via your IdP.
Select this option if you want to authenticate users from domains other than the domains you chose in Select domains for configuration.
When this is selected:
- Any selection you have made in Select domains for configuration is cleared.
All users that sign in to your account or environment will always be authenticated via your IdP, regardless of the domain in their email address. This can be useful, for example, if you manage external contractors in your identity provider who don't have a selected email address for signing in.
Environment federationEnvironment-specific federation also federates your user's identity based on the domain part of the email, but the scope is limited to one or more environments. You can, for instance, enable the identity federation for your dev monitoring environment using your dev IDP instance.
For each environment federation you want to add
- Select Add federation.
- Define the federation.
- Select environment: Select the environment
- Select domains: Select one or more domains
-
Activation: activate your configuration.
Turn on Enable SSO and select Complete configuration.
Test your configuration
To test your configuration
-
Open a new browser instance and a new incognito window.
-
Sign in to one of your Dynatrace environments.
To test an Account or Environment federation, go to the tenant URL first, because that's how Dynatrace SSO gets the context (for example, from
https://abc12345.live.dynatrace.com).
Troubleshooting:
- If you experience trouble, use the fallback user account you created earlier to sign in and change the configuration or disable federation.
- See Frequently Asked Questions below for answers to common questions.
SAML authorization
To use SAML authorization to manage permissions in Dynatrace, you need to specify the security group claim attribute in the attribute mapping configuration that contains the groups/roles of a user from your IdP, and then map groups from your IdP to groups in Dynatrace.
In Dynatrace, all user group permissions are joined together. The user will be granted permissions from all group types: LOCAL, SAML, and SCIM. It is the Account Manager's responsibility to decide if and how user permissions are isolated.
-
Go to Account Management > your account > Identity & access management > Groups and add a new group or find an existing group you want to map. You can filter the list by name and permissions.
Important
- We strongly recommend that you first create a new group (select Create group) to test whether SAML authorization works for that group.
- Switching a
LOCALgroup toSAMLremoves all user assignments to that group. - Make sure you have a non-federated user with manage groups permission as discussed earlier.
-
Expand the Edit pane of the group to set up a mapping.
-
Group name—Make sure it matches the group you intend to edit.
-
Security group claims—A list of one or more federated group names returned by your IdP and mapped to this Dynatrace group.
Select Add claim if you need to add a claim.
This typically isn't a group display name. It can be, for example, an LDAP ID.When you specify security group claim for a group and select Save:
- All existing users from that group are removed.
- The group becomes a federated group. Assignment of users to that group is then controlled via the Security group claim attribute that you specified on Single-sign on.
- The type of the group changes to
SAML
-
Account permissions
Account-related permissions for members of this group. -
Environment permissions
Environment-related permissions for members of this group. -
Management zone permissions
Management zone—related permissions for members of this group.
-
-
Select Save.
Note: Don't sign out of Dynatrace yet. -
Open a new browser instance and a new incognito window and sign in.
-
Go to Account Management and verify that you can still see Identity & and access management > People and Identity & and access management > Groups.
If you can't see them, you've lost your Dynatrace admin permissions. Use the non-federated user account to change the configuration if you've run into any issues. -
Dynatrace checks Security group claims of each user following successful sign-in. If a matching Dynatrace group is found, the user is added to the Dynatrace group and inherits all permissions of that group.
Note:
When using SAML authentication, you don't have to invite users to Dynatrace. During sign-in, a user that doesn't already exist in Dynatrace is created automatically.
- Upon each sign-in, the Dynatrace group assignment is updated based on the values specified by the Federated attribute.
Frequently Asked Questions
SAML configuration and attributes
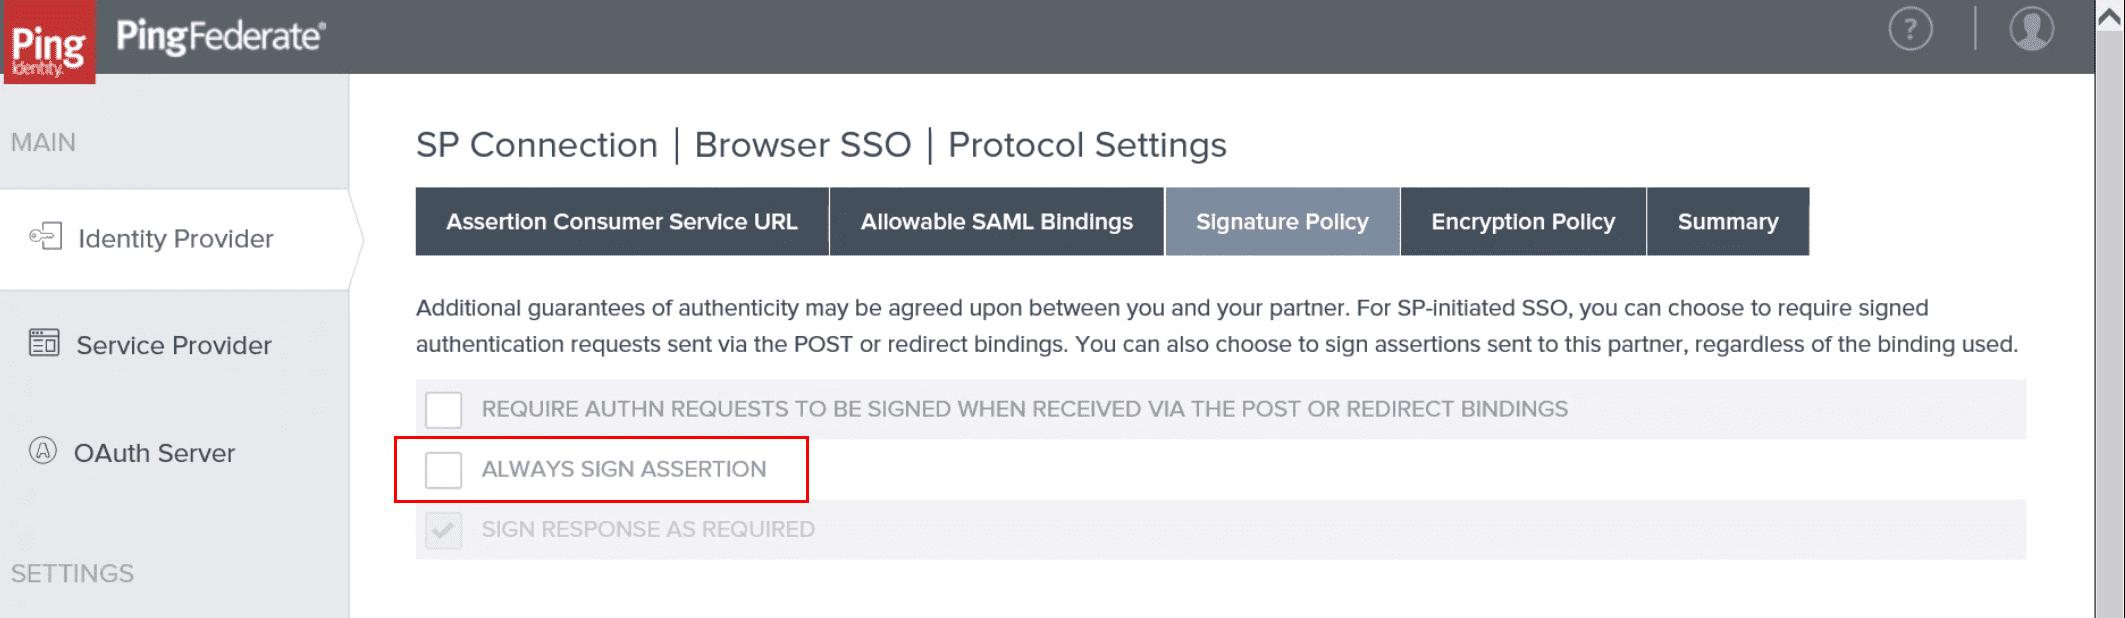
If you are using PingFederate as an IdP and you get a Missing Destination Attribute value error
- Go to PingFederate and select Identity Provider in the left sidebar.
- Select the Signature Policy tab.
- Clear the ALWAYS SIGN ASSERTION checkbox as in the following example.
The NameIdFormat must be urn:oasis:names:tc:SAML:1.1:nameid-format:emailAddress.
You need two issuance transform rules, in this order:
- The first one uses the
Send LDAP Attributes as Claimsrule template and creates an outgoing claim type namedE-Mail Addressfrom an LDAP attribute in your attribute store containing the Dynatrace username (the user’s domain email address). - The second one uses the
Transform an Incoming Claimrule template and creates an outgoing claim typeName IDand outgoing name ID formatEmailwith thePass through all claim valuesoption enabled.
Yes, Dynatrace supports JIT creation of users when using SAML federation. Federated users are created or updated on the fly after successful authentication.
No, it can be removed after Dynatrace has successfully validated ownership of the domain.
No, a full DN contains commas, and this is recognized as independent group names. The IdP should send the group name or group ID.
Yes. When a Dynatrace environment URL is sent in the RelayState parameter, the user is redirected to the specified URL upon signing in. When the RelayState value is missing, the user is redirected to the last accessed Dynatrace tenant or account page.
Depending on the IdP, setting RelayState in an IdP SAML configuration usually affects all IdP users. Dynatrace SSO does not support a default destination per user.
Yes. If the value of the Group SAML attribute contains a comma-separated list of groups, the value will be split by comma and interpreted as a list of groups.
Yes. For example, if your IdP returned groups as the LDAP path:
CN=Admin,OU=SSO Team,DC=dynatrace,DC=com
Dynatrace would interpret this as a comma-separated list of four groups:
CN=Admin, OU=SSO Team, DC=dynatrace, and DC=com
In group mapping, you should use one of these values.
The signing certificate inside the IdP metadata has expired since you set up the SAML configuration. The metadata is always validated at the beginning of the verification process.
To solve this, you need to rotate the signing certificate on your IdP side, save (or copy) the updated IdP metadata, and upload it to your federation configuration in Dynatrace.
Authentication and logout
Upon sign-out, a global sign-out is triggered, including for your IdP, which then cascades to other services. Otherwise, you would be signed out from Dynatrace, but it would be sufficient to just enter your email to re-authenticate.
If you want to disable it (not a good idea from a security standpoint), edit your metadata, remove all SingleLogoutService tags, and upload the updated metadata.
Yes, but you need to perform domain verification and create a configuration for each domain separately. Each domain configuration can use the same IdP metadata and settings.
Yes, both IdP-initiated sign-in and RelayState are supported.
If your security policy requires emergency access to Dynatrace in case of problems with your IdP, we recommend that you invite a non-federated user to the environment with Account manager permissions and use that as your Break Glass account.
If this is not an option, you can configure an additional federated domain to a different IdP and use it for backup sign-on in case of problems with your regular IdP.
Configuring multi-factor authentication (MFA) is not supported by Dynatrace. You can configure authentication and MFA through your organization's IdP.
Configuring multi-factor authentication (MFA) is not supported by Dynatrace. You can configure authentication and MFA through your organization's IdP.
Signatures and certificates
Whole messages need to be signed, including sign-out requests and responses. It isn't sufficient to sign just the assertion part.
Yes, customer IdP metadata can contain multiple signing certificates. Dynatrace SSO validates that SAML messages from the customer IdP are signed by one of them.
SAML metadata can contain more than one certificate, not all of which need to be valid. This is very useful when you want to rotate your certificates because the current one is going to expire.
To switch certificates
-
Create a new certificate that meets our requirements.
CautionDon't change it on your IdP side yet! If you do so, you will cut access to the Dynatrace environment.
-
Append the new certificate to your metadata in Dynatrace.
-
If your IdP allows you to include more than one certificate, you can add the certificate in the IdP and then upload to Dynatrace the entire updated metadata generated by your IdP.
To maintain uninterrupted access to Dynatrace during certificate rotation, look at the entries between the
<KeyDescriptor>tags to verify that the XML metadata contains two different certificates, as shown in the example below.<KeyDescriptor use="signing"><KeyInfo xmlns="http://www.w3.org/2000/09/xmldsig#"><X509Data><X509Certificate>(...) Certificate 1 (...)</X509Certificate></X509Data></KeyInfo></KeyDescriptor><KeyDescriptor use="signing"><KeyInfo xmlns="http://www.w3.org/2000/09/xmldsig#"><X509Data><X509Certificate>(...) Certificate 2 (...)</X509Certificate></X509Data></KeyInfo></KeyDescriptor>Be aware that Azure XML metadata might not contain the new certificate immediately after it is created. If you notice that the certificate is missing, wait a few minutes to allow Azure to process the new certificate and then download the XML metadata again.
-
Otherwise, copy the full
<KeyDescriptor use="signing"> (...) </KeyDescriptor>element in metadata, paste it under the current one, and, in the copy, replace the certificate value with your new certificate value, which is located between the<ds:X509Certificate>and</ds:X509Certificate>tags in the<KeyDescriptor>element you just pasted.
-
-
Update the metadata on the Dynatrace side only.
-
If the verification process completes without issues, you can update the certificate on your IdP side.
-
Run the configuration test again.
-
optional To double-check your configuration, sign out and in again.
If you have problems, you can switch back to the older certificate in your IdP and try again. -
optional Remove the older certificate from your IdP metadata in Dynatrace.
For instructions on how to change the Dynatrace SAML certificate in your IdP, see SAML certificate migration
Troubleshooting
If, after you authenticate with your IdP, you are redirected to a Dynatrace page such as We’ve run into technical difficulties… or 400 Bad Request, it's likely that there's a problem with the configuration.
The most common causes of this are:
- Your IdP doesn’t accept an
authNrequest using ourNameIdformat and returns an error response with the status codeInvalidNameIdPolicy. TheNameIdFormatmust beurn:oasis:names:tc:SAML:1.1:nameid-format:emailAddress. You might also need a rule to create aNameIdusing our format. - You're using a
<saml:Attribute/>to return the Dynatrace username but the attribute wasn't recognized by Dynatrace; alternatively, we couldn't find it usingNameIDas we didn't recognize its format. See the previous question (What claim rules do I need in AD FS on the Dynatrace relying party?) for the proper format. Dynatrace didn't trust your IdP SAML signing certificate. The IdP SAML metadata you uploaded did not contain a certificate for signing that matches the certificate in the assertion sent by your IdP. Verify that the certificate is in the metadata XML file that was uploaded to Dynatrace. If you're using a URL to upload the metadata, look at the contents generated by the URL. In some organizations, the SAML signing certificate must be requested separately and manually inserted into the metadata by saving the URL contents to a file, adding the signing certificate to the file, and then uploading the file to us.
The response from the IdP isn't fully signed (the assertion signature might be present, but it isn't sufficient).
Your IdP doesn't accept some SAML objects or attributes that the SAML 2.0 specification describes as optional—contact a Dynatrace product expert via live chat.
If Error AADSTS50105 - The signed in user is not assigned to a role for the application occurs during federated authentication with Azure Active Directory (Azure AD), it indicates that the user hasn't been granted access to the application in Azure AD.
For details, see the Microsoft documentation:
If Error AADSTS50105 - The request has expired. Try to submit new request. occurs during federated authentication with Azure Active Directory (Azure AD), contrary to the error description, it indicates that the user tried to sign in to Dynatrace by IdP-initiated login (via M365 app launcher) while the Azure application had Signature Verification enabled. This is a limitation of Azure AD, as per SAML Request Signature Verification in the Microsoft documentation:
Enabling Require Verification certificates will not allow IDP-initiated authentication requests (like SSO testing feature, MyApps or M365 app launcher) to be validated as the IDP would not possess the same private keys as the registered application.
To resolve this issue, choose one of the following approaches:
Users need to use the Dynatrace environment URL to sign in to Dynatrace
Signature Verification needs to be disabled
For details, see the Microsoft documentation.
Glossary
| Term | Definition |
|---|---|
account | In the account scope, a customer can manage their federations, account verified domains, federated domains, and account default federation. An account is identified by UUID, which is typical for all Dynatrace applications. |
account domain | When the customer confirms their ownership of a given domain in the process of domain verification in the account, this domain becomes an account verified domain. An account can own multiple verified domains, and multiple accounts can own the same verified domain. |
account default federation | The default federation for a user who doesn't belong to any of the account federated domains. It's used in federation discovery. |
account federated guest | An account federated guest is created whenever a user logs in through account/environment-specific federation, but does not belong to any verified domain within the account. In this case, SSO creates a new user with a very specific identifier to make sure that this user is tied to a single account and does not interfere with the global user, who may freely be assigned to multiple accounts. The username of an account federated guest is remapped on the fly as follows:
For example, user
The mapping from the original login to the account federated guest stamp is automatic.
|
environment | Identified by ID, which is unique across Dynatrace (usually called tenantId). The environment belongs to one account. The environment defines how users sign into it. It can have a user-friendly alias. The alias is unique and the environment can have at least one alias. |
environment discovery | The process used to resolve the environment from the sign-in context. For details, see the Environment resolution section. |
federated domain | Association between domain and federation. When a user signs in to the account and belongs to a federated domain, they are redirected to federated domain's federation. It can be set on the account or environment scope. It's used in federation discovery. |
federation | Defines Dynatrace as a Service Provider (SP), which delegates sign-in, manages sessions, and manages user groups to the customer's Identity Provider (IdP). This configuration enables linking identities (users) to Dynatrace SSO. It has a unique UUID. The federation IdP ID corresponds to the entity ID from the SAML 2.0 specification. Federation belongs to the account. |
federation discovery | The process used to choose the federation for signing in users in the SP-initiated authentication. For details, see the Federation discovery section. |
global federation | Bound to the account verified domain and shared between all accounts having this domain. |
global user | The user for which, in the current setup, the username, login, and email are synonymous. |
IdP-initiated authentication | Sign-in process initiated by the federated IDP. For example, when the user wants to open Dynatrace application in the Azure Portal. For details, see the IdP-initiated authentication section. |
last used environment cookie | An optional cookie that contains the environment ID. For details, see the Environment discovery |
SP-initiated authentication | Sign-in process initiated by Dynatrace. For example, when the user wants to sign into the environment. For details, see the SP-initiated authentication section. |
username | The user enters their username on the SSO sign-in page to sign in. It's in email address format. |