Create a private Synthetic location
You can run your Dynatrace synthetic monitors from a private Synthetic location, which is a location in your private network infrastructure where you install one or more Synthetic-enabled ActiveGate instances.
With monitors executed from a private location, you can bring the testing capabilities available in public locations right into your own environment. With private locations you can:
Measure internal webpage performance and availability.
Measure complex internal applications with browser clickpaths.
Measure external resources with synthetic monitors run from internal locations.
Monitor APIs, both internal and external.
Private Synthetic locations support all types of Dynatrace synthetic monitors.
System and hardware requirements for private locations
Make sure the target host you plan to use for running synthetic monitors complies with system and hardware requirements for private Synthetic locations. Note that Synthetic-enabled ActiveGates have more demanding hardware and system requirements than a regular Environment or Cluster ActiveGate.
Synthetic-enabled ActiveGate installed on Ubuntu 20.04 LTS and 22.04 LTS only You can use TEMP to customize the default temporary directory for private Synthetic files—/var/tmp/dynatrace/synthetic. However, the path must begin with /var/tmp, for example, TEMP=/var/tmp/syn. Dynatrace requires write access to /var/tmp for the installation of Chromium snap packages.
Chromium development for Ubuntu 18.04 stopped at version 112. For important security and performance reasons, we’ve decided to discontinue our support for installing Synthetic-enabled ActiveGate on Ubuntu 18 after ActiveGate version 1.283. ActiveGate version 1.283 is the last Synthetic-enabled ActiveGate supported on Ubuntu 18. Additionally, with Dynatrace version 1.284, we have introduced mechanisms preventing Synthetic-enabled ActiveGates on Ubuntu 18 from being updated beyond version 1.283.
- As Chromium development for Ubuntu 16.04 stopped at version 90, we can no longer assure a high enough level of stability and security for synthetic monitor execution on Ubuntu 16. We have discontinued our support for installing Synthetic-enabled ActiveGate on Ubuntu 16 after ActiveGate version 1.251. That is, ActiveGate version 1.251 is the last Synthetic-enabled ActiveGate supported on Ubuntu 16. With Dynatrace version 1.254, Synthetic-enabled ActiveGates on Ubuntu 16 can no longer be updated.
Before you begin
- You cannot execute synthetic monitors using an Environment ActiveGate configured for multi-environment support.
- You can create a private location using a clean-installed Synthetic-enabled Environment ActiveGate version 1.169+ or Cluster ActiveGate with Dynatrace Managed version 1.176+. If you want to use an existing ActiveGate host, uninstall ActiveGate first.
Synthetic-enabled ActiveGate is used exclusively to run synthetic monitors. A clean ActiveGate installation for the purpose of synthetic monitoring disables all other ActiveGate features, including communication with OneAgents.
- Make sure that the ActiveGate can connect to other Dynatrace components as well as the resource you want to test. See Set up a proxy for private synthetic monitoring.
- Only IPv4 and DNS UDP are supported for network configuration.
- Synthetic-enabled ActiveGate needs access to the Amazon S3 service to upload and access browser monitor screenshots from private locations. Ensure that your firewall configuration allows connections to
*.s3-accelerate.amazonaws.comon port443. You can also set up your proxy to connect to the Amazon S3 service. (Screenshots are stored in a different folder for each monitoring environment, but the S3 Bucket is the same (ruxit-synth-screencap). Data is encrypted by Amazon S3-managed key.) - If you plan to install Chromium and dependencies manually, ensure access to
https://synthetic-packages.s3.amazonaws.com. For security reasons, public access to the S3 bucket is enabled only for specific files; trying anything else will result in a 403 error.
Install a Synthetic-enabled ActiveGate
Synthetic-enabled ActiveGate is used exclusively to run synthetic monitors. A clean ActiveGate installation for the purpose of synthetic monitoring disables all other ActiveGate features, including communication with OneAgents. Make sure the host on which you install the ActiveGate has access to the internet.
If this web UI-guided installation fails, or you prefer to prepare the host for the Synthetic engine yourself, you can manually install Chromium and other dependencies via S3. You can also install Chromium from a custom, local repository.
-
For Environment ActiveGate, in Dynatrace Hub, select ActiveGate > Set up.
For Cluster ActiveGate, go to the Dynatrace Cluster Management Console and select More
 > Add new Cluster ActiveGate.
 -
Select the operating system to view instructions.
-
Create a PaaS Token or enter an existing token. This token has the Download OneAgent and ActiveGate installers
InstallerDownloadtoken scope, which allows you to download the ActiveGate installer. Once provided, the token is automatically appended to download and installation commands, which are then displayed in the UI.You can find existing tokens listed on the Access tokens page. Note that a PaaS token is only displayed once upon creation, after which it's stored encrypted and cannot be revealed. We recommend that you store a PaaS token after creation in a password manager so that you can reuse it as needed.
-
Linux only For Choose installer type, keep the default selection:
x86/64. -
For What's the purpose of this ActiveGate, select Run synthetic monitors from a private location.
-
optional Assign the ActiveGate to a private Synthetic location—select a location from the dropdown list. You can also assign the ActiveGate to a location after installation.
-
optional Set customized options to assign the ActiveGate to a Network zone and ActiveGate group.
-
Download the installer to the target host.
-
Linux only recommended Verify signature—run the displayed command on the target host to download a certificate file and verify the installer.
-
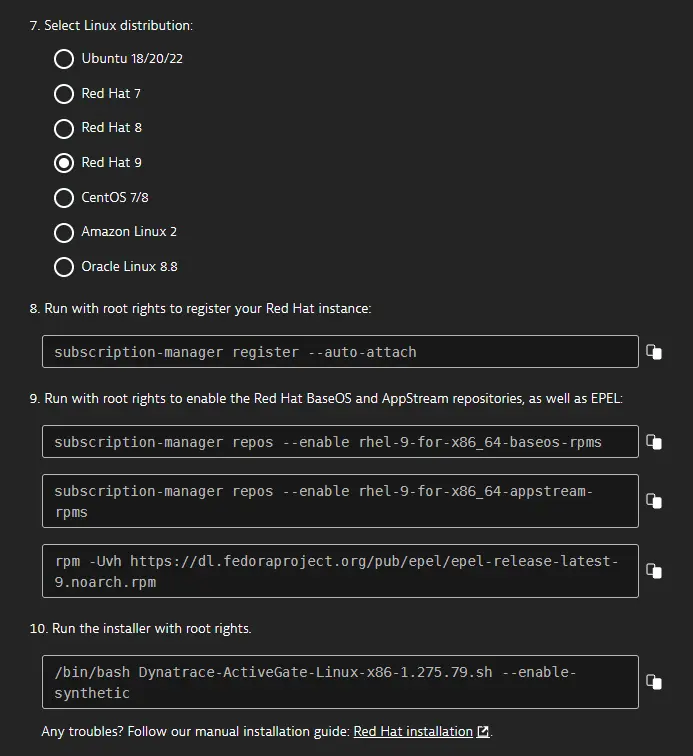
Linux only Select a Linux distribution.
-
Run the installer and any other commands—make sure you use the exact commands displayed in the UI.
Linux only The installer automatically downloads Chromium and the dependencies required by the Synthetic engine. On Red Hat, CentOS, Amazon Linux 2, and Oracle Linux, you also need to enable repositories from which the installer downloads the dependencies. As a prerequisite for enabling proprietary repositories on Red Hat, you need to register your Red Hat instance. The web UI provides you with all the required commands for doing so, as shown in the example below.
-
Verify the ActiveGate installation (Show deployment status).
Add a private location
Create a synthetic monitor
Now, when you create your HTTP or browser monitor, select the location you've just created from the list of all available locations. For more information, see Create an HTTP monitor, Create a single-URL browser monitor, or Record a browser clickpath.
Linux only Install Chromium and dependencies manually from S3
If the web UI-guided installation fails or you prefer to prepare the host for the Synthetic engine yourself, you can install Chromium and other dependencies using the procedure below. Ensure that you can connect to https://synthetic-packages.s3.amazonaws.com to access Chromium and dependencies. For security reasons, public access to the S3 bucket is enabled only for specific files; trying anything else will result in a 403 error.
Also see Install Chromium from a custom repository below.
See how to update Chromium manually in Manage private Synthetic locations. We strongly recommend that you keep your Linux-based Synthetic-enabled ActiveGates and Chromium versions updated—Dynatrace supports Chromium versions that are no more than two versions behind the latest Dynatrace-supported version for a specific ActiveGate release.
Ubuntu Server
Chromium development for Ubuntu 16.04 stopped at version 90. ActiveGate version 1.251 is the last Synthetic-enabled ActiveGate supported on Ubuntu 16.
Chromium development for Ubuntu 18.04 stopped at version 112. ActiveGate version 1.283 is the last Synthetic-enabled ActiveGate supported on Ubuntu 18.
-
Install Synthetic engine dependencies:
-
Download and install Chromium.
-
Download the deb (Ubuntu 16.04 and 18.04) or snap (Ubuntu 20.04 and 22.04) package archive. This is a safe and verified archive hosted by Dynatrace.
Ubuntu 20.04 and 22.04
curl --output chromium.tgz https://synthetic-packages.s3.amazonaws.com/Chromium/snap/chromium-121.0.6167.184-2757.tgzUbuntu 20.04 and 22.04
curl --output chromium.tgz https://synthetic-packages.s3.amazonaws.com/Chromium/snap/chromium-120.0.6099.224-2734.tgzUbuntu 18.04
curl --output chromium.tgz https://synthetic-packages.s3.amazonaws.com/Chromium/deb/chromium-112.0.5615.49-0ubuntu0.18.04.1.tgzUbuntu 20.04 and 22.04
curl --output chromium.tgz https://synthetic-packages.s3.amazonaws.com/Chromium/snap/chromium-120.0.6099.129-2719.tgzUbuntu 18.04
curl --output chromium.tgz https://synthetic-packages.s3.amazonaws.com/Chromium/deb/chromium-112.0.5615.49-0ubuntu0.18.04.1.tgzUbuntu 20.04 and 22.04
curl --output chromium.tgz https://synthetic-packages.s3.amazonaws.com/Chromium/snap/chromium-119.0.6045.159-2695.tgzUbuntu 18.04
curl --output chromium.tgz https://synthetic-packages.s3.amazonaws.com/Chromium/deb/chromium-112.0.5615.49-0ubuntu0.18.04.1.tgzUbuntu 20.04 and 22.04
curl --output chromium.tgz https://synthetic-packages.s3.amazonaws.com/Chromium/snap/chromium-118.0.5993.70-2666.tgzUbuntu 18.04
curl --output chromium.tgz https://synthetic-packages.s3.amazonaws.com/Chromium/deb/chromium-112.0.5615.49-0ubuntu0.18.04.1.tgzUbuntu 20.04 and 22.04
curl --output chromium.tgz https://synthetic-packages.s3.amazonaws.com/Chromium/snap/chromium-117.0.5938.149-2655.tgzUbuntu 18.04
curl --output chromium.tgz https://synthetic-packages.s3.amazonaws.com/Chromium/deb/chromium-112.0.5615.49-0ubuntu0.18.04.1.tgzUbuntu 20.04 and 22.04
curl --output chromium.tgz https://synthetic-packages.s3.amazonaws.com/Chromium/snap/chromium-116.0.5845.187-2623.tgzUbuntu 18.04
curl --output chromium.tgz https://synthetic-packages.s3.amazonaws.com/Chromium/deb/chromium-112.0.5615.49-0ubuntu0.18.04.1.tgzUbuntu 20.04 and 22.04
curl --output chromium.tgz https://synthetic-packages.s3.amazonaws.com/Chromium/snap/chromium-113.0.5672.63-2465.tgzUbuntu 18.04
curl --output chromium.tgz https://synthetic-packages.s3.amazonaws.com/Chromium/deb/chromium-111.0.5563.64-0ubuntu0.18.04.5.tgzUbuntu 20.04 and 22.04
curl --output chromium.tgz https://synthetic-packages.s3.amazonaws.com/Chromium/snap/chromium-111.0.5563.146-2415.tgzUbuntu 18.04
curl --output chromium.tgz https://synthetic-packages.s3.amazonaws.com/Chromium/deb/chromium-110.0.5481.100-0ubuntu0.18.04.1.tgzUbuntu 20.04 and 22.04
curl --output chromium.tgz https://synthetic-packages.s3.amazonaws.com/Chromium/snap/chromium-110.0.5481.177-2367.tgzUbuntu 18.04
curl --output chromium.tgz https://synthetic-packages.s3.amazonaws.com/Chromium/deb/chromium-109.0.5414.74-0ubuntu0.18.04.14.tgzUbuntu 20.04 and 22.04
curl --output chromium.tgz https://synthetic-packages.s3.amazonaws.com/Chromium/snap/chromium-109.0.5414.119-2295.tgzUbuntu 18.04
curl --output chromium.tgz https://synthetic-packages.s3.amazonaws.com/Chromium/deb/chromium-108.0.5359.71-0ubuntu0.18.04.5.tgzUbuntu 20.04 and 22.04
curl --output chromium.tgz https://synthetic-packages.s3.amazonaws.com/Chromium/snap/chromium-108.0.5359.124-2254.tgzUbuntu 18.04
curl --output chromium.tgz https://synthetic-packages.s3.amazonaws.com/Chromium/deb/chromium-107.0.5304.87-0ubuntu11.18.04.1.tgzUbuntu 20.04 and 22.04
curl --output chromium.tgz https://synthetic-packages.s3.amazonaws.com/Chromium/snap/chromium-107.0.5304.121-2221.tgzUbuntu 18.04
curl --output chromium.tgz https://synthetic-packages.s3.amazonaws.com/Chromium/deb/chromium-107.0.5304.87-0ubuntu11.18.04.1.tgzUbuntu 20.04 and 22.04
curl --output chromium.tgz https://synthetic-packages.s3.amazonaws.com/Chromium/snap/chromium-107.0.5304.87-2168.tgzUbuntu 18.04
curl --output chromium.tgz https://synthetic-packages.s3.amazonaws.com/Chromium/deb/chromium-105.0.5195.102-0ubuntu0.18.04.1.tgzUbuntu 20.04 and 22.04
curl --output chromium.tgz https://synthetic-packages.s3.amazonaws.com/Chromium/snap/chromium-106.0.5249.91-2117.tgzUbuntu 16.04
curl --output chromium.tgz https://synthetic-packages.s3.amazonaws.com/Chromium/deb/chromium-90.0.4430.72-0ubuntu0.16.04.1.tgzUbuntu 18.04
curl --output chromium.tgz https://synthetic-packages.s3.amazonaws.com/Chromium/deb/chromium-105.0.5195.102-0ubuntu0.18.04.1.tgzUbuntu 20.04 and 22.04
curl --output chromium.tgz https://synthetic-packages.s3.amazonaws.com/Chromium/snap/chromium-105.0.5195.102-2082.tgzUbuntu 16.04
curl --output chromium.tgz https://synthetic-packages.s3.amazonaws.com/Chromium/deb/chromium-90.0.4430.72-0ubuntu0.16.04.1.tgzUbuntu 18.04
curl --output chromium.tgz https://synthetic-packages.s3.amazonaws.com/Chromium/deb/chromium-103.0.5060.134-0ubuntu0.18.04.1.tgzUbuntu 20.04 and 22.04
curl --output chromium.tgz https://synthetic-packages.s3.amazonaws.com/Chromium/snap/chromium-103.0.5060.134-2036.tgzUbuntu 16.04
curl --output chromium.tgz https://synthetic-packages.s3.amazonaws.com/Chromium/deb/chromium-90.0.4430.72-0ubuntu0.16.04.1.tgzUbuntu 18.04
curl --output chromium.tgz https://synthetic-packages.s3.amazonaws.com/Chromium/deb/chromium-101.0.4951.64-0ubuntu0.18.04.1.tgzUbuntu 20.04
curl --output chromium.tgz https://synthetic-packages.s3.amazonaws.com/Chromium/snap/chromium-101.0.4951.64-1993.tgzUbuntu 16.04
curl --output chromium.tgz https://synthetic-packages.s3.amazonaws.com/Chromium/deb/chromium-90.0.4430.72-0ubuntu0.16.04.1.tgzUbuntu 18.04
curl --output chromium.tgz https://synthetic-packages.s3.amazonaws.com/Chromium/deb/chromium-100.0.4896.127-0ubuntu0.18.04.1.tgzUbuntu 20.04
curl --output chromium.tgz https://synthetic-packages.s3.amazonaws.com/Chromium/snap/chromium-100.0.4896.127-1967.tgzUbuntu 16.04
curl --output chromium.tgz https://synthetic-packages.s3.amazonaws.com/Chromium/deb/chromium-90.0.4430.72-0ubuntu0.16.04.1.tgzUbuntu 18.04
curl --output chromium.tgz https://synthetic-packages.s3.amazonaws.com/Chromium/deb/chromium-99.0.4844.84-0ubuntu0.18.04.1.tgzUbuntu 20.04
curl --output chromium.tgz https://synthetic-packages.s3.amazonaws.com/Chromium/snap/chromium-99.0.4844.84-1945.tgzUbuntu 16.04
curl --output chromium.tgz https://synthetic-packages.s3.amazonaws.com/Chromium/deb/chromium-90.0.4430.72-0ubuntu0.16.04.1.tgzUbuntu 18.04
curl --output chromium.tgz https://synthetic-packages.s3.amazonaws.com/Chromium/deb/chromium-95.0.4638.69-0ubuntu0.18.04.1.tgzUbuntu 20.04
curl --output chromium.tgz https://synthetic-packages.s3.amazonaws.com/Chromium/snap/chromium-96.0.4664.110-1854.tgzUbuntu 16.04
curl --output chromium.tgz https://synthetic-packages.s3.amazonaws.com/Chromium/deb/chromium-90.0.4430.72-0ubuntu0.16.04.1.tgzUbuntu 18.04
curl --output chromium.tgz https://synthetic-packages.s3.amazonaws.com/Chromium/deb/chromium-94.0.4606.71-0ubuntu0.18.04.1.tgzUbuntu 20.04
curl --output chromium.tgz https://synthetic-packages.s3.amazonaws.com/Chromium/snap/chromium-94.0.4606.71-1772.tgzUbuntu 16.04
curl --output chromium.tgz https://synthetic-packages.s3.amazonaws.com/Chromium/deb/chromium-90.0.4430.72-0ubuntu0.16.04.1.tgzUbuntu 18.04
curl --output chromium.tgz https://synthetic-packages.s3.amazonaws.com/Chromium/deb/chromium-91.0.4472.77-0ubuntu0.18.04.1.tgzUbuntu 20.04
curl --output chromium.tgz https://synthetic-packages.s3.amazonaws.com/Chromium/snap/chromium-92.0.4515.131-1691.tgzUbuntu 16.04
curl --output chromium.tgz https://synthetic-packages.s3.amazonaws.com/Chromium/deb/chromium-90.0.4430.72-0ubuntu0.16.04.1.tgzUbuntu 18.04
curl --output chromium.tgz https://synthetic-packages.s3.amazonaws.com/Chromium/deb/chromium-91.0.4472.77-0ubuntu0.18.04.1.tgzUbuntu 20.04
curl --output chromium.tgz https://synthetic-packages.s3.amazonaws.com/Chromium/snap/chromium-91.0.4472.77-1608.tgzUbuntu 16.04
curl --output chromium.tgz https://synthetic-packages.s3.amazonaws.com/Chromium/deb/chromium-90.0.4430.72-0ubuntu0.16.04.1.tgzUbuntu 18.04
curl --output chromium.tgz https://synthetic-packages.s3.amazonaws.com/Chromium/deb/chromium-90.0.4430.72-0ubuntu0.18.04.1.tgzUbuntu 20.04
curl --output chromium.tgz https://synthetic-packages.s3.amazonaws.com/Chromium/snap/chromium-90.0.4430.93-1568.tgzUbuntu 16.04
curl --output chromium.tgz https://synthetic-packages.s3.amazonaws.com/Chromium/deb/chromium-89.0.4389.82-0ubuntu0.16.04.1.tgzUbuntu 18.04
curl --output chromium.tgz https://synthetic-packages.s3.amazonaws.com/Chromium/deb/chromium-89.0.4389.82-0ubuntu0.18.04.1.tgzUbuntu 20.04
curl --output chromium.tgz https://synthetic-packages.s3.amazonaws.com/Chromium/snap/chromium-89.0.4389.90-1523.tgzUbuntu 20.04
curl --output chromium.tgz https://synthetic-packages.s3.amazonaws.com/Chromium/snap/chromium-88.0.4324.150-1479.tgzUbuntu 16.04
curl --output chromium.tgz https://s3.amazonaws.com/synthetic-packages/Chromium/deb/chromium-87.0.4280.66-0ubuntu0.16.04.1.tgzUbuntu 18.04
curl --output chromium.tgz https://s3.amazonaws.com/synthetic-packages/Chromium/deb/chromium-87.0.4280.66-0ubuntu0.18.04.1.tgzUbuntu 20.04
curl --output https://synthetic-packages.s3.amazonaws.com/Chromium/snap/chromium-87.0.4280.88-1424.tgzUbuntu 16.04
curl --output chromium.tgz https://s3.amazonaws.com/synthetic-packages/Chromium/deb/chromium-86.0.4240.198-0ubuntu0.16.04.1.tgzUbuntu 18.04
curl --output chromium.tgz https://s3.amazonaws.com/synthetic-packages/Chromium/deb/chromium-86.0.4240.198-0ubuntu0.18.04.1.tgzcurl --output chromium.tgz https://s3.amazonaws.com/synthetic-packages/Chromium/deb/chromium-84.0.4147.105-0ubuntu0.16.04.1.tgzYou can verify the authenticity of the packages using the signature files stored together with the package archives.
-
Extract the installation packages. Go to the directory where you saved the archive and run the following command:
mkdir /tmp/chromium ; tar xzf chromium.tgz -C /tmp/chromiumThis creates a
/tmp/chromiumdirectory and extracts the packages into it. -
Install the extracted packages.
This installs all the packages extracted to the
/tmp/chromium/directory. You can delete the/tmp/chromium/directory and the downloadedchromium.tgzarchive after successful Chromium installation.
-
-
Ubuntu 16.04 and 18.04 only Disable automatic update of Chromium packages.
Note that for Ubuntu 20.04, autoupdate is disabled as part of the installation command in Step 2 above.
echo "chromium-browser hold" | sudo dpkg --set-selectionsecho "chromium-codecs-ffmpeg-extra hold" | sudo dpkg --set-selections -
After you satisfy the dependencies, run the ActiveGate installer with root rights with the
--enable-syntheticparameter set tomanual. For example:/bin/sh ./Dynatrace-ActiveGate-Linux.sh --enable-synthetic=manual
Red Hat Enterprise Linux, CentOS, Oracle Linux, and Amazon Linux
-
Set up repositories.
-
Install Synthetic engine dependencies.
sudo yum install -y xorg-x11-server-Xvfb xorg-x11-xkb-utils xorg-x11-server-utils xorg-x11-fonts-100dpi xorg-x11-fonts-75dpi xorg-x11-fonts-Type1 libwayland-server mesa-libgbm curl nss-tools -
Download and install Chromium.
-
Download the rpm package archive. This is a safe and verified archive hosted by Dynatrace.
Red Hat Enterprise Linux/CentOS 7, Amazon Linux 2
curl --output chromium.tgz https://synthetic-packages.s3.amazonaws.com/Chromium/rpm/chromium-120.0.6099.224-1.el7.tgzRed Hat Enterprise Linux/Oracle Linux 8
curl --output chromium.tgz https://synthetic-packages.s3.amazonaws.com/Chromium/rpm/chromium-121.0.6167.139-2.el8.tgzRed Hat Enterprise Linux 9
curl --output chromium.tgz https://synthetic-packages.s3.amazonaws.com/Chromium/rpm/chromium-121.0.6167.139-1.el9.tgzRed Hat Enterprise Linux/CentOS 7, Amazon Linux 2
curl --output chromium.tgz https://synthetic-packages.s3.amazonaws.com/Chromium/rpm/chromium-120.0.6099.199-1.el7.tgzRed Hat Enterprise Linux/Oracle Linux 8
curl --output chromium.tgz https://synthetic-packages.s3.amazonaws.com/Chromium/rpm/chromium-120.0.6099.199-1.el8.tgzRed Hat Enterprise Linux 9
curl --output chromium.tgz https://synthetic-packages.s3.amazonaws.com/Chromium/rpm/chromium-120.0.6099.199-1.el9.tgzRed Hat Enterprise Linux/CentOS 7, Amazon Linux 2
curl --output chromium.tgz https://synthetic-packages.s3.amazonaws.com/Chromium/rpm/chromium-120.0.6099.129-1.el7.tgzRed Hat Enterprise Linux/Oracle Linux 8
curl --output chromium.tgz https://synthetic-packages.s3.amazonaws.com/Chromium/rpm/chromium-120.0.6099.129-1.el8.tgzRed Hat Enterprise Linux 9
curl --output chromium.tgz https://synthetic-packages.s3.amazonaws.com/Chromium/rpm/chromium-120.0.6099.129-1.el9.tgzRed Hat Enterprise Linux/CentOS 7, Amazon Linux 2
curl --output chromium.tgz https://synthetic-packages.s3.amazonaws.com/Chromium/rpm/chromium-119.0.6045.159-1.el7.tgzRed Hat Enterprise Linux/Oracle Linux 8
curl --output chromium.tgz https://synthetic-packages.s3.amazonaws.com/Chromium/rpm/chromium-119.0.6045.159-1.el8.tgzRed Hat Enterprise Linux 9
curl --output chromium.tgz https://synthetic-packages.s3.amazonaws.com/Chromium/rpm/chromium-119.0.6045.159-2.el9.tgzRed Hat Enterprise Linux/CentOS 7, Amazon Linux 2
curl --output chromium.tgz https://synthetic-packages.s3.amazonaws.com/Chromium/rpm/chromium-118.0.5993.70-1.el7.tgzRed Hat Enterprise Linux/Oracle Linux 8
curl --output chromium.tgz https://synthetic-packages.s3.amazonaws.com/Chromium/rpm/chromium-118.0.5993.70-1.el8.tgzRed Hat Enterprise Linux 9
curl --output chromium.tgz https://synthetic-packages.s3.amazonaws.com/Chromium/rpm/chromium-118.0.5993.70-1.el9.tgzRed Hat Enterprise Linux/CentOS 7, Amazon Linux 2
curl --output chromium.tgz https://synthetic-packages.s3.amazonaws.com/Chromium/rpm/chromium-117.0.5938.132-1.el7.tgzRed Hat Enterprise Linux/Oracle Linux 8
curl --output chromium.tgz https://synthetic-packages.s3.amazonaws.com/Chromium/rpm/chromium-117.0.5938.132-1.el8.tgzRed Hat Enterprise Linux 9
curl --output chromium.tgz https://synthetic-packages.s3.amazonaws.com/Chromium/rpm/chromium-117.0.5938.132-1.el9.tgzRed Hat Enterprise Linux/CentOS 7, Amazon Linux 2
curl --output chromium.tgz https://synthetic-packages.s3.amazonaws.com/Chromium/rpm/chromium-117.0.5938.132-1.el7.tgzRed Hat Enterprise Linux 8
curl --output chromium.tgz https://synthetic-packages.s3.amazonaws.com/Chromium/rpm/chromium-117.0.5938.132-1.el8.tgzRed Hat Enterprise Linux/CentOS 7, Amazon Linux 2
curl --output chromium.tgz https://synthetic-packages.s3.amazonaws.com/Chromium/rpm/chromium-113.0.5672.126-1.el7.tgzRed Hat Enterprise Linux 8
curl --output chromium.tgz https://synthetic-packages.s3.amazonaws.com/Chromium/rpm/chromium-113.0.5672.126-1.el8.tgzRed Hat Enterprise Linux/CentOS 7, Amazon Linux 2
curl --output chromium.tgz https://synthetic-packages.s3.amazonaws.com/Chromium/rpm/chromium-112.0.5615.165-1.el7.tgzRed Hat Enterprise Linux 8
curl --output chromium.tgz https://synthetic-packages.s3.amazonaws.com/Chromium/rpm/chromium-112.0.5615.165-1.el8.tgzRed Hat Enterprise Linux/CentOS 7, Amazon Linux 2
curl --output chromium.tgz https://synthetic-packages.s3.amazonaws.com/Chromium/rpm/chromium-111.0.5563.64-1.el7.tgzRed Hat Enterprise Linux 8
curl --output chromium.tgz https://synthetic-packages.s3.amazonaws.com/Chromium/rpm/chromium-110.0.5481.77-1.el8.tgzRed Hat Enterprise Linux/CentOS 7, Amazon Linux 2
curl --output chromium.tgz https://synthetic-packages.s3.amazonaws.com/Chromium/rpm/chromium-110.0.5481.77-1.el7.tgzRed Hat Enterprise Linux 8
curl --output chromium.tgz https://synthetic-packages.s3.amazonaws.com/Chromium/rpm/chromium-110.0.5481.77-1.el8.tgzRed Hat Enterprise Linux/CentOS 7, Amazon Linux 2
curl --output chromium.tgz https://synthetic-packages.s3.amazonaws.com/Chromium/rpm/chromium-109.0.5414.119-1.el7.tgzRed Hat Enterprise Linux 8
curl --output chromium.tgz https://synthetic-packages.s3.amazonaws.com/Chromium/rpm/chromium-109.0.5414.119-1.el8.tgzRed Hat Enterprise Linux/CentOS 7, Amazon Linux 2
curl --output chromium.tgz https://synthetic-packages.s3.amazonaws.com/Chromium/rpm/chromium-108.0.5359.124-3.el7.tgzRed Hat Enterprise Linux 8
curl --output chromium.tgz https://synthetic-packages.s3.amazonaws.com/Chromium/rpm/chromium-108.0.5359.124-3.el8.tgzRed Hat Enterprise Linux/CentOS 7, Amazon Linux 2
curl --output chromium.tgz https://synthetic-packages.s3.amazonaws.com/Chromium/rpm/chromium-103.0.5060.114-1.el7.tgzRed Hat Enterprise Linux 8
curl --output chromium.tgz https://synthetic-packages.s3.amazonaws.com/Chromium/rpm/chromium-105.0.5195.125-2.el8.tgzRed Hat Enterprise Linux/CentOS 7, Amazon Linux 2
curl --output chromium.tgz https://synthetic-packages.s3.amazonaws.com/Chromium/rpm/chromium-103.0.5060.114-1.el7.tgzRed Hat Enterprise Linux 8
curl --output chromium.tgz https://synthetic-packages.s3.amazonaws.com/Chromium/rpm/chromium-103.0.5060.114-1.el8.tgzRed Hat Enterprise Linux/CentOS 7, Amazon Linux 2
curl --output chromium.tgz https://synthetic-packages.s3.amazonaws.com/Chromium/rpm/chromium-103.0.5060.114-1.el7.tgzRed Hat Enterprise Linux 8
curl --output chromium.tgz https://synthetic-packages.s3.amazonaws.com/Chromium/rpm/chromium-102.0.5005.115-1.el8.tgzRed Hat Enterprise Linux/CentOS 7
curl --output chromium.tgz https://synthetic-packages.s3.amazonaws.com/Chromium/rpm/chromium-103.0.5060.114-1.el7.tgzRed Hat Enterprise Linux 8
curl --output chromium.tgz https://synthetic-packages.s3.amazonaws.com/Chromium/rpm/chromium-102.0.5005.115-1.el8.tgzRed Hat Enterprise Linux/CentOS 7
curl --output chromium.tgz https://synthetic-packages.s3.amazonaws.com/Chromium/rpm/chromium-99.0.4844.84-1.el7.tgzRed Hat Enterprise Linux 8
curl --output chromium.tgz https://synthetic-packages.s3.amazonaws.com/Chromium/rpm/chromium-99.0.4844.84-1.el8.tgzRed Hat Enterprise Linux/CentOS 7
curl --output chromium.tgz https://synthetic-packages.s3.amazonaws.com/Chromium/rpm/chromium-99.0.4844.84-1.el7.tgzRed Hat Enterprise Linux 8
curl --output chromium.tgz https://synthetic-packages.s3.amazonaws.com/Chromium/rpm/chromium-99.0.4844.84-1.el8.tgzRed Hat Enterprise Linux/CentOS 7
curl --output chromium.tgz https://synthetic-packages.s3.amazonaws.com/Chromium/rpm/chromium-99.0.4844.84-1.el7.tgzRed Hat Enterprise Linux 8
curl --output chromium.tgz https://synthetic-packages.s3.amazonaws.com/Chromium/rpm/chromium-99.0.4844.84-1.el8.tgzRed Hat Enterprise Linux/CentOS 7
curl --output chromium.tgz https://synthetic-packages.s3.amazonaws.com/Chromium/rpm/chromium-90.0.4430.93-1.el7.tgzRed Hat Enterprise Linux 8
curl --output chromium.tgz https://synthetic-packages.s3.amazonaws.com/Chromium/rpm/chromium-96.0.4664.110-2.el8.tgzRed Hat Enterprise Linux/CentOS 7
curl --output chromium.tgz https://synthetic-packages.s3.amazonaws.com/Chromium/rpm/chromium-90.0.4430.93-1.el7.tgzRed Hat Enterprise Linux 8
curl --output chromium.tgz https://synthetic-packages.s3.amazonaws.com/Chromium/rpm/chromium-94.0.4606.61-1.el8.tgzRed Hat Enterprise Linux/CentOS 7
curl --output chromium.tgz https://synthetic-packages.s3.amazonaws.com/Chromium/rpm/chromium-90.0.4430.93-1.el7.tgzRed Hat Enterprise Linux 8
curl --output chromium.tgz https://synthetic-packages.s3.amazonaws.com/Chromium/rpm/chromium-91.0.4472.164-1.el8.tgzRed Hat Enterprise Linux/CentOS 7
curl --output chromium.tgz https://synthetic-packages.s3.amazonaws.com/Chromium/rpm/chromium-90.0.4430.93-1.el7.tgzRed Hat Enterprise Linux 8
curl --output chromium.tgz https://synthetic-packages.s3.amazonaws.com/Chromium/rpm/chromium-90.0.4430.93-1.el8.tgzRed Hat Enterprise Linux/CentOS 7
curl --output chromium.tgz https://synthetic-packages.s3.amazonaws.com/Chromium/rpm/chromium-90.0.4430.93-1.el7.tgzRed Hat Enterprise Linux 8
curl --output chromium.tgz https://synthetic-packages.s3.amazonaws.com/Chromium/rpm/chromium-90.0.4430.93-1.el8.tgzRed Hat Enterprise Linux/CentOS 7
curl --output chromium.tgz https://synthetic-packages.s3.amazonaws.com/Chromium/rpm/chromium-89.0.4389.82-1.el7.tgzRed Hat Enterprise Linux 8
curl --output chromium.tgz https://synthetic-packages.s3.amazonaws.com/Chromium/rpm/chromium-89.0.4389.82-1.el8.tgzRed Hat Enterprise Linux/CentOS 7
curl --output chromium.tgz https://s3.amazonaws.com/synthetic-packages/Chromium/rpm/chromium-88.0.4324.150-1.el7.tgzRed Hat Enterprise Linux 8
curl --output chromium.tgz https://s3.amazonaws.com/synthetic-packages/Chromium/rpm/chromium-88.0.4324.150-1.el8.tgzRed Hat Enterprise Linux/CentOS 7
curl --output chromium.tgz https://synthetic-packages.s3.amazonaws.com/Chromium/rpm/chromium-87.0.4280.88-1.el7.tgzRed Hat Enterprise Linux 8
curl --output chromium.tgz https://synthetic-packages.s3.amazonaws.com/Chromium/rpm/chromium-87.0.4280.88-1.el8.tgzRed Hat Enterprise Linux/CentOS 7
curl --output chromium.tgz https://s3.amazonaws.com/synthetic-packages/Chromium/rpm/chromium-85.0.4183.121-1.el7.tgzRed Hat Enterprise Linux 8
curl --output chromium.tgz https://s3.amazonaws.com/synthetic-packages/Chromium/rpm/chromium-85.0.4183.83-1.el8.tgzcurl --output chromium.tgz https://s3.amazonaws.com/synthetic-packages/Chromium/rpm/chromium-84.0.4147.89-1.el7.tgzYou can verify the authenticity of the packages using the signature files stored together with the package archives.
-
Extract the installation packages. Go to the directory where you saved the archive and run the following command:
mkdir /tmp/chromium ; tar xzf chromium.tgz -C /tmp/chromiumThis creates a
/tmp/chromiumdirectory and extract the packages into it. -
Install extracted packages.
sudo yum install -y /tmp/chromium/*.rpmThis installs all the packages extracted to the
/tmp/chromium/directory. You can delete the/tmp/chromium/directory and the downloadedchromium.tgzarchive after successful Chromium installation.
-
-
Disable automatic update of Chromium packages:
sudo yum -y install yum-plugin-versionlocksudo yum versionlock chromiumsudo yum versionlock chromium-common -
optional Install non-Latin TrueType fonts:
sudo yum install dejavu-fonts-common.noarch dejavu-sans-fonts.noarch -
After you satisfy the dependencies, run the ActiveGate installer with root rights with the
--enable-syntheticparameter set tomanual. For example:/bin/sh ./Dynatrace-ActiveGate-Linux.sh --enable-synthetic=manual
Linux only Install Chromium from a custom repository
ActiveGate version 1.243+ In addition to web UI-guided ActiveGate installation and manual installation of Chromium and dependencies, you can also install ActiveGate by pointing to a custom, local repository for Chromium components. As this repository is an HTTP server that you set up within your network, the advantage of this method is that it can be used in environments with intranet-only or limited network access.
This method of installing Chromium broadly consists of:
Downloading the required Dynatrace-hosted deb, snap, or rpm package archives and their corresponding signature files.
Installing and running a locally hosted web server where the downloaded Chromium components reside.
Downloading and running the ActiveGate installer on the target host with an environment variable pointing to the location of the custom repository on the HTTP server.
A custom Chromium repository can be used only for Chromium components, not their dependencies. Installing Chromium from a custom repository will only work if all dependencies have been resolved before installation.
- Custom repositories can only be used for Chromium installation and autoupdate—see Chromium autoupdate from a custom repository in Manage private Synthetic locations for details.
-
Download the Chromium components—the package archive and signature file—from the safe and verified archive hosted by Dynatrace. See Requirements for private Synthetic locations for links to the latest supported and provided Chromium versions.
We recommend keeping your Linux-based Synthetic-enabled ActiveGates and Chromium versions up to date; choose the latest provided Chromium version for ActiveGate.
For example, for ActiveGate version 1.255 on Ubuntu 22. the required files are:
- Package archive—
https://synthetic-packages.s3.amazonaws.com/Chromium/snap/chromium-107.0.5304.87-2168.tgz - Signature file—
https://synthetic-packages.s3.amazonaws.com/Chromium/snap/chromium-107.0.5304.87-2168.tgz.sig
The corresponding download commands are:
curl -o chromium-107.0.5304.87-2168.tgz https://synthetic-packages.s3.amazonaws.com/Chromium/snap/chromium-107.0.5304.87-2168.tgzcurl -o chromium-107.0.5304.87-2168.tgz.sig https://synthetic-packages.s3.amazonaws.com/Chromium/snap/chromium-107.0.5304.87-2168.tgz.sig - Package archive—
-
Install a web server of your choice and create a directory, for example,
chromium-repo, to serve the Chromium components to the ActiveGate host. Copy the downloaded Chromium components to this directory. -
Download the ActiveGate installer from Dynatrace Hub.
-
Resolve all dependencies and enable repositories as required as shown in Install Chromium and dependencies manually from S3 above. The custom repository can be used only for Chromium packages, not their dependencies.
-
Install the ActiveGate with the Synthetic module enabled (
--enable-synthetic) and theDYNATRACE_SYNTHETIC_CUSTOM_CHROMIUM_REPOenvironment variable pointing to the location of the custom repository (https://172.18.0.100/chromium-repoin this example).sudo DYNATRACE_SYNTHETIC_CUSTOM_CHROMIUM_REPO=http://172.18.0.100:8000/chromium-repo /bin/bash Dynatrace-ActiveGate-Linux-x86-1.257.0.20221129-155835.sh --enable-syntheticYou can use the hostname of the HTTP server instead of the IP address so long as the ActiveGate host can resolve the hostname.
Once you've installed Chromium in this way from a custom repository, it can only be autoupdated. See Chromium autoupdate from a custom repository in Manage private Synthetic locations for details and update alternatives.
Custom Chromium version
You can install a custom Chromium version, that is, override the Chromium version that the ActiveGate installer looks for. This is applicable for manual ActiveGate installation, as described in Chromium installation via S3 or via a custom repository.
In this command for manual ActiveGate installation via S3, an environment variable points to an explicit Chromium version number 107.0.5304.87-2168, which is part of the package archive for Ubuntu 20 or 22.
sudo /bin/sh -c "export DYNATRACE_SYNTHETIC_EXPLICIT_CHROMIUM_VERSION=107.0.5304.87-2168; /bin/bash Dynatrace-ActiveGate-Linux-x86-1.257.0.20221129-155835.sh --enable-synthetic"
This command searches for the Chromium version 107.0.5304.87-2168 in the custom repository https://172.18.0.100/chromium-repo.
sudo DYNATRACE_SYNTHETIC_EXPLICIT_CHROMIUM_VERSION=107.0.5304.87-2168 DYNATRACE_SYNTHETIC_CUSTOM_CHROMIUM_REPO=http://172.18.0.100:8000/chromium-repo /bin/bash Dynatrace-ActiveGate-Linux-x86-1.257.0.20221129-155835.sh --enable-synthetic
Frequently asked questions
Each tgz package archive is stored in the S3 bucket together with the *.tgz.sig signature file. To verify if the packages on your drive are authentic Dynatrace-provided archives:
-
Download the signature file. The filename is identical to the package archive but has the
sigfilename extension. For example, for Chromium 78, the command is:curl --output chromium.tgz.sig https://synthetic-packages.s3.amazonaws.com/Chromium/rpm/chromium-78.0.3904.97-1.el7.tgz.sig -
Verify the package:
wget https://ca.dynatrace.com/dt-root.cert.pem ; openssl cms-verify-in chromium.tgz.sig-inform PEM-content chromium.tgz-binary-CAfile dt-root.cert.pem > /dev/null -
Verify the signature timestamp.
You can also get the exact timestamp of a signature. Download the
*.tgz.sig.tsrfile from the same location as installation packages and signature and run the following command:openssl ts -reply -in chromium.tgz.sig.tsr -text
With ActiveGate version 1.175+, an ActiveGate executing synthetic monitors can connect through the proxy to both the Dynatrace Cluster and the tested resource. For more information, see Setting up proxy for private synthetic monitoring.
No, you need to run a clean installation specifically for the purpose of synthetic monitoring to enable your ActiveGate to execute monitors from private locations.
Private Synthetic locations require a clean installation of ActiveGate specifically for the purpose of synthetic monitoring.
Manually editing the custom.properties file is not enough to enable the ActiveGate to execute synthetic monitors.
Troubleshoot
Visit the Troubleshooting forum in the Dynatrace Community for more troubleshooting information.